POS Balances
The POS Balances setting is the mechanism that causes the takings and Cash Events recorded for a Till Drawer to be posted to the Nominal Ledger.
A POS Balance record states and sets in stone the balance in a Till Drawer at a particular time (i.e. at the end of a work session). You cannot use a POS Balance record to change or otherwise control the balance of a Till Drawer. If you need to change the balance, use a Cash Event.
When you create a POS Balance record for a particular Till Drawer using any of the four methods described below, the balance for that Drawer (i.e. the value of the cash, cheques, credit card payments etc that it contains) will be calculated, based on the Drawer's previous balance and on all Sales Ledger and POS Invoices, Receipts and Cash Events recorded since then. When you mark that POS Balance record as OK and save, a Nominal Ledger Transaction will be created, recording those sales and cash movements in the Nominal Ledger (unless you have prevented the creation of Nominal Ledger Transactions in the Number Series - POS Balances setting).
When entering a POS Balance record, you can choose 'Cash Up Report' from the Operations menu if you need to see the sales transactions and Cash Events that contribute to the Drawer's Balance. Selecting this function will cause a Cash Up report containing this information to be printed to screen. The period of the report will run from the previous POS Balance record for the Drawer to the time of the one you are entering. If you adjust the balance by entering new Cash Events, remember to update the time of the POS Balance record you are entering, so that it will take the new Cash Events into account.
After you mark a POS Balance record as OK and save, you can still use the 'Cash Up Report' Operations menu function. As it will use the same report period as just mentioned, the report will now act as a permanent record of the sales transactions and Cash Events entered since the previous POS Balance record.
As already mentioned, the balance in a POS Balance record is calculated automatically from the Drawer's previous balance and all Sales Ledger and POS Invoices, Receipts and Cash Events recorded since then. This means that before you start using a Till Drawer, you must "prime" it by entering a POS Balance record for it, dated the day before you first use it and with a zero balance (the balance will be calculated to be zero automatically). If you do not "prime" a Till Drawer in this way, the balances shown in the Cash Up report for that Drawer may not be correct. Use methods (1) or (2) below to create these initial POS Balance records.
You can enter a POS Balance for a particular Till Drawer using the following methods:
- On a till that uses a live connection with the server, you can enter a POS Balance on the till itself, working directly in the POS Balances setting. You cannot enter POS Balances on tills with live-sync connections to the server.
- For all tills, you can record POS Balances separately for each Till Drawer remotely from a desktop client, again working directly in the POS Balances setting.
- You can create a POS Balance record from the Cash Up report. When you produce the report for a particular Till/Drawer combination, it will contain a closing balance figure for the Till Drawer. Click (Windows/Mac OS X) or tap (iOS/Android) this figure to create a POS Balance record, containing the same closing balance figure.
- The final method that you can use to create POS Balances is to run the 'Cash Up' Maintenance function for a particular Till/Drawer combination. This function will first create a Cash Event that will move the full balance (including all Payment Modes i.e. payment methods) in the specified Drawer to the back office or bank (assuming you have not already created this Cash Event yourself). If you created a Cashier Count record prior to running the 'Cash Up' function and the value of that Cashier Count is different to the value that should be in the Drawer, the function will create a second Cash Event that writes off the difference (again, providing you have not already created this Cash Event yourself). The function will then close the work session and finally it will create a POS Balance record that will be marked as OK automatically. The Cash Events will mean that this POS Balance will record a zero balance in the Till Drawer.
In the first three cases, you can use the POS Balances setting in the Point of Sales module or the POS Balance register in the Restaurant module to enter a new POS Balance record. If you are using
work sessions, you must close the current work session for the Till Drawer before you can create a POS Balance record using these methods. The 'POS Balance: New' window will open:
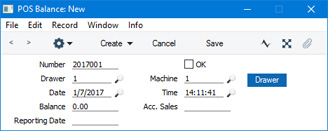
- Number
An identifying code for each POS Balance record will be generated automatically, and in most cases there will be no need to change it. The default will be chosen as follows:- It will be taken from the first valid row in the Number Series - POS Balances setting.
- It will be the next number following on from the last POS Balance entered.
- Drawer
- Paste Special
Drawers setting, Point of Sales/Restaurant module
- Enter here the Drawer for which you are entering a POS Balance. You must specify a Drawer before you can save the POS Balance record. The Drawer that was used together with the Local Machine Code of the till you are working on in the most recent POS Session appears here as a default.
You can choose a Drawer using 'Paste Special' or by clicking or touching the [Drawer] button on the right.
- Machine
- Paste Special
Local Machines setting, Point of Sales/Restaurant/Technics module
Enter here the Local Machine Code of the till for which you are entering a POS Balance.
- The Local Machine Code of the till you are working on will appear here as a default.
- If you are recording POS Balances separately for each live till remotely on a desktop client, be sure to enter the correct Local Machine Code for the till in question before saving.
- Date
- Paste Special
Choose date
- The Date when the POS Balance was created: this will not be updated when you save the record. However, you can update it yourself, in which case the Balance (below) will be updated automatically.
- If you are entering POS Balances yourself (i.e. you are not using the 'Cash Up' Maintenance function), you can only enter one POS Balance for each Local Machine/Drawer combination per day.
- Time
- Paste Special
Current time
- The Time when the POS Balance was created: this will not be updated when you save the record. However, you can update it yourself, in which case the Balance (below) will be updated automatically.
- If you are using work sessions and you are creating a POS Balance record yourself (i.e. you are not using the 'Cash Up' Maintenance function), you can only do so after closing a work session. So, the Time in the field must be later than the time when you closed the session for the Till/Drawer combination. The 'Cash Up' function will close the session automatically before creating a POS Balance record.
- Balance
- When you specify a Machine and Drawer in the fields above, the balance for that Till/Drawer combination (i.e. the value of cash, cheques, credit card payments etc that it contains) will be calculated, based on the previous balance and all Sales Ledger and POS Invoices, Receipts and Cash Events recorded from then until the specified time. You cannot change this figure directly, but it will be updated if you change the Machine, Drawer or Time.
- If you are not using work sessions, you may find you can speed up the calculation of this figure by selecting the Start from Previous POS Balance option in the POS Settings setting.
- OK
- To approve a POS Balance record, tick the OK box and save. Having done so, you will no longer be able to change the record.
- When you approve a POS Balance record, a Nominal Ledger Transaction will be created, providing you haven't prevented the creation of Nominal Ledger Transactions in the Number Series - POS Balances setting. This Transaction will record in the Nominal Ledger the sales transactions and Cash Events that contribute to the Balance. Please refer to the 'Nominal Ledger Transactions from POS Balances' section immediately below for details about the Transaction.
- POS Balances created by the 'Cash Up' Maintenance function will be marked as OK automatically. Therefore all such POS Balances will have connected Nominal Ledger Transactions.
- If you need to open the Nominal Ledger Transaction that was created from a POS Balance record, choose 'Open NL Transaction' from the Operations menu.
- Reporting Date
- In a POS Balance record created by the 'Cash Up' Maintenance function, this field will contain the date when the work session was opened. In a POS Balance record that you create yourself, this field will remain empty.
- If you are using the Use Reporting Date for NL and Reports option in the Restaurant Settings setting in the Restaurant module, this date will be used as the Transaction Date of the Nominal Ledger Transaction created from the POS Balance record. Otherwise (i.e. if you are not using this option or this field is empty), the Date (above) will be used as the Transaction Date of the Nominal Ledger Transaction. If a work session lasts more than one day, this option therefore controls whether the date of the Nominal Ledger Transaction will be determined by the beginning or the end of the work session.
Nominal Ledger Transactions from POS Balances
When you mark a POS Balance record as OK and save, a Nominal Ledger Transaction will be created. This Transaction will record in the Nominal Ledger all the sales transactions and Cash Events that contribute to the Balance (i.e. all the sales transactions and Cash Events for a particular Till Drawer for a particular day or
work session).
Depending on the events being recorded, the Transaction may include some or all of the elements listed below. The Accounts will be chosen as follows:
- Debit
- Account(s) from flip A of the Payment Mode(s) specified in the Cash Event.
- Credit
- Credit Account from the Cash Event. If you did not specify one yourself, this will be the Back Office A/C from the POS Settings setting if there is one.
- Back Office Account(s) from flip E of the Payment Mode(s) specified in the Cash Event.
- Debit
- Credit Account from the Cash Event. If you did not specify one yourself, this will be the Back Office A/C from the POS Settings setting if there is one.
- Back Office Account(s) from flip E of the Payment Mode(s) specified in the Cash Event.
- Credit
- Account(s) from flip A of the Payment Mode(s) specified in the Cash Event.
- Debit
- Credit Account from the Cash Event. If you did not specify one yourself, this will be the Writeoff A/C from the POS Settings setting.
- Account(s) from flip A of the Payment Mode(s) specified in the Cash Event.
- Credit
- Account(s) from flip A of the Payment Mode(s) specified in the Cash Event.
POS Invoice and Bar Tab
- Debit
- Account(s) from flip A of the Payment Mode(s) connected in the POS Buttons setting to the button used by the cashier to register the payment.
- Tags/Objects will be taken from the Person record for the Salesman/cashier, from the Contact record for the Branch, from the Contact record for the Customer and from the Tab Item Group record for the till (Local Machine).
- Credit (Sales)
- If the POS Invoice has a Price List and there is a record in the Price register for the Item/Price List/Customer combination or in the Quantity Dependent Prices setting for the Item/Price List combination (depending on the Type of the Price List), the Sales Account will be taken from that Price or Quantity Dependent Price record.
- It will be taken from the Item record.
- It will be taken from the Item Group to which the Item belongs.
- The Sales Account in the Account Usage S/L setting will be used.
Tags/Objects will be taken from the Item or Item Group. In addition, the Tags/Objects assigned to the debit posting will also be assigned to this posting.
- Credit (VAT)
- The Output VAT Account will be taken from a VAT Code chosen as follows:
- The Sales VAT Code for the Customer will be used.
- It will be taken from the appropriate row for the Item or Item Group in the Price List used in the POS Invoice.
- It will be taken from the Item record.
- It will be taken from the Item Group to which the Item belongs.
- The VAT Code on the 'Sales' card of the Account Usage S/L setting will be used.
If you are using Tax Templates, the Tax Template in each POS Invoice and Bar Tab row will be chosen as described here.
- Tags/Objects will be chosen in the same way as those assigned to the posting to the Sales Account.
If change was given to a Customer, the full amount paid by the Customer will be debited to the Account from flip A of the Payment Mode and the change will be credited to the POS Change Account specified in the Account Usage S/L setting. If you have not specified a POS Change Account, then the sale value will be debited to the Account from the Payment Mode, so the change will not be recorded in the Nominal Ledger. Change is never posted from Bar Tabs.
---
Settings related to Point of Sales:
Go back to: