Opening Balances in the Sales Ledger - Entering Receipts
As with entering Invoices, you can get a lot of help with entering your
Receipts using the shortcuts built in to HansaWorld Enterprise. Perhaps the most useful tool is the
'Paste Special' command. You can use 'Paste Special' whenever you enter data in a field that refers to another register or setting.
There is no need to enter any Receipts from the previous fiscal year, because you should only have entered outstanding Invoices from that year. You should only follow the steps described below for Receipts from the current year to date (i.e. only if you are starting to use HansaWorld Enterprise in the middle of a fiscal year).
- Open the 'Receipts: Browse' window by clicking the [Receipts] button in the Sales Ledger.
- When the 'Receipts: Browse' window opens, click [New] or use the Ctrl-N (Windows and Linux) or ⌘-N (Mac OS X) keyboard shortcut to open a new record.
- The 'Receipt: New' window is shown. You can use a single window to enter all your Receipts from the earlier part of the year, even if they are in different Currencies and Payment Modes.
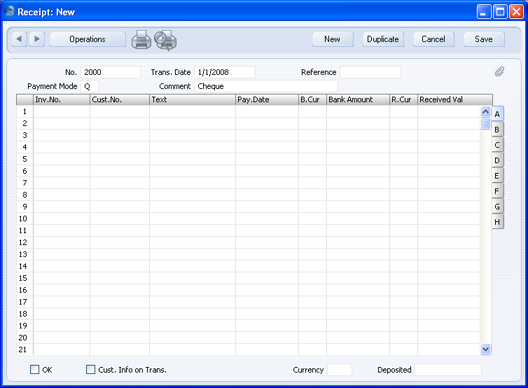
- Enter the data in the top of the window. Select a Payment Mode using 'Paste Special' to open a list of the Payment Modes you created earlier. Make sure the Transaction Date is correct.
- For each Receipt, enter the Invoice Number in the first column (or use 'Paste Special' to choose from the unpaid Invoices) and press the Return key.
- If you have an Invoice that is part-paid, alter the Received Value field to show the amount paid.
- If any receipt uses a different Payment Mode to that specified in the top of the window, move to flip C to enter a Payment Mode to be used for that row only. Again, use 'Paste Special' to ensure the correct one is selected.
- When you have entered every Receipt, you should check what you have entered. If you find any errors you can change them as needed. When you are satisfied, click the OK check box in the lower left-hand corner.
- When you click [New] or [Save], the Receipt is approved and after this may not deleted or changed.
---
In this chapter: