Webshop - Listing and Displaying Products
This page describes selecting the products that will be included in the webshop and displaying those products online. All the settings and registers mentioned on this page are located in the Webshop and CMS module unless otherwise specified.
---
Having added a webshop node to your website as described here, the next step is to select the products that will be sold in the webshop.
To do this, you need to divide the products into categories. When a browser user visits your webshop, they will first be shown a list of product categories. Depending on how you have configured your categories, clicking or tapping on a category will either display a list of products belonging to the category or a list of sub-categories. A product must belong to at least one category if it is to be available in your webshop.
Follow these steps:
- Enter the Product Categories in the Product Categories setting:
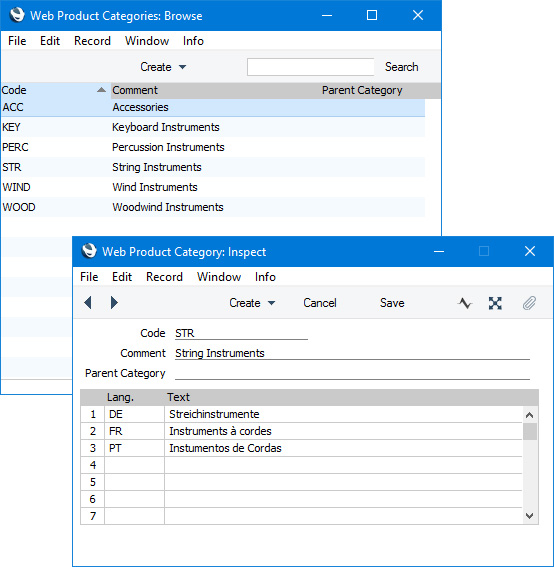
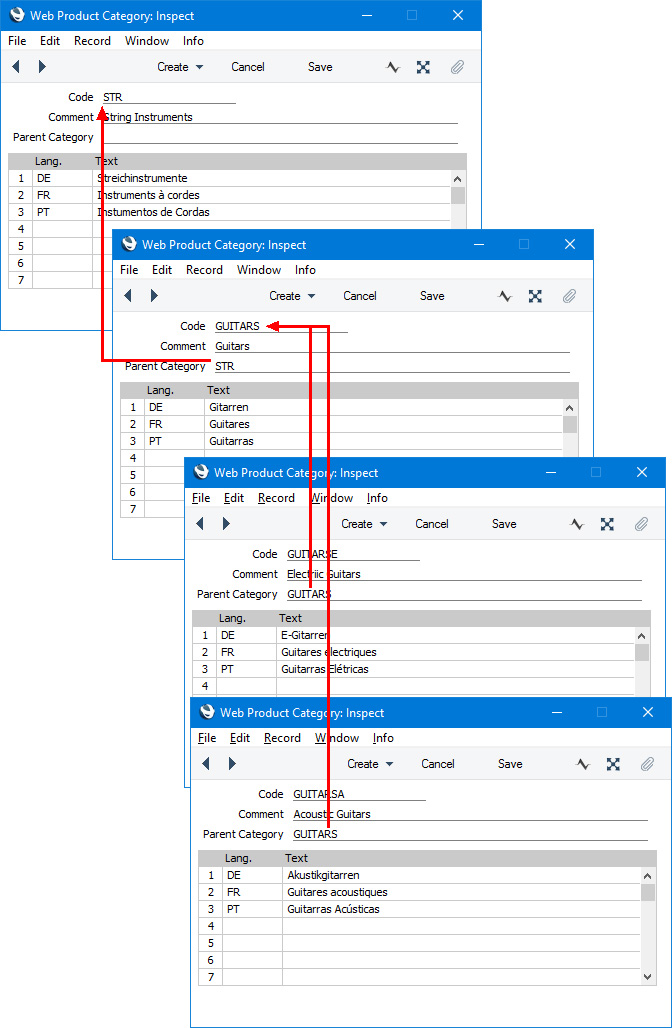
Use the Parent Category field if you need a hierarchical structure. In each record on a lower level, this field should contain the Product Category on the level immediately above:
- When a browser user visits the "catalog" sub-node of your webshop,, the Webshop Area (i.e. the <div id="webapp">) will list the top-level Product Categories in alphabetical order by Code:
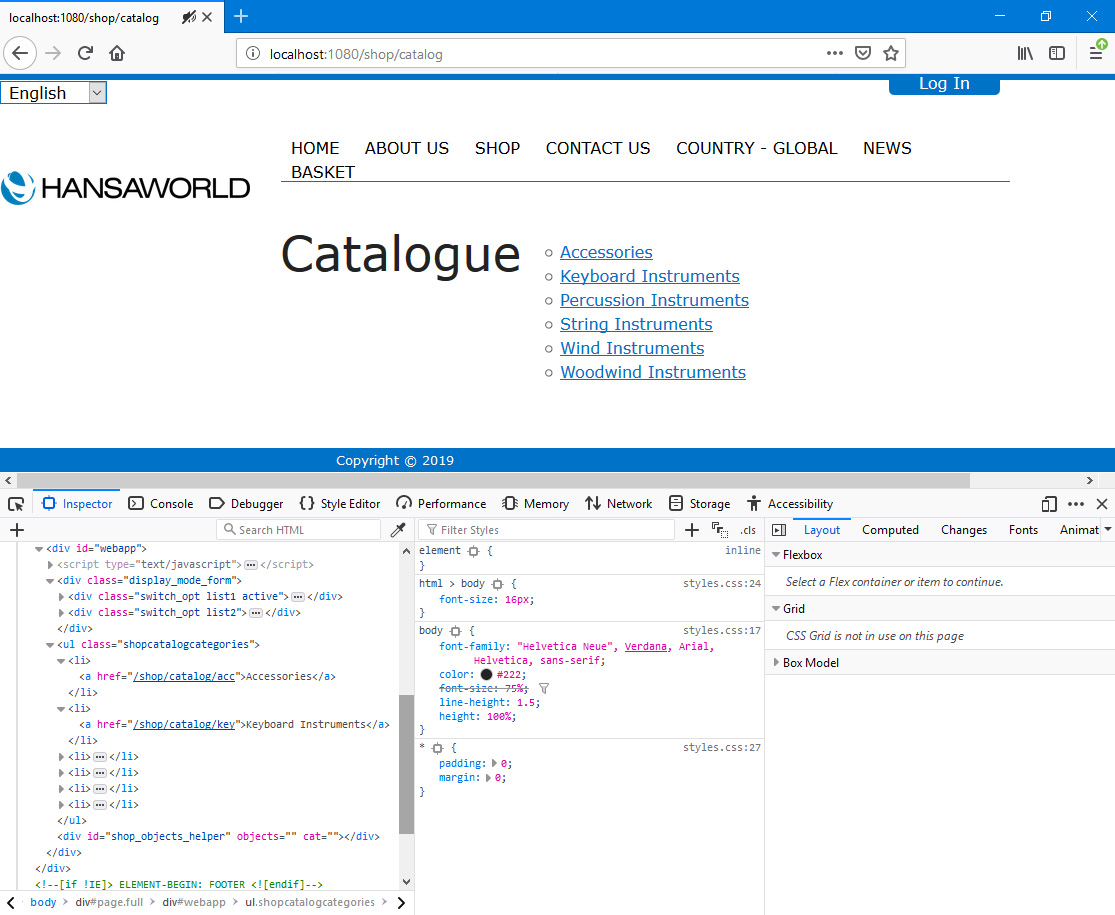
The Categories will be listed as an Unordered List with Class "shopcatalogcategories".
The links to each Category are constructed as follows:
- /Webshop_App_Web_structure_name/catalog/Category_Code
For example:
- http://domainname/shop/catalog/key
If the user clicks or taps on a Category that has Sub-Categories, the Sub-Categories will be listed:
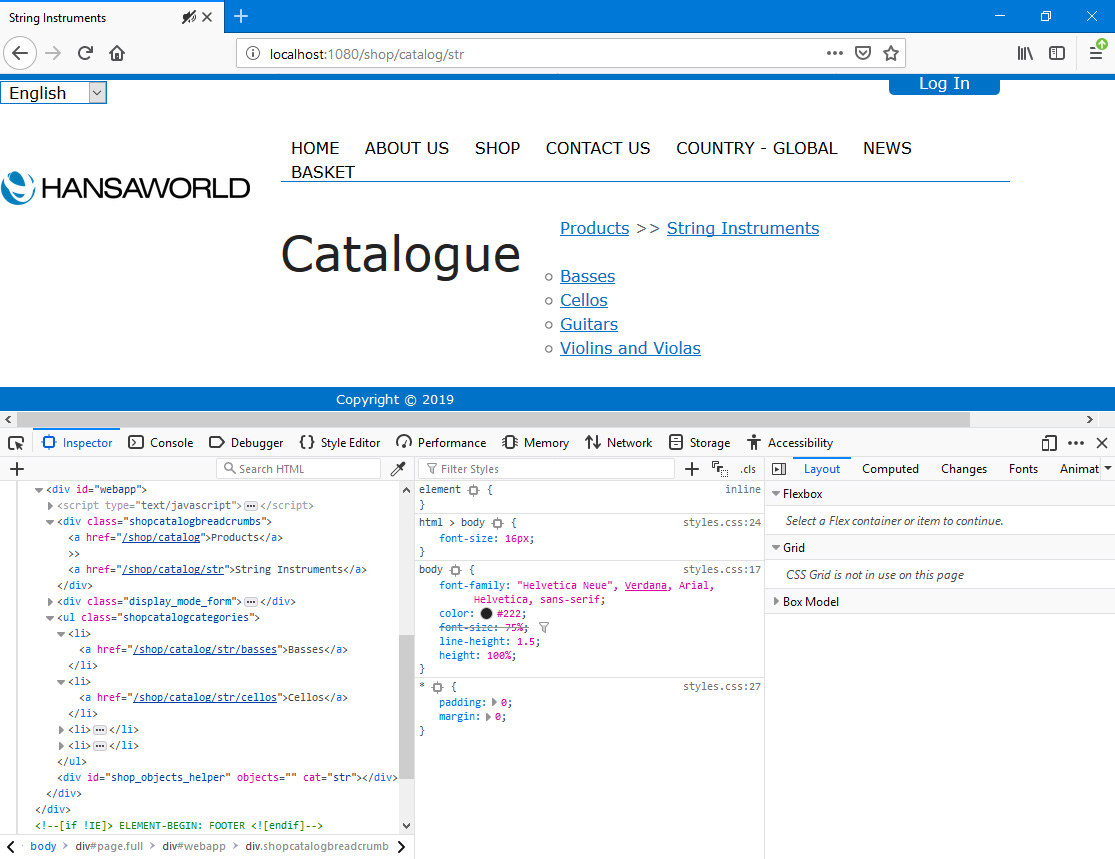
As before, the Sub-Categories will be listed as an Unordered List with Class "shopcatalogcategories".
Breadcrumbs will be added above the Categories, in a <div> with class "shopcatalogbreadcrumbs".
- The next step is to add products to the webshop. For an Item to be made available to the webshop you need to create a related record in the Product register in the Webshop and CMS module. Each Item can have a single connected Product:
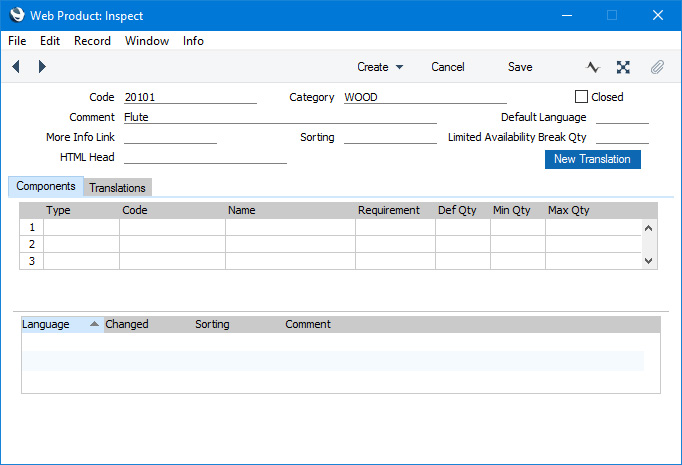
The basic fields in the Product record are:
- Code
- Paste Special
Item register
- Each record in the Product register (i.e. each Product that you will sell online) must be connected to a record in the Item register. To establish this connection, enter an existing Item Number in this field.
- Category
- Paste Special
Product Categories setting, Webshop and CMS module
- Use this field to assign each Product to a Product Category. You can enter more than one Category, separated with commas.
- You must assign a Product to at least one Category for it to be available in your webshop.
- Closed
- Tick this box when you need to withdraw a Product from sale.
- Comment
- The Description from the Item record will be copied here when you enter its Item Number in the Code field above.
- If a Product does not have any connected Translations, this Comment will be used as the name of the Product in browsers.
You can add records to the Product register individually, or you can create them from Items in batches using the 'Create Products from Items' Maintenance function. Using this function, the Code and Comment in each new Product will be copied from the originating Item, and the Category will be taken from the specification window. If there is an image (.jpg file) attached to the originating Item, it will be copied to the Product as well (only the first .jpg file will be copied if there is more than one). Please refer here for details about this function.
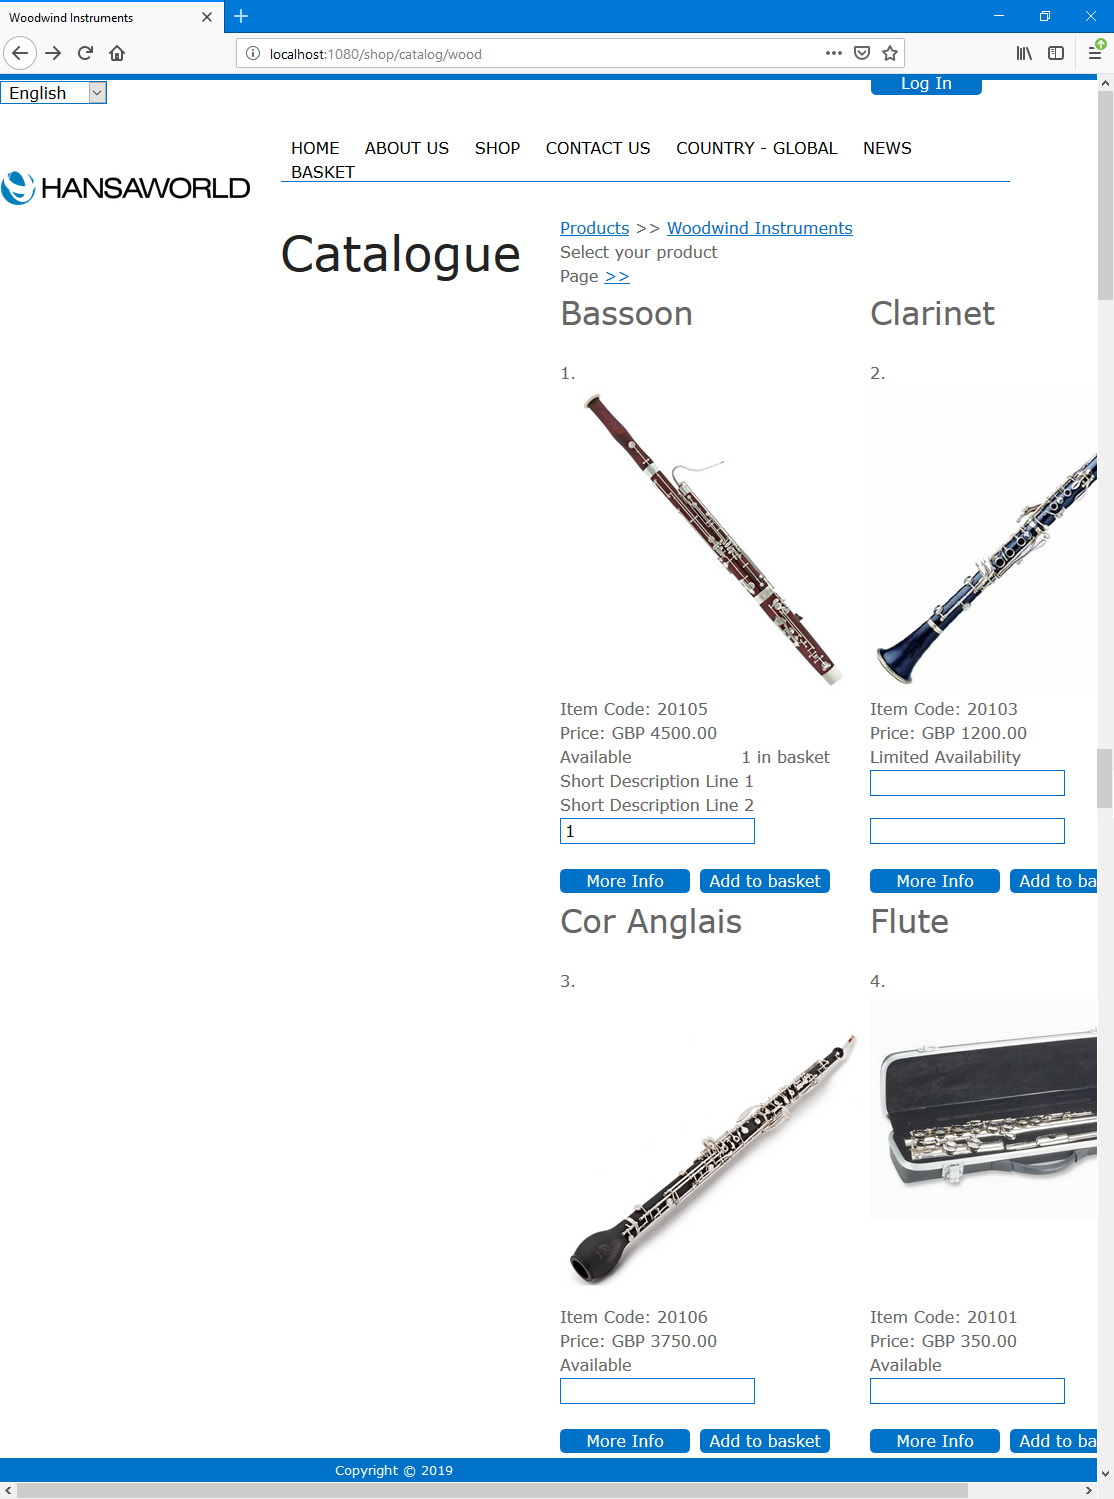
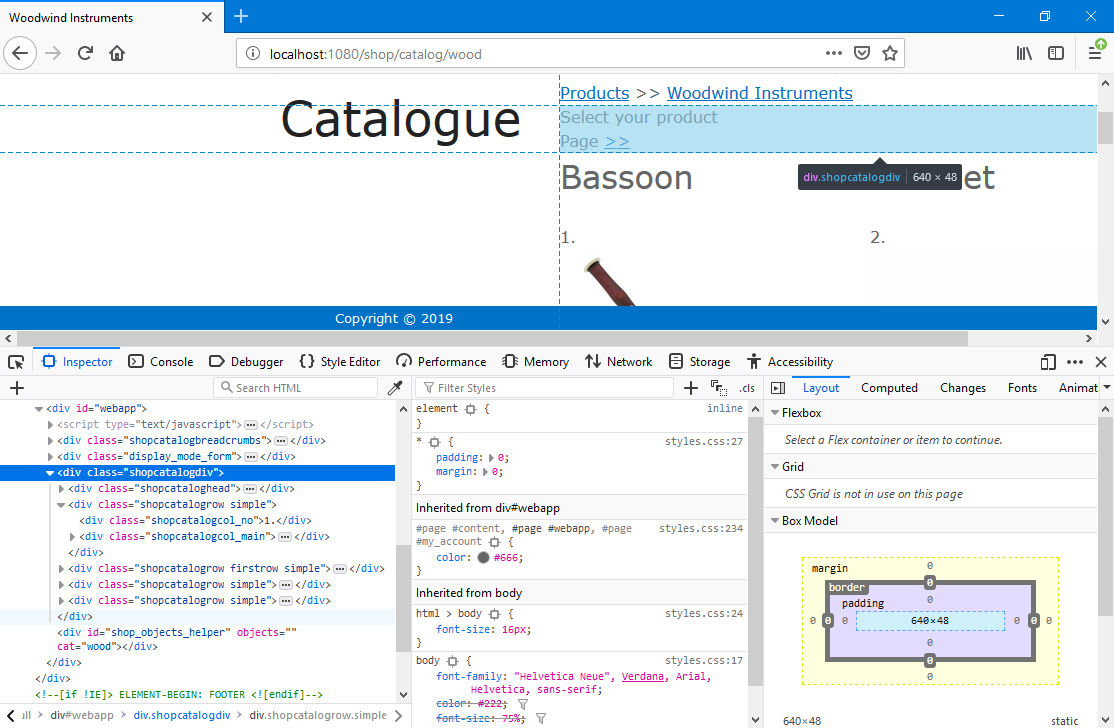
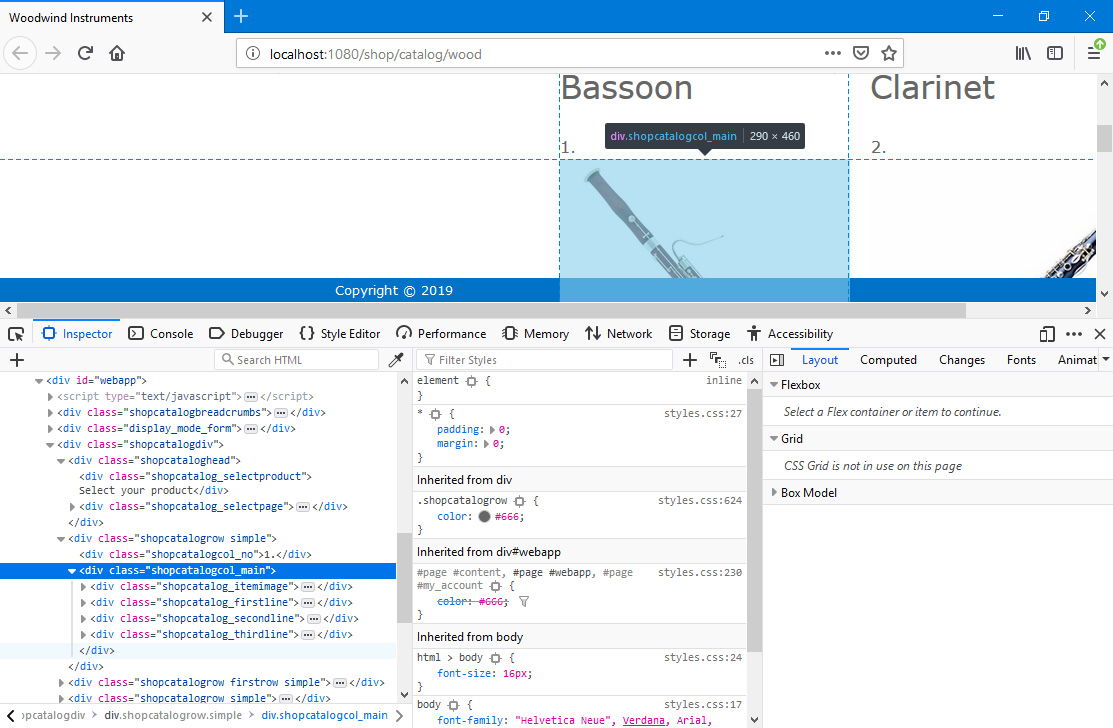
- When a browser user opens a Category containing Products, the Webshop Area (i.e. the <div id="webapp">) will list those Products:
When the Webshop Area contains a Product listing (i.e. when the /catalog sub-node of the "Webshop App" Node is being displayed), the page will be based on the Catalogue Page specified in the Webshop Settings setting or, if you have not specified a Catalogue Page, on the Page specified in the Structure record for the "Webshop App" Node (steps 4 and 1 respectively on the Webshop page). The Product listing will be divided into various sections that are described below. If you don't need an individual section to be displayed, you may be able to hide them using an option in Standard ERP, or you can apply a display: none attribute to the relevant <div> id or class in your .css file.
- Breadcrumbs
- <div class="shopcatalogbreadcrumbs"> (as in the listing of Product Categories).
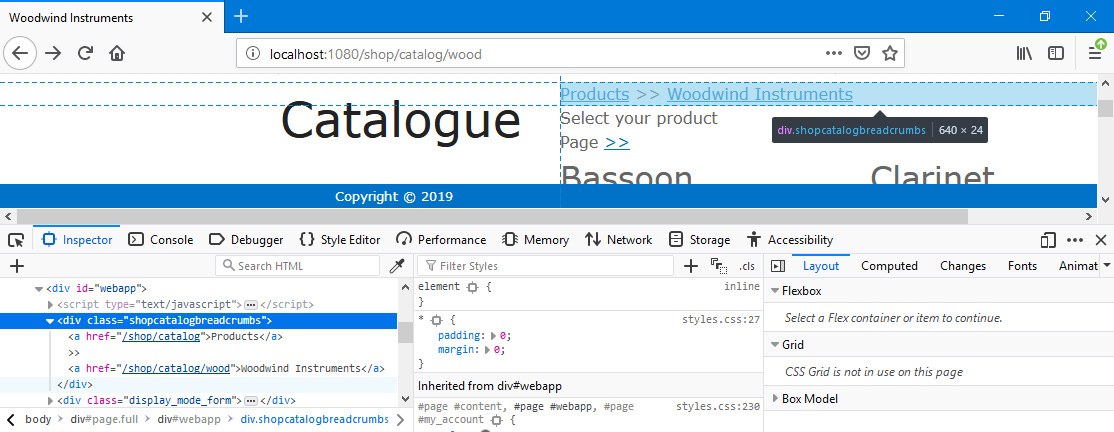
- The breadcrumbs are constructed using Web Text 25312 ("Products" by default) and the Product Category Comments or appropriate translations.
- All or Favourite Items selection
- <form class="fav_item_form">
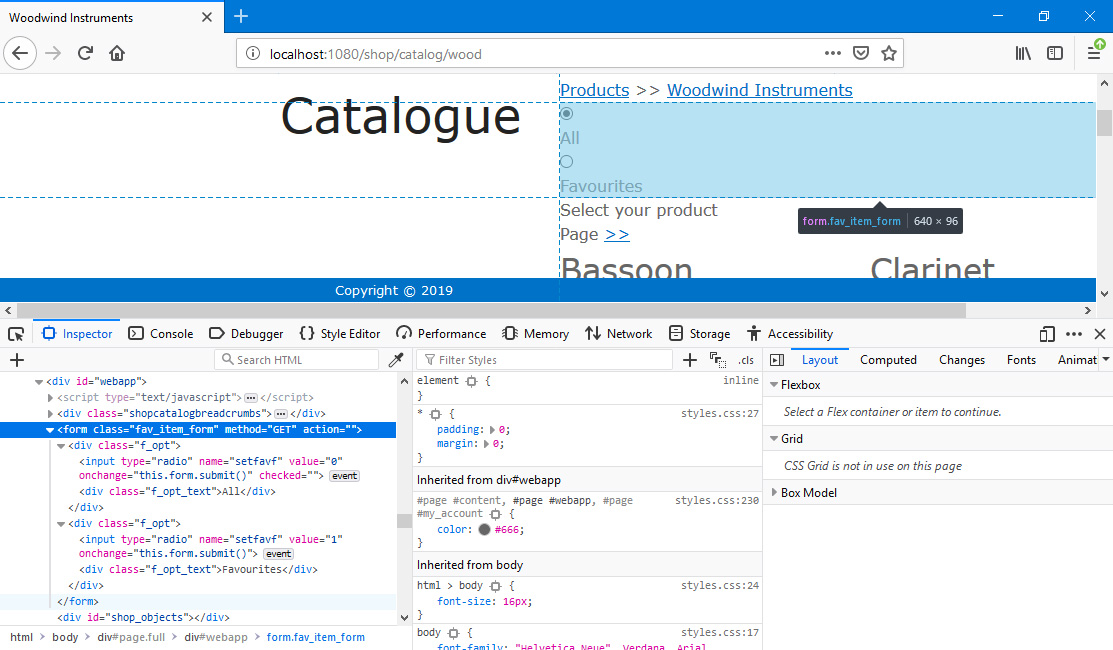
- This <form> will only be used when the browser user has logged in.
- Each option will be wrapped in its own <div class=f_opt>. Inside this <div>, the option names will be wrapped in <div f_opt_text>.
- The option names are Web Texts 25534 ("All" by default) and 25535 ("Favourites").
- Product Listing including Header
- The two lines above the Product listing and the Product listing itself are wrapped in a <div class="shopcatalogdiv">.
- Header
- Inside the <div class="shopcatalogdiv">, the two lines above the Product listing are wrapped in a <div class="shopcataloghead">.
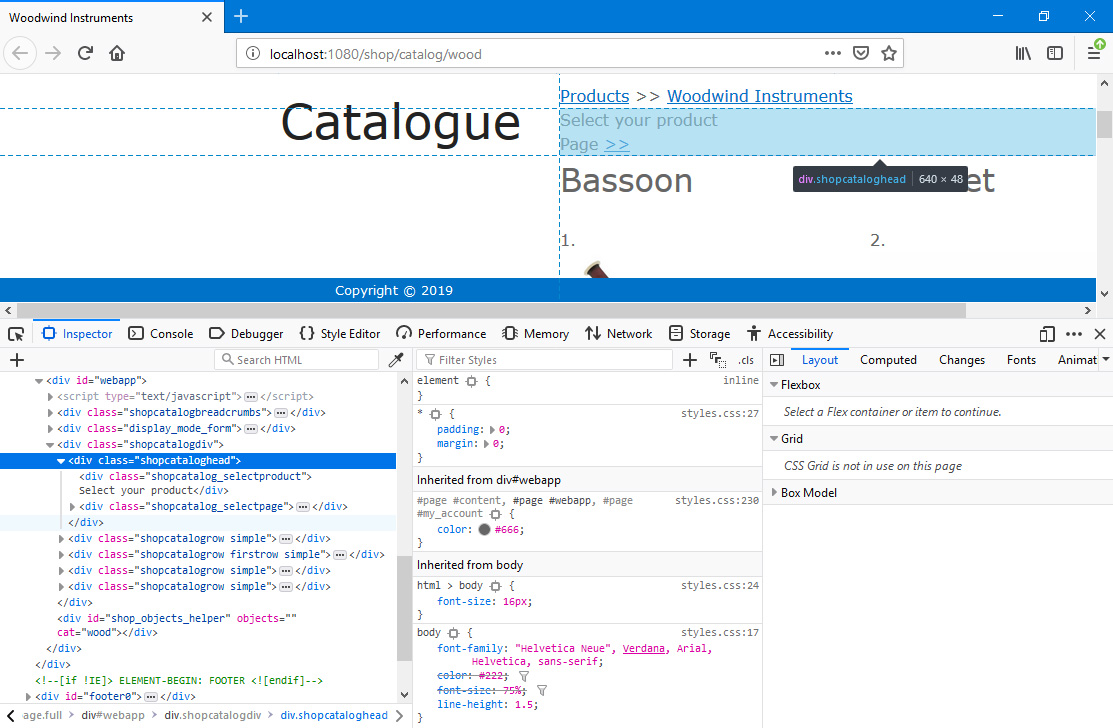
- "Select your product" text
- Inside the <div class="shopcataloghead">, the first line is wrapped in a <div class="shopcatalog_selectproduct">.
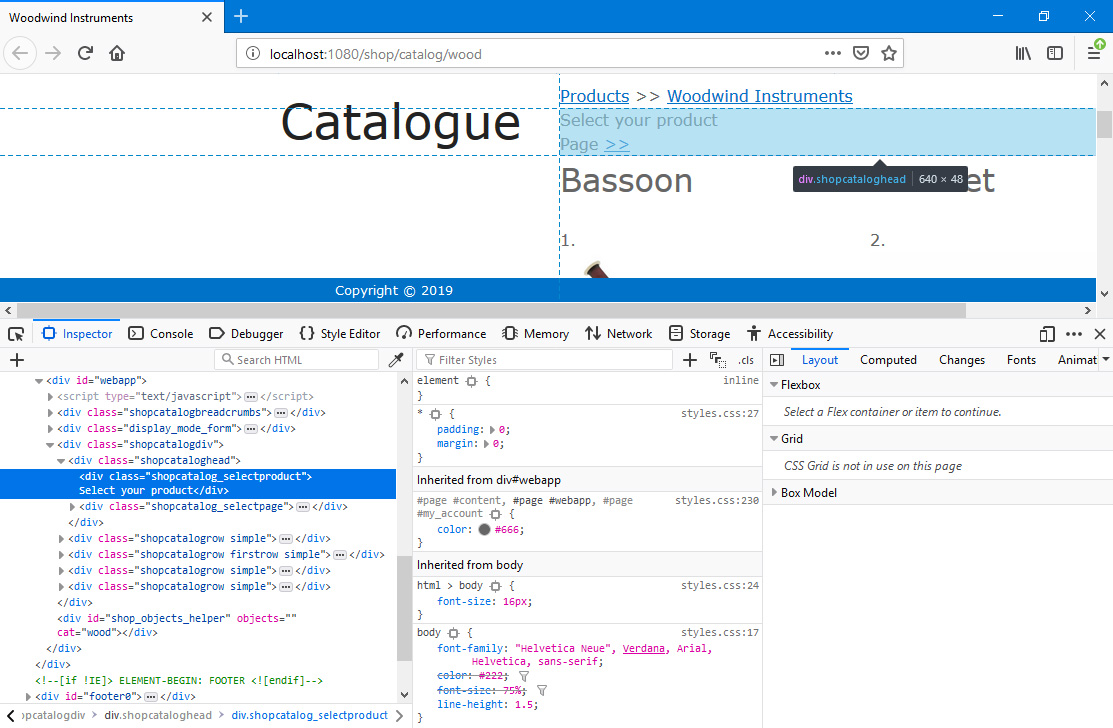
- The "Select your product" text is Web Text 25311.
- Page Selection
- Inside the <div class="shopcataloghead">, the second line (the page selector) is wrapped in a <div class="shopcatalog_selectpage">.
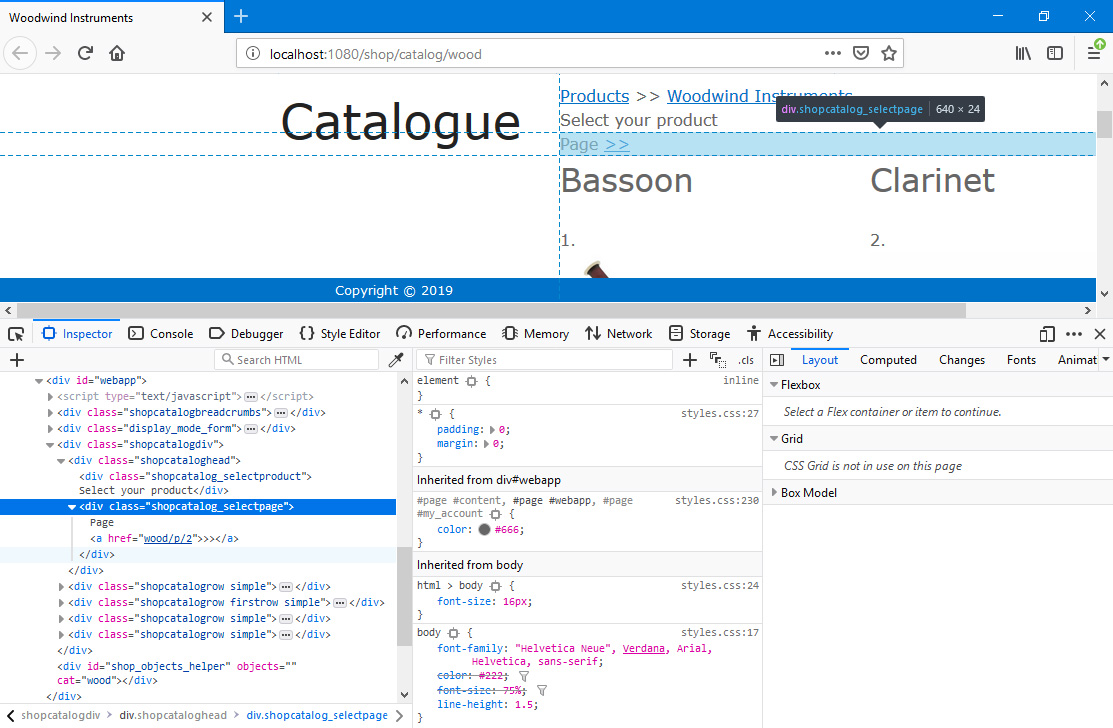
- The "Page" text is Web Text 25310.
- Pagination is controlled using the Catalogue pages options in the Webshop Company Settings setting:
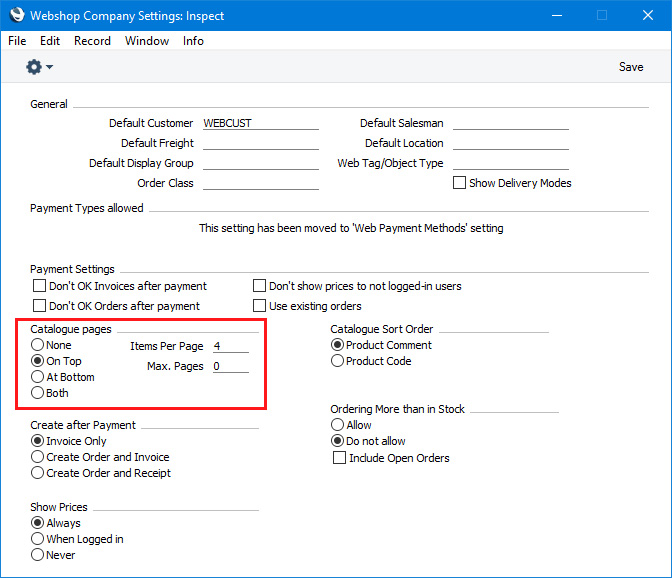
- None
- The page selector (i.e. the <div class="shopcatalog_selectpage">) will not be included in the Product listing, and all Products will be listed on the same page (i.e. the Items per Page field to the right will not be used).
- On Top
- The page selector will be placed above the Product listing (as illustrated above), and the number of Products displayed on a page will depend on the Items per Page field.
- At Bottom
- The page selector will be placed below the Product listing.
- Both
- Page selectors will be placed both above and below the Product listing.
- Items Per Page
- If you have selected the On Top, At Bottom or Both options above, specify here how many Products should be displayed on each page. Do not leave this field empty if you have selected one of options mentioned as this will be interpreted as zero Products per page.
- Max. Pages
- If you have selected the On Top, At Bottom or Both options above, you can use this field to specify a maximum number of pages. Leave this field empty if you would like all Products to be listed irrespective of the number of pages required.
- Product Listing
- Inside the <div class="shopcatalogdiv">, each Product is wrapped in a <div class="shopcatalogrow">.
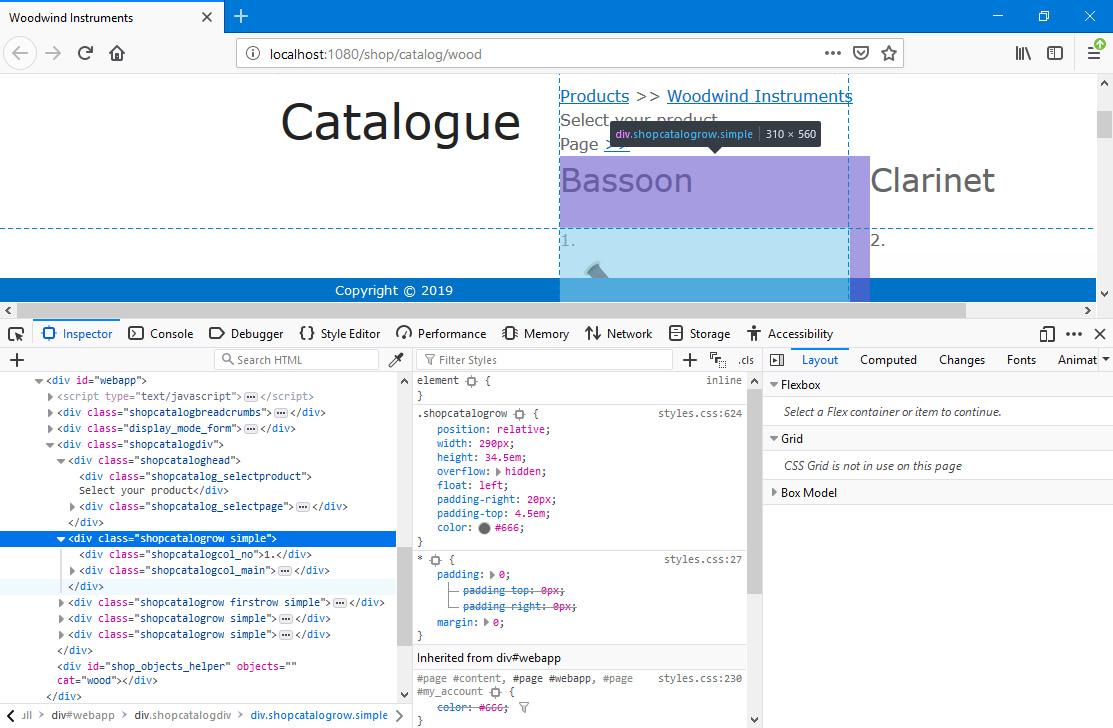
- By default, Products are listed in alphabetical order by name or translation. If you would like to impose a different order, use the Sorting field in each Product record:
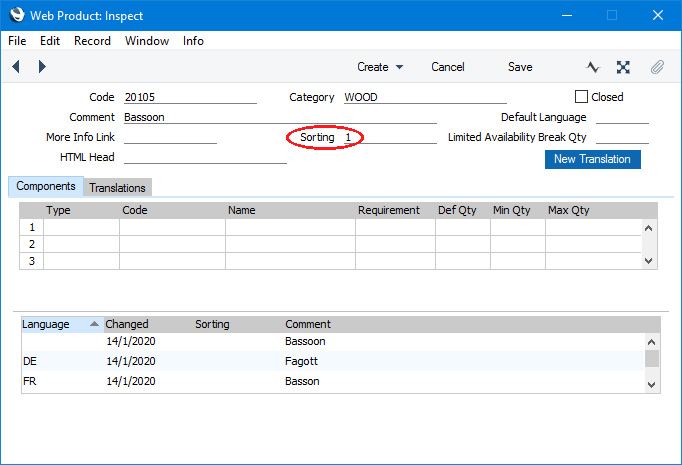
- You can use any alphanumeric scale. For example, a Product with "1" in its Sorting field will be listed above a Product whose Sorting is "2".
- Position Numbering
- <div class="shopcatalogcol_no"> (inside <div class="shopcatalogrow">).
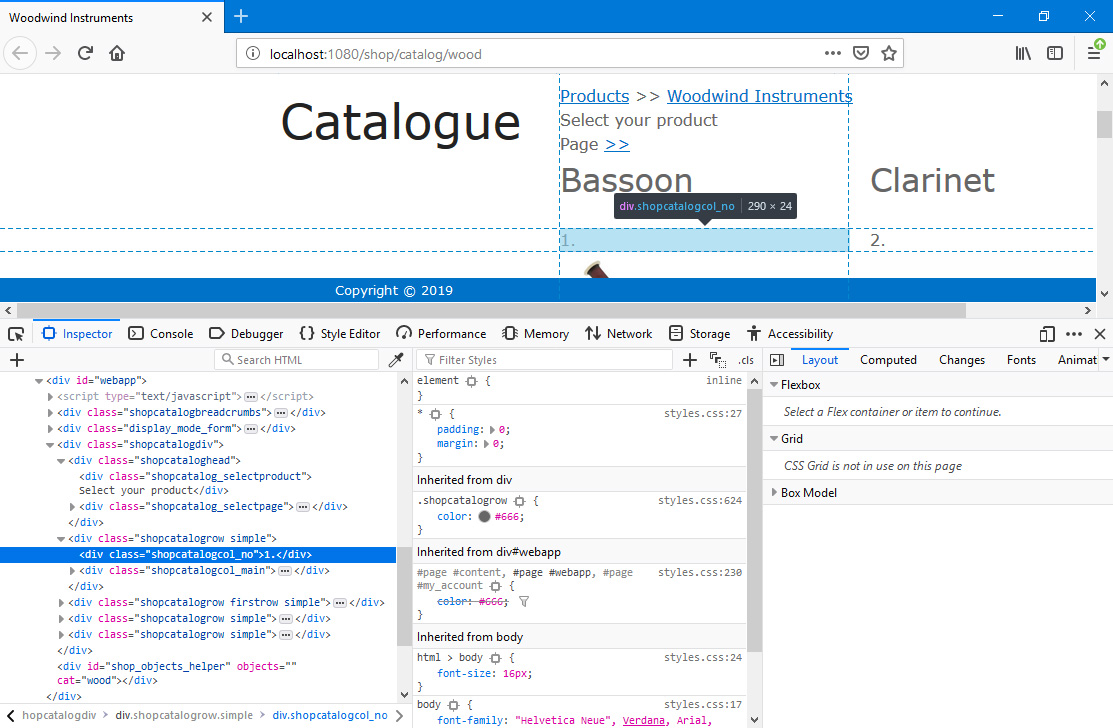
- Numbers signifying the position of each Product in the list will be generated automatically.
- Product Listing
- Inside <div class="shopcatalogrow">, all Product details apart from the position number will be enclosed in <div class="shopcatalogcol_main">).
- Product Image
- <div class="shopcatalog_itemimage"> (inside <div class="shopcatalogcol_main">).
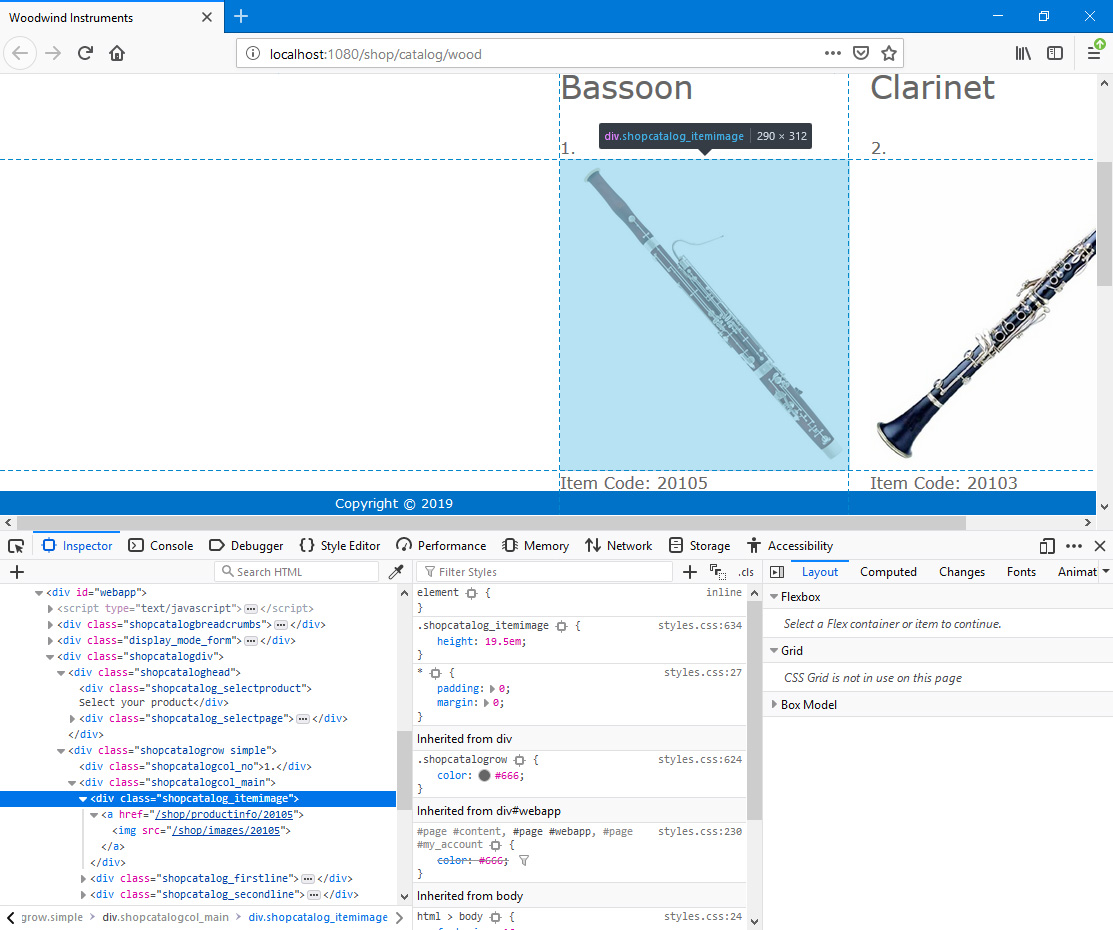
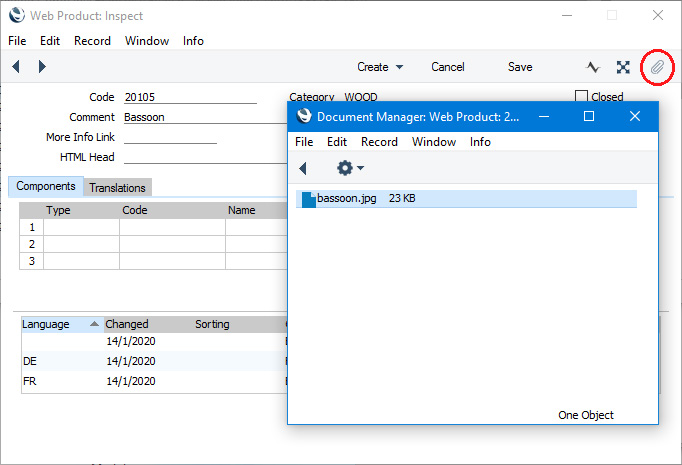
- Attach image files to each Product record using the Document Manager (with paper clip icon) in the usual way:
- The following file formats are supported: .BMP, .GIF, .JPEG and .JPG.
- If a Product has more than one image, the first one alphabetically will be used. If a Product does not have an image, an additional <div class="shopcatalog_itemimage_replace"> will be inserted where the image would otherwise be (i.e. inside <div class="shopcatalogcol_main">).
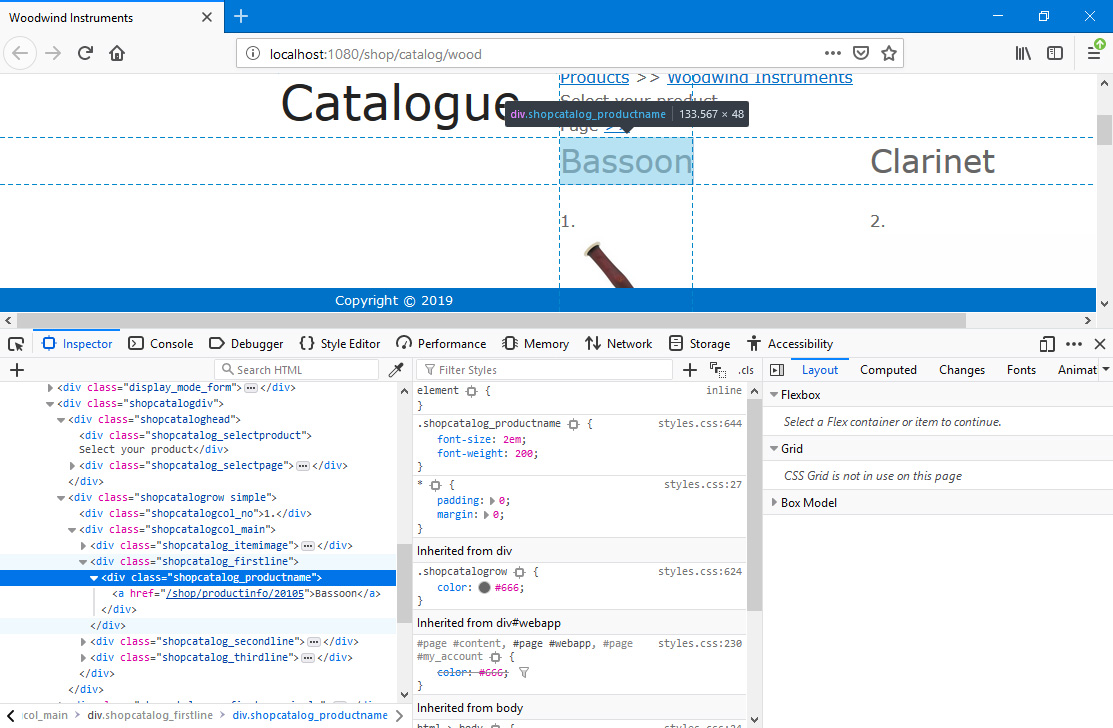
- Product Name
- The Product Name is wrapped in two <divs>: <div class="shopcatalog_productname"> inside <div class=shopcatalog_firstline">.
- The Product Name will be chosen as follows:
- If the Product record has a connected Translation in the language selected by the browser user, the Comment in that Translation will be used as the Product Name.
- If the browser user has not selected a language or has chosen a language for which you have not entered a Translation, the Comment will be taken from the Translation in the Default Language of the Product:
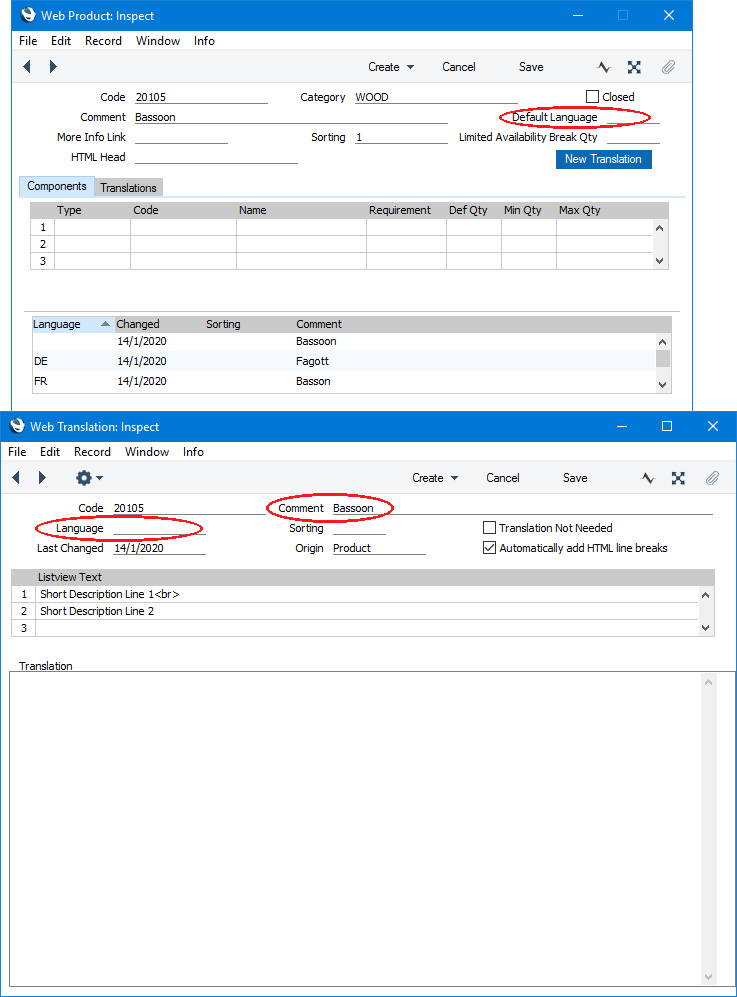
As shown in the illustration, the Default Language can be blank, in which case you should ensure that the Product has a connected Translation without a Language.
Note that in Translations connected to Products, the Origin field should contain "Product".
- If there isn't a suitable Translation connected to the Product record, the Comment in the Product record itself will be used as the Product Name.
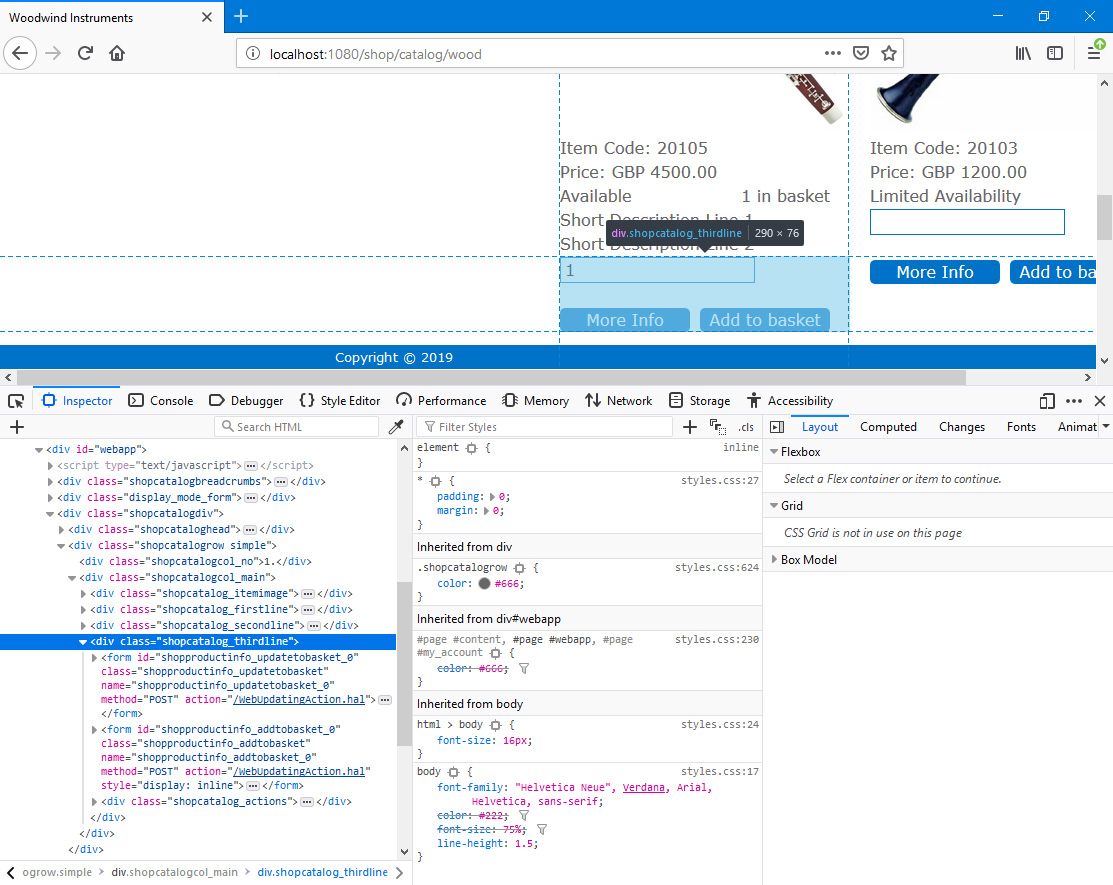
- Product Information
- <div class=shopcatalog_secondline"> follows <div class=shopcatalog_firstline"> and includes up to five pieces of information in their own individual <divs>: the Product Number, the Unit Price, the stock level indicator, the quantity in the basket and the short description.
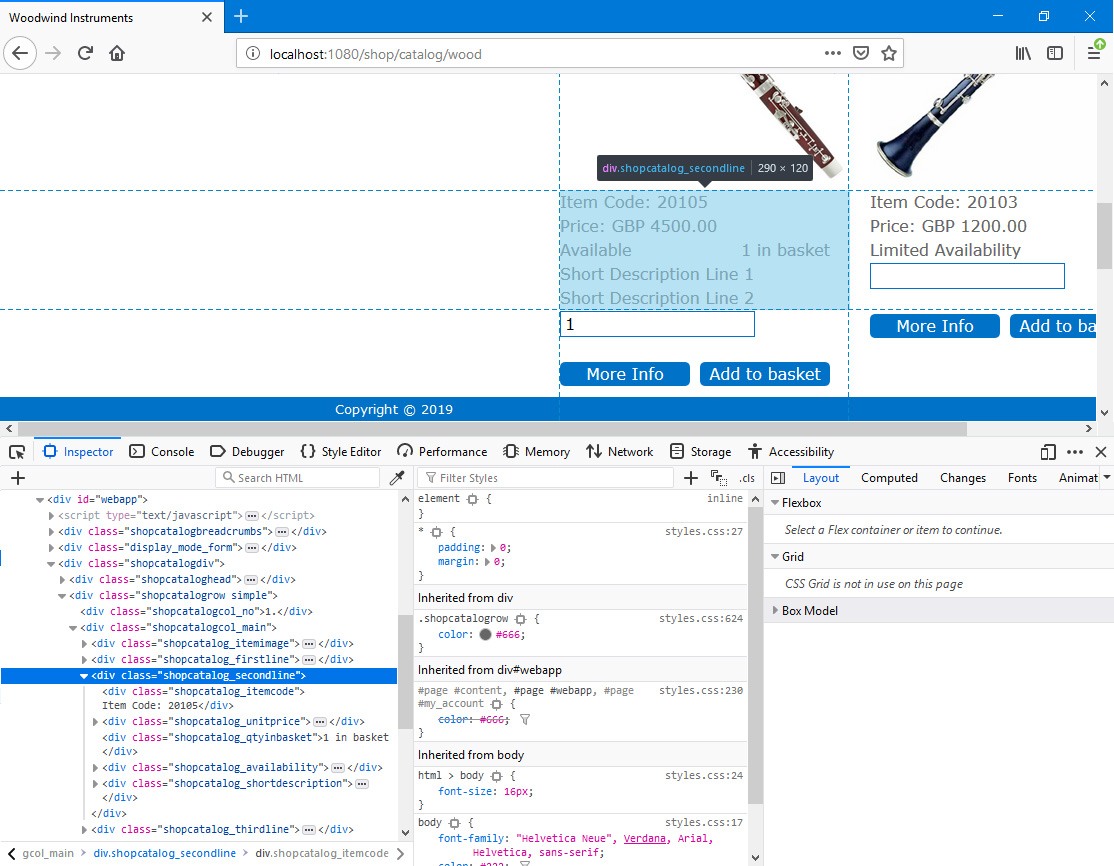
- Item Code
- <div class="shopcatalog_itemcode"> inside <div class=shopcatalog_secondline">.
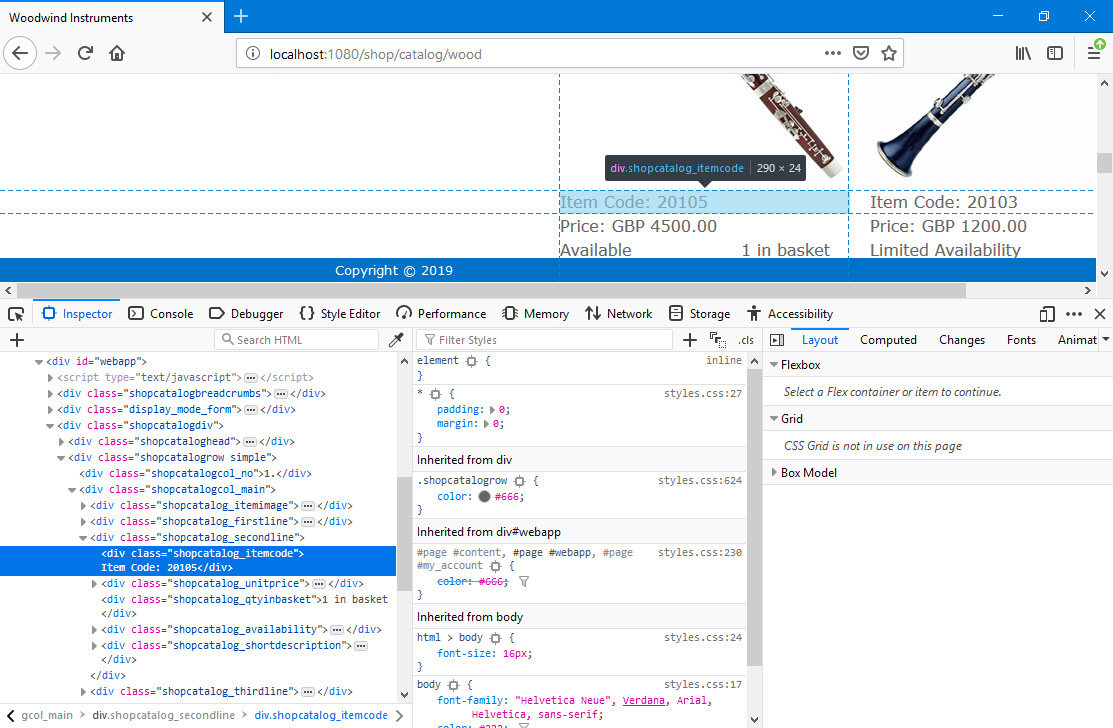
- The "Item Code" text is Web Text 32433 (the colon and trailing space will be added automatically).
- Unit Price
- <div class="shopcatalog_unitprice"> inside <div class=shopcatalog_secondline">.
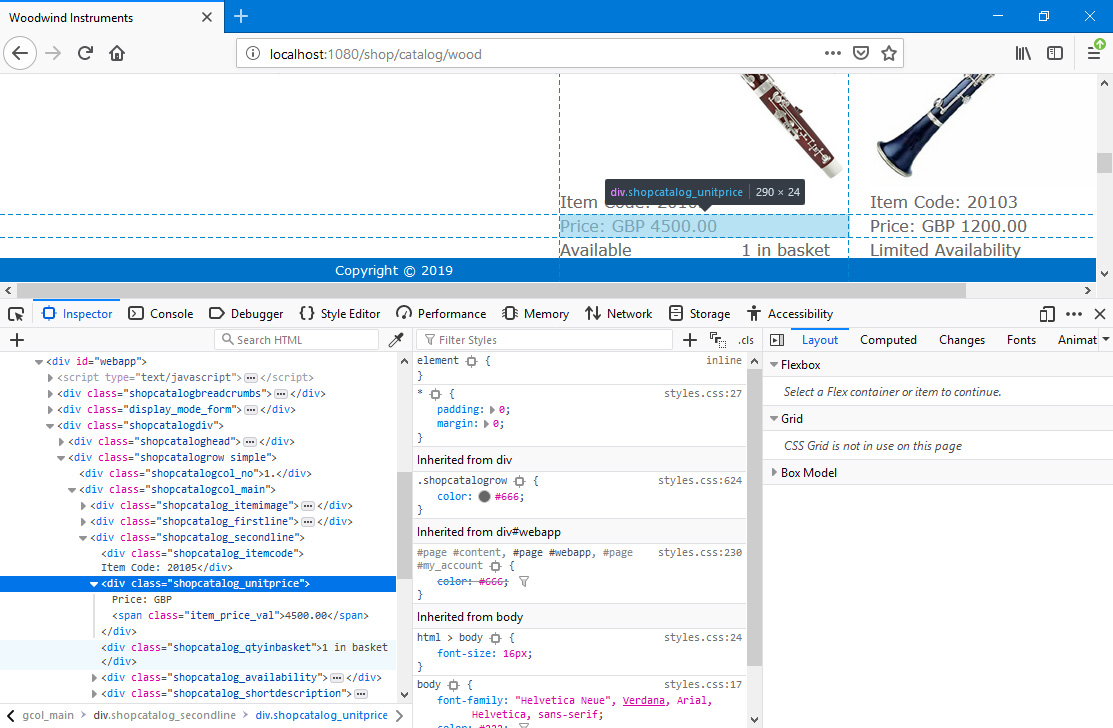
- The "Price:" text is Web Text 25600 (the trailing space will be added automatically but not the colon, so include this in your Web Text record).
- If the browser user has not logged in, the following Unit Prices will be displayed:
- If you have specified a Default Customer in the Webshop Company Settings setting and you have assigned a Price List to that Customer or to the Customer Category to which it belongs, Unit Prices will be taken from that Price List.
- If you have not specified a Default Customer, the Default Customer does not have a Price List or an Item is not on the Price List in question, the Base Price from the Item record will be used as the Unit Price.
- If a browser user has logged in, Unit Prices will be taken from the Price List that you have assigned to that user's Customer record in the Contact register or to the Customer Category to which it belongs. Again, if the Customer does not have a Price List, or an Item is not on the Price List in question, the Base Price from the Item record will be used instead.
- Unit Price figures will include VAT (and Extra Tax) if the relevant Price List is one that is Inclusive of VAT or if you have specified on the 'VAT / Tax' card of the Account Usage S/L setting that Base Prices include VAT (or VAT and Extra Tax).
- Unit Prices will be displayed in the Sales Currency of the Customer (Default or logged-in). If the Customer's Sales Currency field is empty, Unit Prices will be in your home Currency.
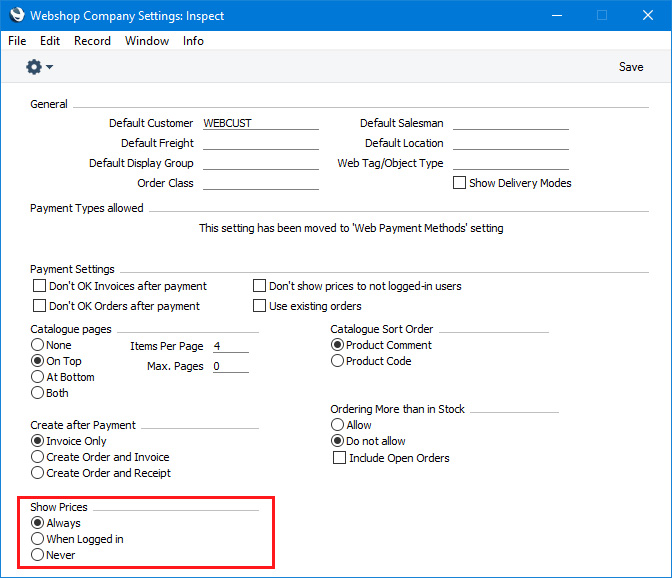
- Also in the Webshop Company Settings setting, you can use the Show Prices options to hide Unit Prices or to show them only to browser users who have logged in:
- Quantity in basket
- <div class="shopcatalog_qtyinbasket"> inside <div class=shopcatalog_secondline">.
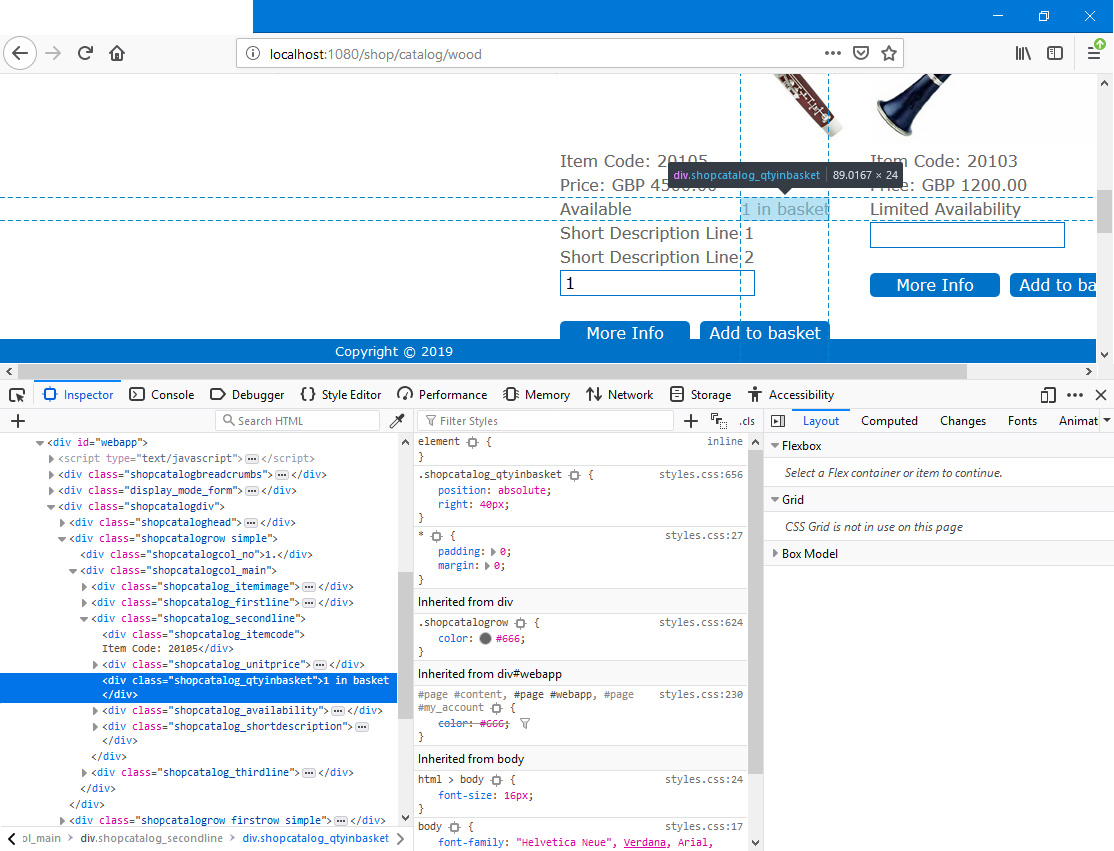
- The "in basket" text is Web Text 25602 (the preceding space will be added automatically).
- This <div> will only be included in the Product listing if there is a quantity of the Product in the basket.
- Please refer here for details about the basket.
- Stock Availability
- <div class="shopcatalog_availability"> inside <div class=shopcatalog_secondline">.
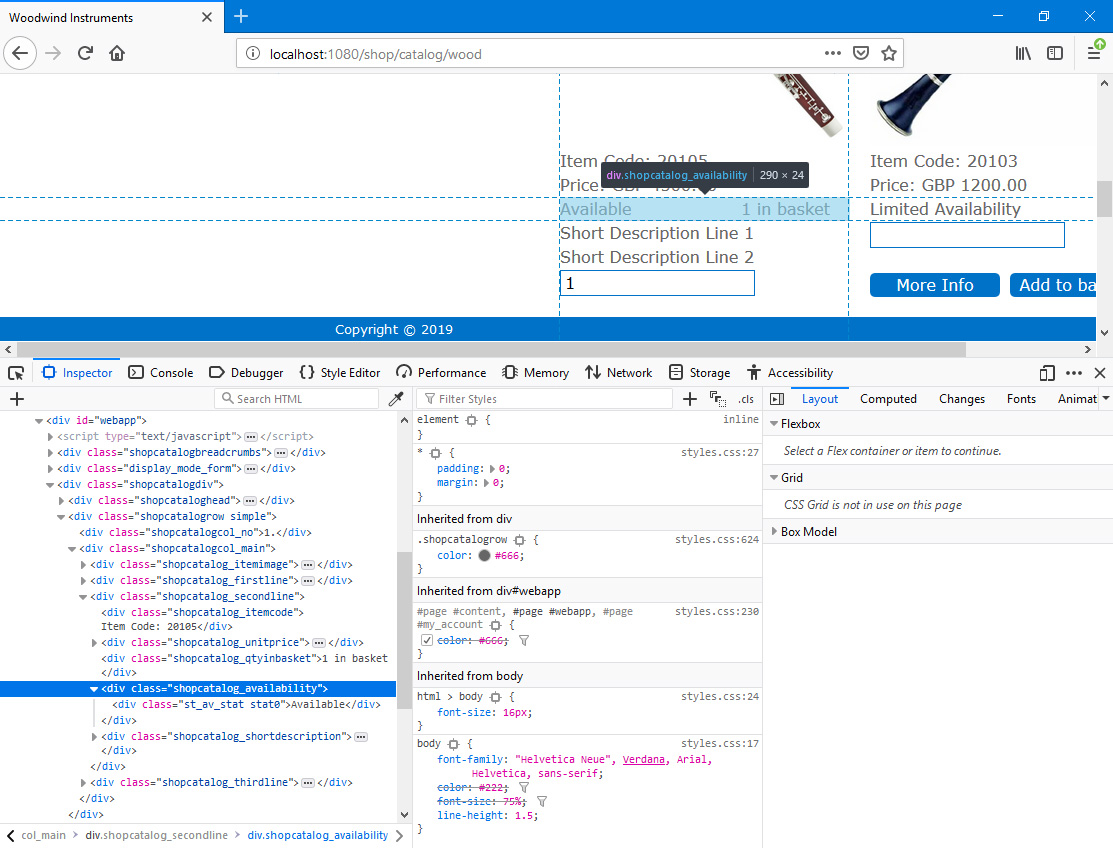
- Please refer to the Stock Levels page for details about displaying stock levels in the webshop and about preventing the sale of Products that are out of stock.
- Short Description
- <div class="shopcatalog_shortdescription"> inside <div class=shopcatalog_secondline">.
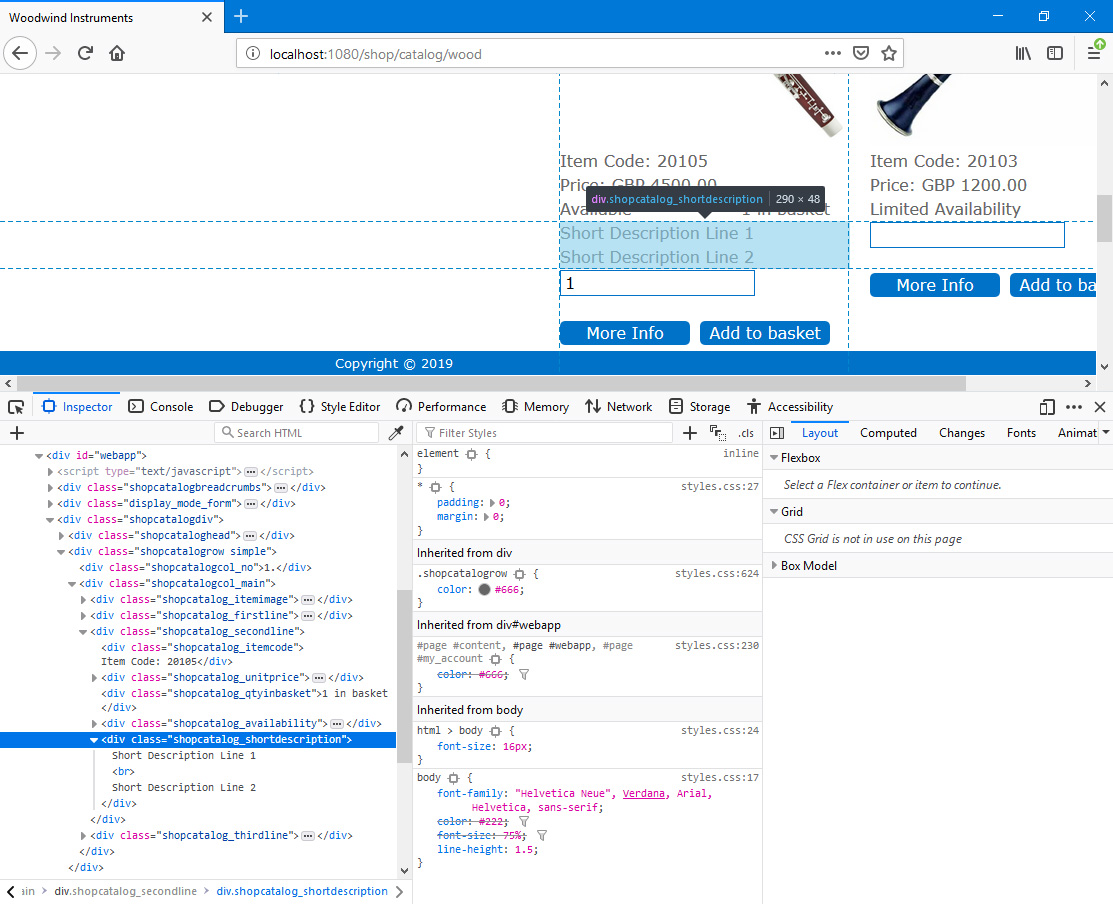
- The short description will be chosen as follows:
- If the Product record has a connected Translation in the language selected by the browser user, the short description will be taken from the Listview Text matrix in that Translation record.
- If the browser user has not selected a language or has chosen a language for which you have not entered a Translation, the short description will be taken from the Listview Text matrix in the Translation in the Default Language of the Product.
- If the Product record does not have any connected Translation records, no short description will be displayed.
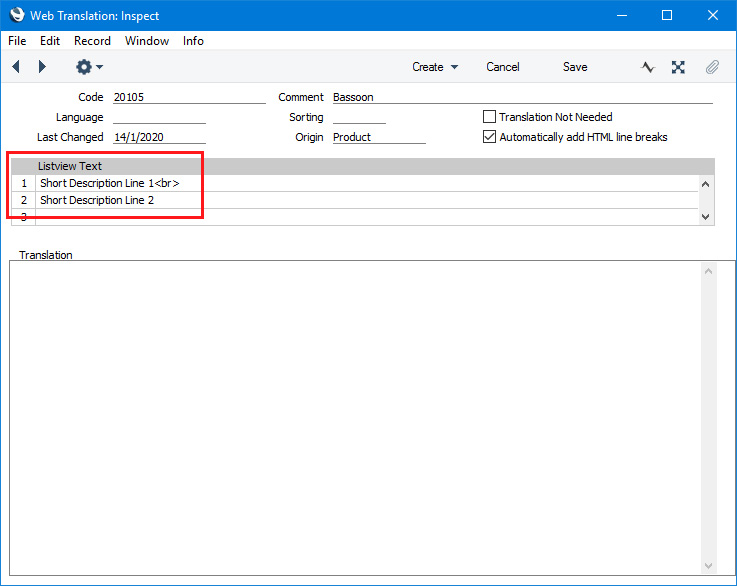
- As shown in the illustration, include <br> tags in the Listview Text matrix to force line breaks.
- Product Information
- <div class=shopcatalog_thirdline"> follows <div class=shopcatalog_secondline"> and includes the Quantity field and the two buttons in separate <divs>.
- Quantity field
- <form class="shopproductinfo_updatetobasket"> inside <div class=shopcatalog_thirdline">.
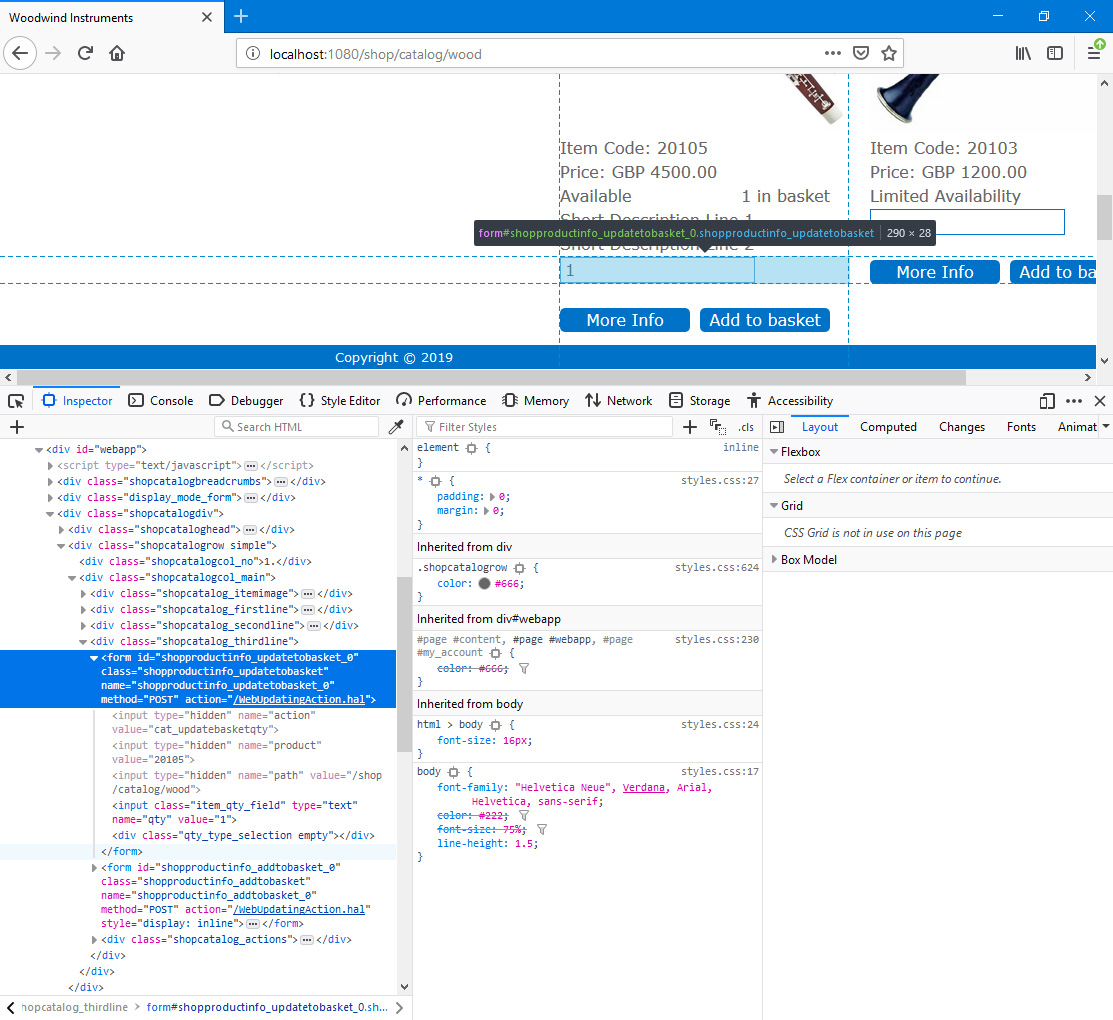
- The Quantity field allows browser users to add a quantity greater than one to their basket. When the user returns to the Product listing, the Quantity field will display the last quantity added.
- <form class="shopproductinfo_addtobasket"> also visible in the illustration will be empty for standard Items. It will only be used when an Item has Varieties, as described here.
- Buttons
- <div class="shopcatalog_actions"> inside <div class=shopcatalog_thirdline">.
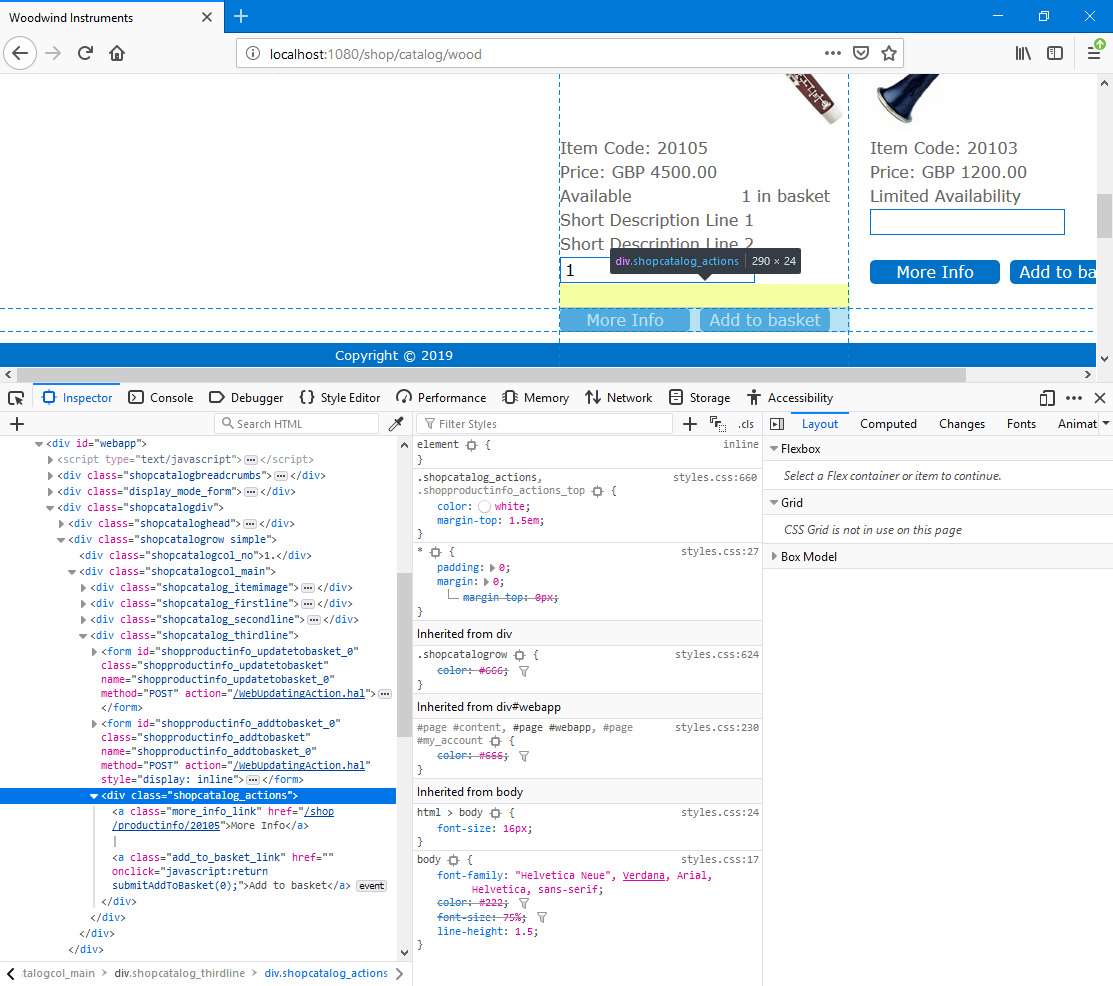
- [More Info]
- Browser users can go to a separate page that displays more information about a Product using this button or by clicking or tapping the Product Name or the image. The button label "More Info" is Web Text 25511. Please refer Ihere for more details about this button.
- [Add to basket]
- Browser users can use this button to add a Product to their basket. If the Quantity field is empty, one unit will be added to the basket. Otherwise, the quantity specified in the Quantity field will be added.
- Use the Action after adding item to basket options in the Webshop Settings setting to specify where the user should be taken after adding a Product to their basket:
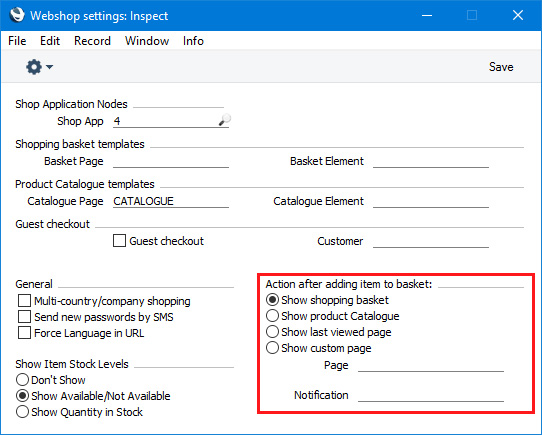
- If you specify an Element in the Notification field, that Element will be displayed above the Webshop Area (i.e. above the <div id="webapp">) in the page that the user is taken to after adding a Product to their basket (except the custom page). If the user is taken to a custom page, the Notification Element will be displayed in the page within the webshop that the user next visits (e.g. Product listing, search results, basket, checkout).
- The button label "Add to basket" is Web Text 25510.
- Please refer here for more details about the Action after adding item to basket options and here for more details about the basket.
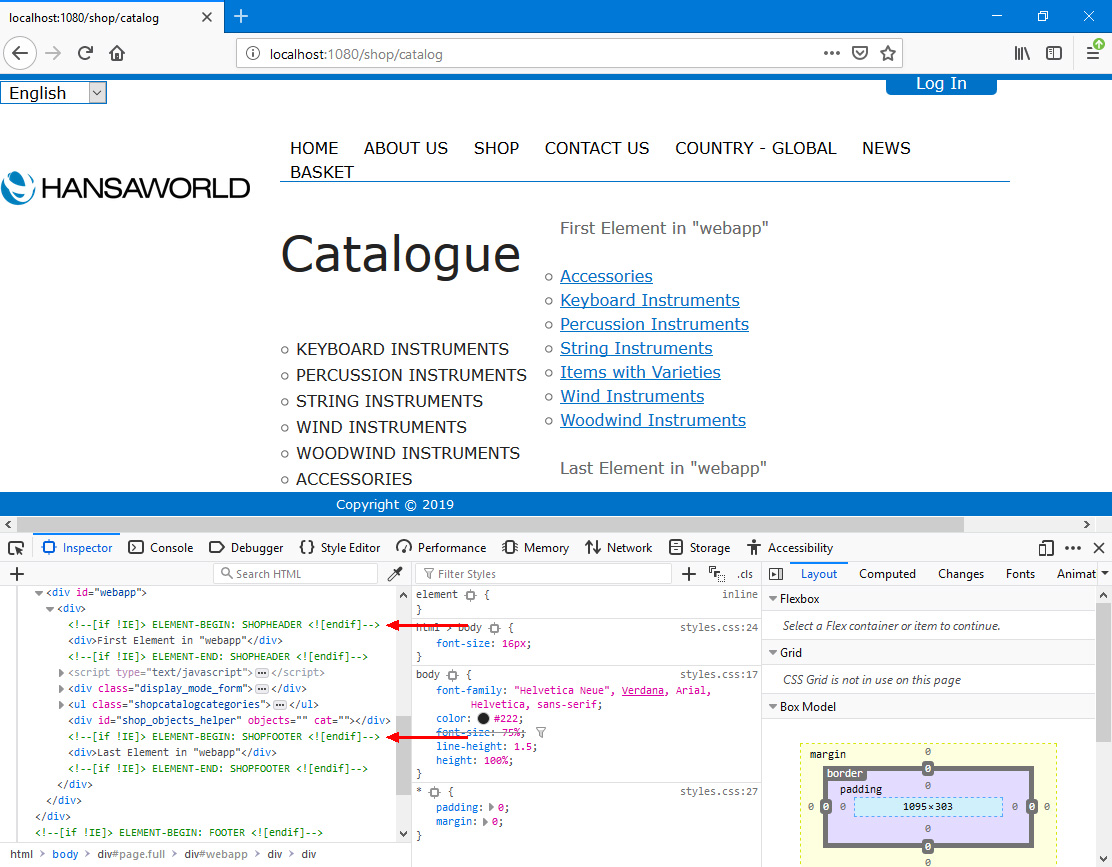
- Header and Footer
- You can add a header and/or footer to the Product listing (they will also be used when listing search results). They will be the first and last Elements in the <div id="webapp">. Follow these steps:
- Create separate Elements (with associated Translations) for the header and the footer:
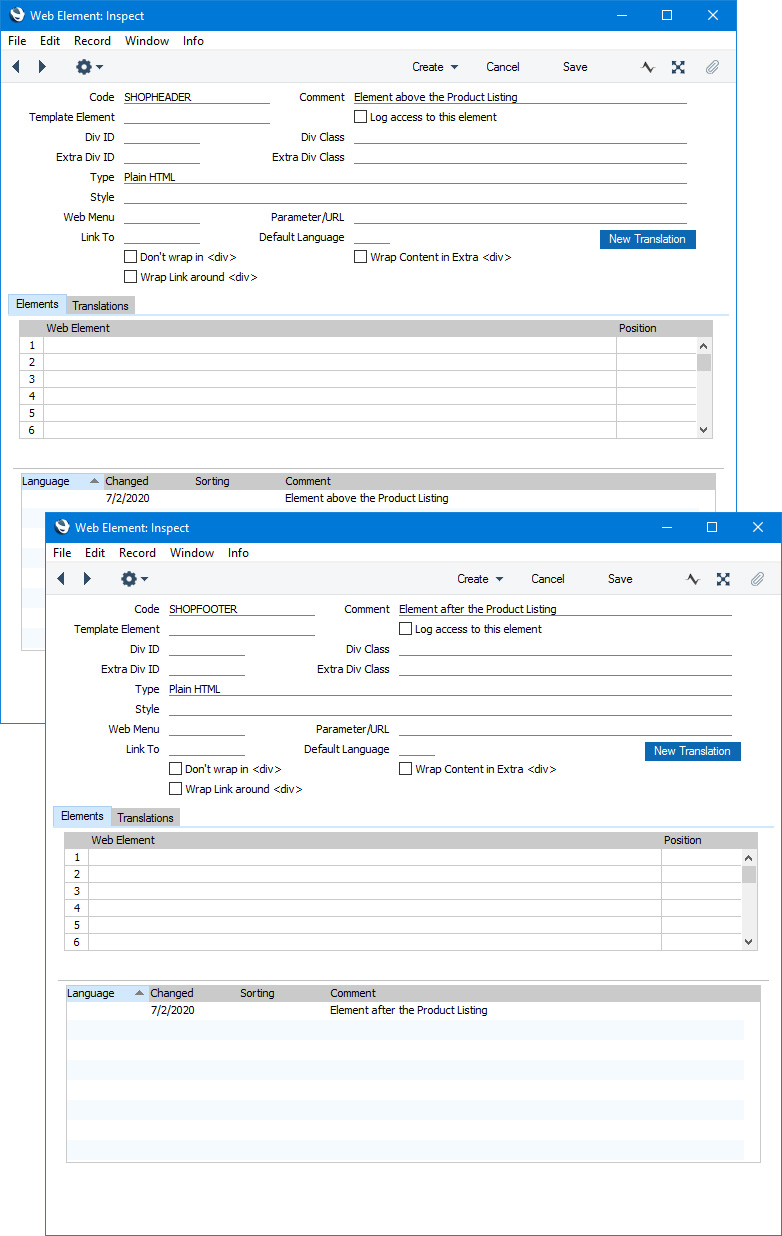
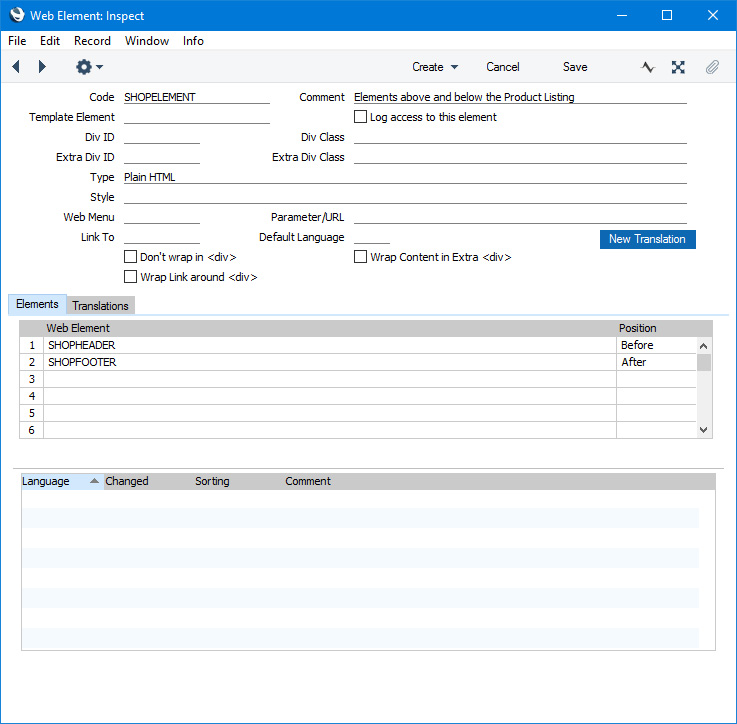
- Create a wrapper Element. In this wrapper Element, list the header and footer Elements from step 1 and place them in the "Before" and "After" Positions respectively:
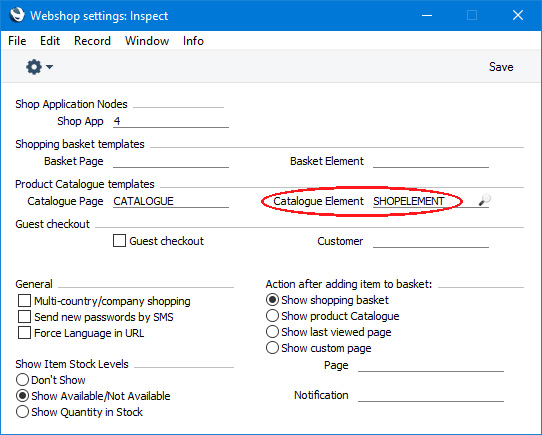
- Specify the wrapper Element in the Catalogue Element field in the Webshop Settings setting:
- This is the result in a browser:
- Product Views
- If a browser user is logged in when they view a Product listing, separate records for each Product will be created in the Product Views setting. This setting keeps a record of the Products that have been viewed by each Customer.
---
The Webshop in Standard ERP:
Go back to:
|