Opening Balances in the Nominal Ledger
In the Nominal Ledger, the task of entering opening balances can have two stages:
- You should enter balances for each Account as they stood at the end of the previous fiscal year. You can use the Brought Forward Balances setting or the Simulation register for this task. This information should be available in the Trial Balance report obtained from your old system.
You can enter a single opening balance figure for each Account, or you can divide the opening balance figure into individual postings. This decision may depend on the Account itself.
The advantages of using the Brought Forward Balances setting for this purpose are that you can save unbalanced Brought Forward Balance records, and you can return to a Brought Forward Balance record to change it. This allows you to enter opening balances as a gradual process, saving frequently. The disadvantage is that the Account Reconciliation register does not recognise balances entered in the Brought Forward Balances setting. So, if you are entering opening balances for Bank Accounts as individual postings that later you will need to reconcile with your bank statement, as may be the case in the UK, you will need to use the Simulation register. You can return to saved Simulations to edit them, again allowing the process of entering opening balances to be a gradual one. While a Simulation must balance before you can save it, you can save a Simulation periodically with a posting to a temporary balancing Account on the last line until it is complete. You can then convert it to a Transaction, after which the postings will be made available to the Account Reconciliation register.
If you want to use the Brought Forward Balances setting, refer to steps 1-8 below. If you want to use the Simulation register, refer to steps 9-17.
- If appropriate, enter Transactions for the current year to date, using the Transaction register. Please refer to steps 18-24 below.
Once you have entered all balances and Transactions, print out a Trial Balance and compare it with that obtained from your old system. Any discrepancies should be investigated immediately: any delay will make this more difficult.
The following sections assume you have already defined a Chart of Accounts and a set of VAT Codes.
To enter Account balances as they stood at the end of the previous financial year to the Nominal Ledger using the Brought Forward Balances setting, follow these steps:
- Select the Nominal Ledger module using the [Switch Module] button in the Navigation Centre or the Ctrl-0/⌘-0 (zero) keyboard shortcut.
- Click the [Settings] button in the Navigation Centre or use the Ctrl-S/⌘-S keyboard shortcut to open the 'Settings' list. Double-click 'Brought Forward Balances' in the list.
- When the 'Brought Forward Balances: Browse' window opens, select 'New' from the Create menu in the Button Bar to open a new record.
- Enter the information as shown in the following illustration. Full details of the fields are to be found in the description of the Brought Forward Balances register. It is recommended that you choose a Transaction Date that is at the end of the previous fiscal year and that is, in any case, prior to the date when you will be starting work with Standard ERP.
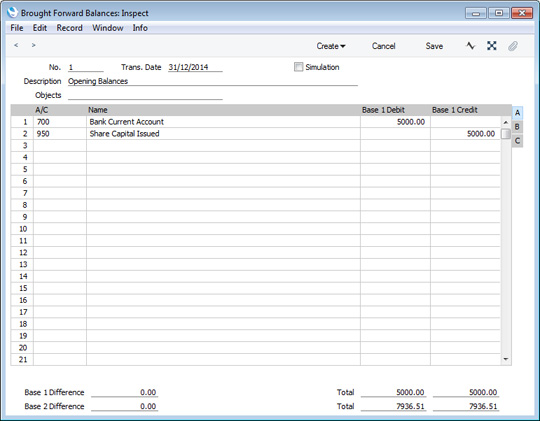
Use each row in the grid to enter the balances of each Account, taking the figures from the Trial Balance report produced by your old system.
If you are not using Currencies, enter the balances in the Base 1 Debit and Credit fields.
If you have Accounts with balances in Base Currency 2, enter those balances in the Base 2 Debit and Credit fields on flip B (click the small button marked "B" on the right of the grid to see these fields). If you have Accounts with balances in a foreign Currency (i.e. not in Base Currency 1 or 2), use the fields on flip C. You should also enter home Currency balances for these Accounts on flip A: no Currency conversion will take place because users will have many different methods of converting opening balance figures.
- The Brought Forward Balances screen has 500 rows, allowing you to enter opening balances for up to 500 Accounts in a single record. If you need to enter a significant number of opening balances, it is recommended that you save the Brought Forward Balances record periodically, by clicking the [Save] button in the top right-hand corner. The record does not have to balance for you to save it. Account balances will be updated as soon as you save the record. However, if you discover a mistake at a later date, you will be able to correct the record without difficulty.
- If you run out of rows, select 'New' from the Create menu (or use the Ctrl-N/⌘-N keyboard shortcut) . The Brought Forward Balances record will be saved and closed, and a new empty record will be opened, allowing you to enter more opening balances.
- If you are using Objects, you should enter a separate record to the Brought Forward Balances setting for each Object and one for the total. For example, if you have a Cash Account with a balance of 100.00 that is divided between two departments so that 49.00 belongs to Department 1 and 51.00 to Department 2, enter three Brought Forward Balance records as follows:
- 1st record, Cash Account, no Objects, total figure (100.00)
- 2nd record, Cash Account, Object for Dept 1, figure for Dept 1 (49.00)
- 3rd record, Cash Account, Object for Dept 2, figure for Dept 2 (51.00)
- Finish with [Save] when you have entered the last balance, and close the window by clicking the close box.
To enter Account balances as they stood at the end of the previous financial year to the Nominal Ledger using the Simulation register, follow these steps:
- Select the Nominal Ledger module using the [Switch Module] button in the Navigation Centre or the Ctrl-0/⌘-0 (zero) keyboard shortcut.
- Click the [Registers] button in the Navigation Centre and then double-click 'Simulations' in the resulting list to open the Simulation register.
- When the 'Simulations: Browse' window opens, select 'New' from the Create menu in the Button Bar to open a new record.
If you don't need to open the 'Simulations: Browse' window, a shortcut that omits step 10 is to open the + drop-down menu from the Navigation Centre (in the top right-hand corner if you are using Windows or Linux, towards the top left if you are using Mac OS X) and select 'Simulations'.
- Enter the information as shown in the following illustration. Full details of the fields are to be found in the description of the Simulation register. It is recommended that you choose a Transaction Date that is at the end of the previous fiscal year and that is, in any case, prior to the date when you will be starting work with Standard ERP.
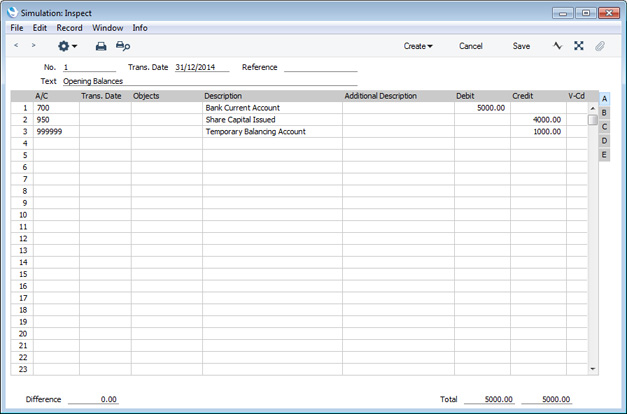
If you are entering a single opening balance figure for each Account, use each row in the grid to enter these balances, taking the figures from the Trial Balance report produced by your old system. If you are entering opening balances as individual postings, enter each posting on a separate row. You can enter single opening balance figures for some Accounts, and individual postings for others. For example, you can enter previously unreconciled postings to your Bank Account(s) individually, so that you can reconcile them with your bank statement later. Please refer to the description of the Account Reconciliation register for details about reconciling postings with your bank statement.
If you are not using Currencies, enter the balances in the Base 1 Debit and Credit fields.
If you have Accounts with balances in Base Currency 2, enter those balances in the Base 2 Debit and Credit fields on flip C (click the small button marked "C" on the right of the grid to see these fields). If you have Accounts with balances in a foreign Currency (i.e. not in Base Currency 1 or 2), use the fields on flip D. In both cases, enter the Currency itself on flip D as well. You should also enter home Currency balances for these Accounts on flip A: no Currency conversion will take place because users will have many different methods of converting opening balance figures.
- The Simulation screen has 300 rows, allowing you to enter opening balances for up to 300 Accounts in a single record. If you need to enter a significant number of opening balances, it is recommended that you save the Simulation record periodically, by clicking the [Save] button in the top right-hand corner. The record has to balance for you to save it, so each time you need to save, you can make a balancing posting to a temporary balancing Account as shown in the illustration above. If you discover a mistake at a later date, you will be able to correct the record without difficulty.
- If you run out of rows, select 'New' from the Create menu (or use the Ctrl-N/⌘-N keyboard shortcut) . The Simulation record will be saved and closed, and a new empty record will be opened, allowing you to enter more opening balances.
- If you are using Objects, you should enter a separate row in the Simulation for each Object, but not a separate row for the total. For example, if you have a Cash Account with a balance of 100.00 that is divided between two departments so that 49.00 belongs to Department 1 and 51.00 to Department 2, enter two rows in the Simulation as follows:
- 1st row, Cash Account, Object for Dept 1, figure for Dept 1 (49.00)
- 2nd row, Cash Account, Object for Dept 2, figure for Dept 2 (51.00)
- Finish with [Save] when you have entered the last balance, and close the window by clicking the close box.
- When you save a Simulation, it will not update Account balances immediately. This means you can save it many times, making sure that it contains no mistakes.
When you are sure the Simulation is correct, close it by clicking the close box. On returning to the 'Simulations: Browse' window and highlight the Simulation in the list. Choose 'Create NL Transactions' from the Operations menu in the top left-hand corner of the window:
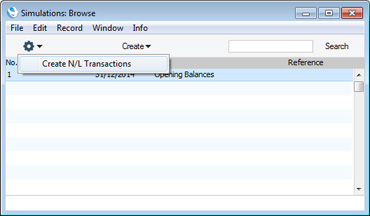
A Nominal Ledger Transaction will be generated from the Simulation. This Transaction will update the balances of each Account. You cannot change a Transaction once it has been created, hence the need to make sure the Simulation was correct before creating the Transaction. This is also the reason for entering opening balances in the Simulation register and not directly to the Transaction register. Transactions are described in more detail below in points 18-24.
If you created more than one Simulation, you can highlight them all in the 'Simulations: Browse' window before choosing the 'Create NL Transactions' function. Nominal Ledger Transactions will be generated from each highlighted Simulation. To highlight several Simulations, click on the first one, hold down the Shift key on your keyboard and click on the last one.
If you are starting to use Standard ERP in the middle of a financial year, you should now enter the Transactions for the current year so far. You should enter these from the original documentation, not copy them from Transaction Journal reports produced from your old system. This will ensure that you do not enter any Transactions that relate to the Sales or Purchase Ledger. These will be entered later. Follow these steps:
- Using the [Switch Module] button in the Navigation Centre, ensure you are in the Nominal Ledger.
- Click the [Registers] button in the Navigation Centre and then double-click 'Transactions' in the resulting list to open the Transaction register.
- When the 'Transactions: Browse' window opens, select 'New' from the Create menu in the Button Bar to open a new record.
If you don't need to open the 'Transactions: Browse' window, a shortcut that omits step 19 is to open the + drop-down menu from the Navigation Centre (in the top right-hand corner if you are using Windows or Linux, towards the top left if you are using Mac OS X) and select 'Transactions'.
- Enter the information as shown in the following illustration. Full details of the fields are to be found in the description of the Transaction register. Ensure you use the same Transaction Date that was used when entering the Transaction to your previous system.

Use the Base 1 Debit and Credit fields to record values in your home Currency. Please refer here for details about using foreign Currencies in Nominal Ledger Transactions.
- The Transaction screen does not have an OK check box, so Account Balances are updated as soon as you save the Transaction. Therefore, before saving the Transaction, make sure that no mistakes have been made. One check is that the Debit and Credit totals are the same. Once you have saved the Transaction, you will not be able to change it.
- Click the [Save] button (or use the Shift-Enter keyboard shortcut) to save the Transaction. Alternatively, if you select 'New' from the Create menu (or use the Ctrl-N/⌘-N keyboard shortcut) , the Transaction will be saved and closed, and a new empty record will be opened, allowing you to enter another Transaction.
You can use another feature when you need to enter several Transactions quickly in one sitting and don't want to interrupt your typing by reaching for the mouse. Enter the debits in a Transaction first and then, with the cursor in the Base 1 Credit field in the final credit row, press the Return or Enter key twice. The first pressing causes the correct credit amount to be entered for you, balancing the entry. The second saves, closes and commits the Transaction to the Nominal Ledger and opens a new, empty, Transaction.
- Finish with [Save] when you have entered the last Transaction, and close the window by clicking the close box.
---
In this chapter:
Go back to:
|