Editing Customer Details (My Account) - Invoices
The "Invoices" page is a separate sub-node built in to the
"My Account App" Node that Customers can use to see a list of their Invoices. As it is a sub-node built in to the "My Account App" Node, it will be displayed in the
My Account Area (i.e. in the
<div id="my_account">). The name of the sub-node is hard-coded to be "/invoices".
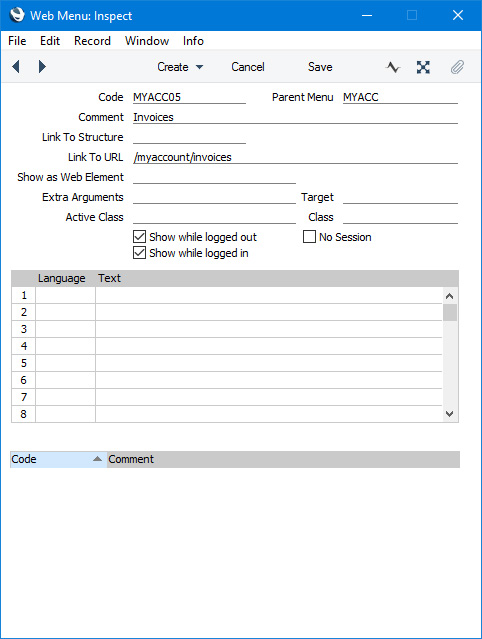
If you want Customers to be able to view their Invoices, you must provide a button or menu item that will take users to the "Invoices" page. Specify /My_Account_App_Web_structure_name/invoices (e.g. /myaccount/invoices) as the anchor (using the Link to URL field if you are providing a menu item):
Please refer to step 7 on the
Editing Customer Details (My Account) page for more details about adding a menu to the "My Account App" Node.
When a Customer goes to the /invoices sub-node, their Invoices from the first period in the Reporting Periods setting will be displayed in the My Account Area (i.e. in the <div id="my_account">):
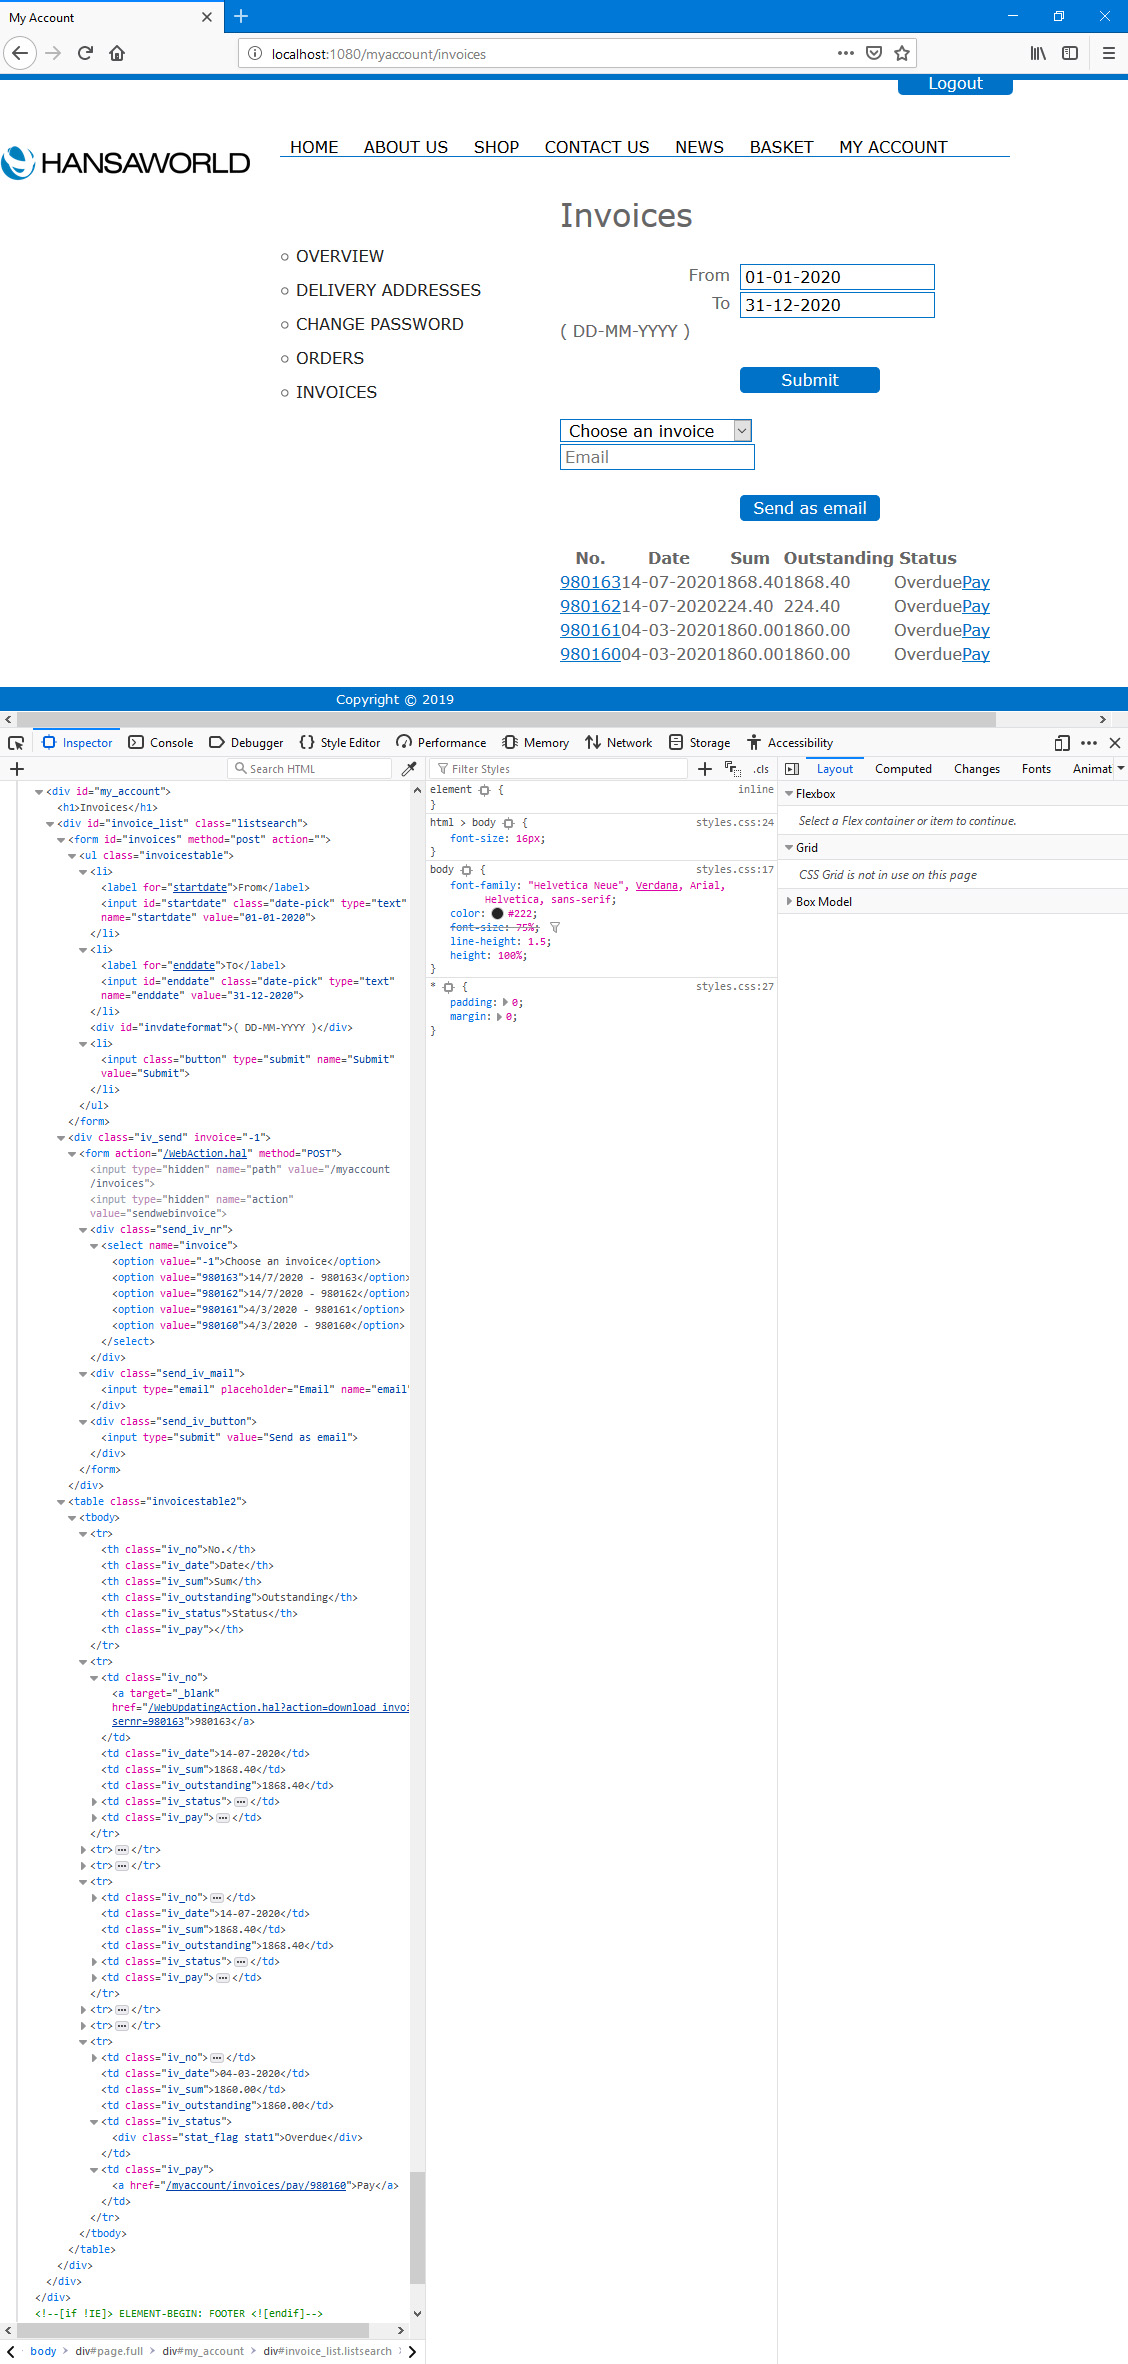
In this illustration, the following attributes are assigned automatically by Standard ERP (i.e. you will not be able to change these attributes, but you will be able to apply styling to them in your .css file):
- <h1> (used for the "Invoices" (Web Text 25807) heading)
- <div id="invoice_list" "class="listsearch"> (contains the period fields, the date format guide, the [Submit] (Web Text 20067) button and the Invoice listing)
- <form id="invoices"> (inside the previous <div>, contains the period fields, the date format guide and the [Submit] button)
- <ul class="invoicestable"> (inside the previous <form>, contains the period fields, the date format field and the [Submit] button)
- <div id="invdateformat"> (contains the date format guide, taken from the Company Date and Numeric Format setting. By default, the Web Texts for the date format guide assume the Leading Zero before Day, Leading Zero before Month and Century check boxes are ticked and the Date Separator is -. Change the appropriate Web Text (listed towards the end of this page) if these assumptions are not correct. The fields displaying the report period will obey these options)
- <input class="button"> (used for the [Submit] button)
- <div class="iv_send"> (contains the 'Choose an invoice' (Web Text 25814) drop-down menu, the Email (Web Text 25607) field and the [Send as email] (Web Text 25813) button)
- <div class="send_iv_nr"> (contains the 'Choose an invoice' drop-down menu)
- <div class="send_iv_mail"> (contains the Email field)
- <div class="send_iv_button"> (contains the [Send as email] button)
- <table class="invoicestable2"> (contains the Invoice listing)
- <th class="iv_no"> (contains the "No." (Web Text 25804) column heading)
- <th class="iv_date"> (contains the "Date" (Web Text 25805) column heading)
- <th class="iv_sum"> (contains the "Sum" (Web Text 25806) column heading)
- <th class="iv_outstandin g"> (contains the "Outstanding" (Web Text 25799) column heading)
- <th class="iv_status"> (contains the "Status" (Web Text 25808) column heading)
- <td class="iv_no"> (contains the data in the "No." column)
- <td class="iv_date"> (contains the data in the "Date" column) (this column lists Invoice Dates)
- <td class="iv_sum"> (contains the data in the "Sum" column)
- <td class="iv_outstanding"> (contains the data in the "Outstanding" column)
- <td class="iv_status"> (contains the data in the "Status" column)
- <td class="iv_pay"> (contains the "Pay" link)
The Customer can change the period and can also click or tap on an Invoice Number if they need to see an individual Invoice. A PDF version of the Invoice will be opened in a new browser tab. This will be created using the usual Form Template that you have assigned to the
Invoice Form using the
'Define Form' function.
An Invoice will not be included in the list if it has not been marked as OK or if it has been invalidated.
The 'Choose an invoice' (Web Text 25814) drop-down menu, the Email (Web Text 25607) field and the [Send as email] (Web Text 25813) button will be included in the My Account Area if the Letter Tag field on the 'Invoice' card of the Webshop Email setting is not blank and if at least one Invoice is listed. If a Customer wants to be sent an Invoice by email, they should select the Invoice Number from the drop-down menu, enter an email address in the Email field and press the [Send as email] button. To configure this feature, use the Webshop Email setting as described on the 'Checkout - Email Confirmations' page with this exception:
- If you will base emails on a Customer Letter, the Name in the Customer Letter must be "invoice-resend". You do not need to enter "invoice-resend" in the Letter Tag field on the 'Invoice' card of the Webshop Email setting, but as already mentioned this field must contain an entry for this feature to be included in the /invoices sub-node.
When a Customer presses the [Send as email] button, the page will be re-drawn to include the message "Invoice was sent successfully" (
Web Text 25825) or "Failed to send Invoice" (Web Text 25826), depending on the outcome:
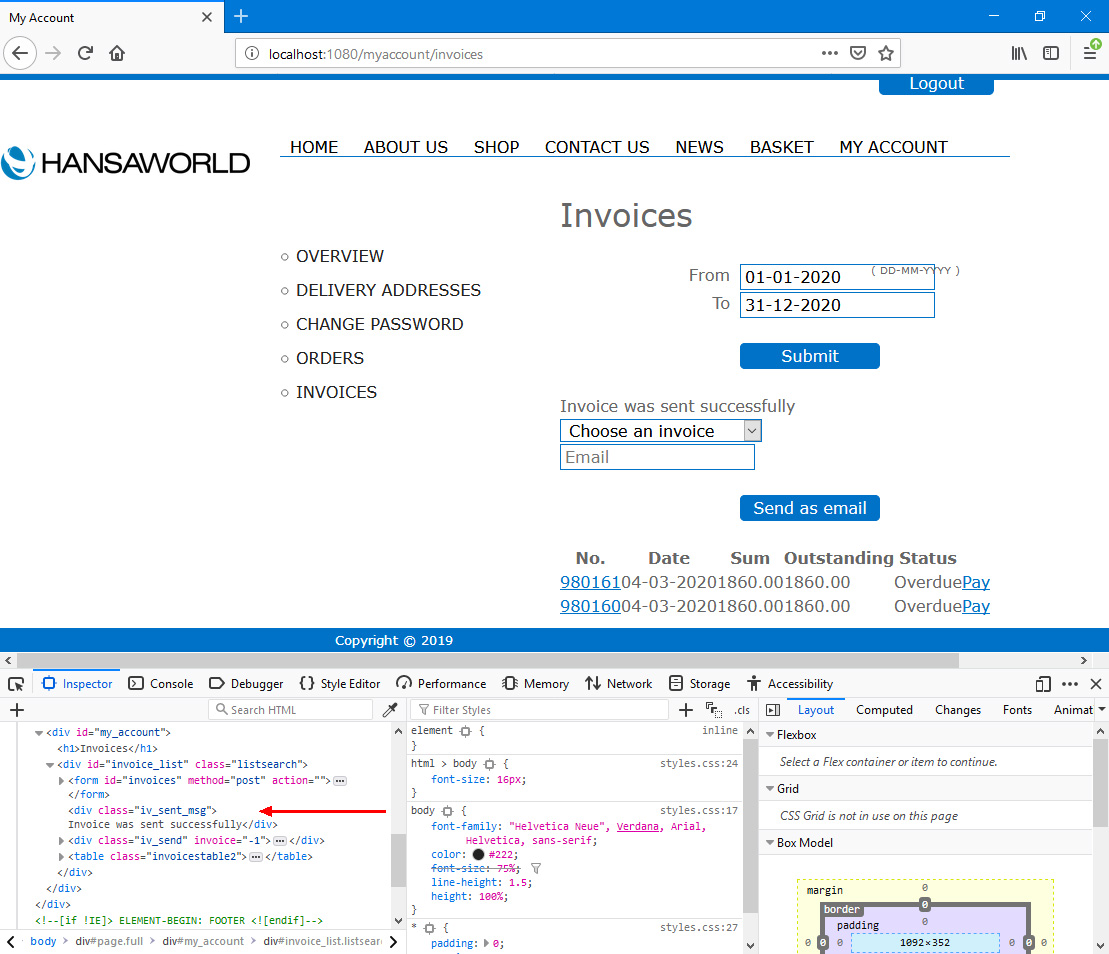
"Invoice was sent successfully" (
Web Text 25825) will be in
<div class="iv_sent_msg"> while "Failed to send Invoice" (Web Text 25826) will be in
<div class="iv_sent_msg error">.
For mails to be sent, you must subscribe to the Email and Conferences and External Email modules and you must have configured the Email SMTP Server setting. Please refer here for full details about the mailing facilities in Standard ERP.
If you need Customers to be able to pay Invoices from the /invoices sub-node, you must be able to accept payments by PayPal, Paysera or Paymark.
As shown in the illustration above,there will be a "Pay" (Web Text 31416) link next to each open Invoice. This link will take the Customer to a /pay sub-node where they can choose the payment method that they wish to use:
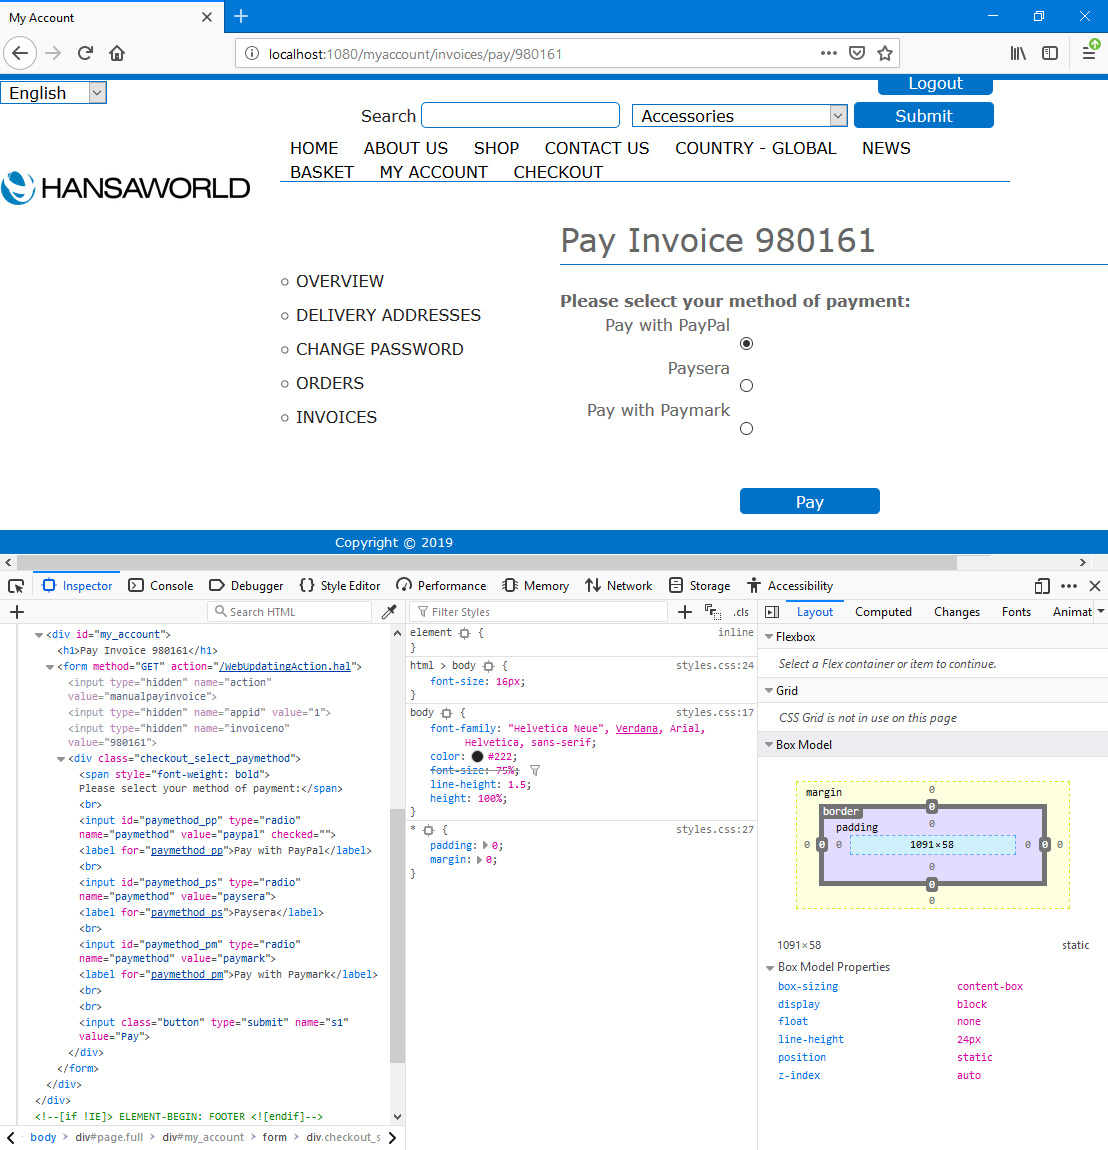
In this illustration, the following attributes are assigned automatically by Standard ERP (i.e. you will not be able to change these attributes, but you will be able to apply styling to them in your .css file):
- <h1> (used for the "Pay Invoice" (Web Text 25824) heading)
- <div class="checkout_select_paymethod"> (contains the "Please select your method of payment:" (Web Text 25322) heading, the payment options and the [Pay] (Web Text 25516) button)
- <input class="button"> (used for the [Pay] button)
After the customer selects an option, they will be taken to the relevant payment provider's website where they can pay.
You can use the following options to change the appearance of the "Invoices" page:
- By default, the browser page displaying the /invoices sub-node will be based on the Page specified in the Structure record for the "My Account App" Node. Specify a Template Page on the 'Invoices' card in the My Account Settings setting if you would like it to be based on a different Page.
- Using the Template Element field on the 'Invoices' card in the My Account Settings setting, you can specify that a header and/or footer will be added to the beginning and end of the <div id="my_account">. Please refer to step 7 ix on the Editing Customer Details (My Account) page for an illustrated example.
- If you do not want the "Invoices" <h1> heading (Web Text 25807) to appear, select the Template elements override built-in headings option in the My Account Settings setting. This option applies to the /changepassword and /orders sub-nodes as well as /invoices.
You can use the
Web Texts setting to change the following texts:
| Sub-Node | Default Text | Web Text Code |
| | |
| My Account App/invoices | Submit [button] | 20067 |
| My Account App/invoices | Invoices [<h1> heading] | 25807 |
| My Account App/invoices | From [field label] | 25802 |
| My Account App/invoices | To [field label] | 25803 |
| My Account App/invoices | Choose an invoice | 25814 |
| My Account App/invoices | Email | 25607 |
| My Account App/invoices | Send as email | 25813 |
| My Account App/invoices | Invoice was sent successfully | 25825 |
| My Account App/invoices | Failed to send Invoice | 25826 |
| My Account App/invoices | No. [column heading] | 25804 |
| My Account App/invoices | Date [column heading] | 25805 |
| My Account App/invoices | Sum [column heading] | 25806 |
| My Account App/invoices | Outstanding [column heading] | 25799 |
| My Account App/invoices | Status [column heading] | 25808 |
| My Account App/invoices | MM-DD-YYYY | 25650 |
| My Account App/invoices | DD-MM-YYYY | 25651 |
| My Account App/invoices | YYYY-MM-DD | 25652 |
| My Account App/invoices | MM-YYYY-DD | 25653 |
| My Account App/invoices | DD-YYYY-MM | 25654 |
| My Account App/invoices | YYYY-DD-MM | 25655 |
| My Account App/invoices | Paid | 25810 |
| My Account App/invoices | Over due | 25811 |
| My Account App/invoices | Open | 25812 |
| My Account App/invoices | Pay | 31416 |
| My Account App/invoices | File not found | 25000 |
| My Account App/invoices/pay | Pay Invoice [<h1> heading, the space and the Invoice No. will be added automatically] | 25824 |
| My Account App/invoices/pay | Please select your method of payment: | 25322 |
| My Account App/invoices/pay | Pay with PayPal | 25524 |
| My Account App/invoices/pay | Paysera | 25538 |
| My Account App/invoices/pay | Pay with Paymark | 25543 |
| My Account App/invoices/pay | Pay [button] | 25516 |
---
Allowing Contacts to Use Your Website:
Go back to: