Webshop - Checkout and Payment - Payment by Paysera
This page describes paying for webshop sales using Paysera. All the settings and registers mentioned on this page are located in the Webshop and CMS module unless otherwise specified.
---
Paysera is an online payment gateway that you can use to receive payments made through the webshop. Paysera is based in Lithuania and can be used in Europe. If you would like Customers to be able to pay for webshop sales through Paysera, follow these steps after opening a business account with Paysera:
- Create a record in the Merchant ID setting in which the Partner is Paysera:

The Merchant ID setting is located in the Webshop module (not the Webshop and CMS module) and in the Point of Sales module.
Choose the Live option when you are ready to receive payments from Customers through the webshop.
- Create a record in the Payment Gateways setting with a Code and Comment and filling in the fields described below. Again, this setting is located in the Webshop module and in the Point of Sales module:
Misc Card
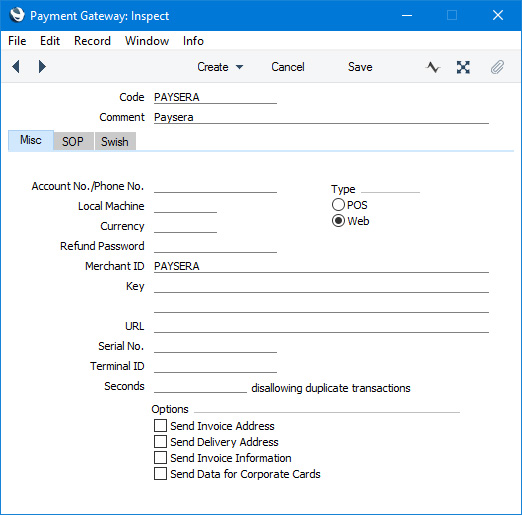
- Merchant ID
- Paste Special
Merchant ID setting, Webshop module/Point of Sales module
- Use this field to connect the Payment Gateway record to the Merchant ID record from step 1.
- Type
- Select the Web option.
SOP Card
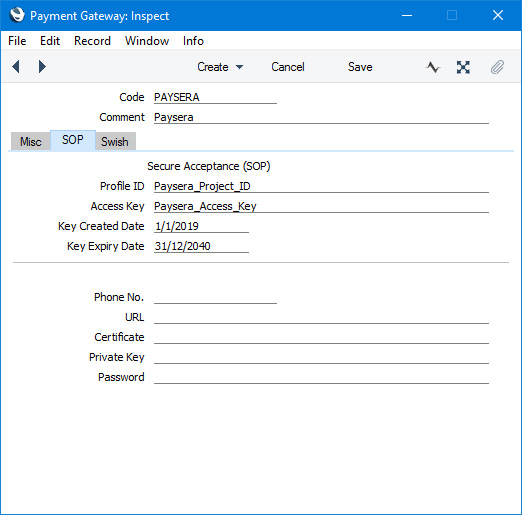
- Profile ID
- Enter your Paysera Project ID, which you can find on the My Projects page on the Paysera website.
- Access Key
- Enter your Paysera Access Key, which you can find on the Paysera website at My Projects>>Project Settings>>General Project Settings>>Project Password.
- Key Created Date, Key Expiry Date
- Paste Special
Choose date
- These fields must be filled in before you can save the Payment Gateway record. Enter the current date or an earlier date as the Created Date and a future date as the Expiry Date.
- Change to the Webshop and CMS module and enter a record in the Web Payment Methods setting. The existence of this record will add a "Paysera" option to the webshop checkout page ("Paysera" is Web Text 25538).
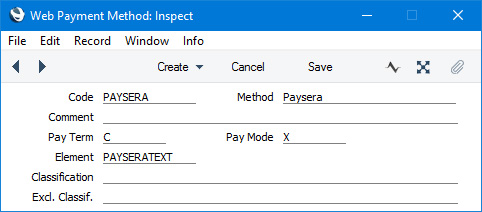
- Method
- Paste Special
Choice of possible entries
- Specify "Paysera" as the Method.
- Pay Term
- Paste Special
Payment Terms setting, Sales/Purchase Ledger
- You can specify using the Create after Payment options (step 4 below) that successful Paysera payments will cause the creation of Invoices and/or Orders in Standard ERP. Specify here the Payment Term that is to be used in those Invoices and Orders.
- As the payments will have been successful, this should usually be a Payment Term whose Type is "Cash".
- Pay Mode
- Paste Special
Payment Modes setting, Sales/Purchase Ledger
- If you specify using the Create after Payment options (step 4 below) that successful Paysera payments will cause the creation of Prepayment Receipts in Standard ERP, specify here the Payment Mode that is to be used in those Receipts.
- If successful payments will cause the creation of Invoices only, each Invoice will include a row recording the payment. The Payment Mode in this row will also be taken from this field.
- Element
- Paste Special
Element register, Webshop and CMS module
- If you would like some explanatory text and/or images to appear next to the "Paysera" option on the webshop checkout page, create an Element and connected Translation(s) for the explanatory text and then enter the Code of that Element in this field.
- Classification, Exclude Classification
- Paste Special
Contact Classifications setting, CRM module
- These fields allow you to make the Paysera payment method available to specific Customers. Enter a Classification to make it available to Customers with that Classification, and/or an Exclude Classification to deny it to Customers with that Classification. If a Customer has both the Classification and the Exclude Classification, the Exclude Classification will take priority and so Paysera will not be available. You can enter several Classifications separated by commas in both fields: only one of those Classifications has to be matched to one of the Customer's Classifications for Paysera to be made or not made available.
- Please refer to the General Payment Options page for details about the fields and options in the Webshop Company Settings setting that are used with every payment option. The Create after Payment options in this setting will be used with Paysera payments.
- If you need confirmatory emails to be sent to Customers, please refer to the Email Confirmations page.
When a Customer selects the "Paysera" option (
Web Text 25538) on the webshop checkout page and presses the [Buy] button (Web Text 25542), the consequences in Standard ERP will be as follows:
- A record will be created in the Payment Sessions setting.
- The Customer will be taken to the Paysera website where they can pay.
- Depending on the Create after Payment option that you selected in the Webshop Company Settings setting an Invoice, an Order and Invoice or an Order and Receipt will be created, with details taken from the relevant record in the Webshop Baskets setting and the Webshop Company Settings setting.
- If you followed step 5 to configure the sending of confirmatory emails to Customers, an email will be sent. If you based the email on a Customer Letter, it will not appear in anyone's Mailbox in Standard ERP, but it will be visible in the Email Queue in the Email and Conferences and Technics modules.. If you based the email on Standard Texts, it will be visible in the Admin Mailbox (as specified in the Mail and Conference Settings setting). If you are using the Lock and Send emails Automatically option, it will be sent to the Email Queue automatically.
- The record in the Webshop Baskets setting will be deleted.
- The record in the Payment Sessions setting will be marked as Completed. It will not be marked as Completed if there was an error in the creation of the Order, Invoice or Receipt e.g. If you selected "Create Order and Receipt" as the Create after Payment option and the Prepayment Receipt was not marked as OK because the On Account option has not been selected in the Contact record for the Customer.
- If you selected "Invoice Only" or "Create Order and Invoice" as the Create after Payment option, the user in the browser will be taken to /Webshop_App_Web_structure_name/payment/complete/invoice/invoice_number (e.g. http://domainname/shop/payment/complete/invoice/19001), where they will be shown the following Web Texts:
| Default Text | Web Text Code |
| | |
| Payment completed successfully | 25409 |
| Click here to see your invoice | 25411 |
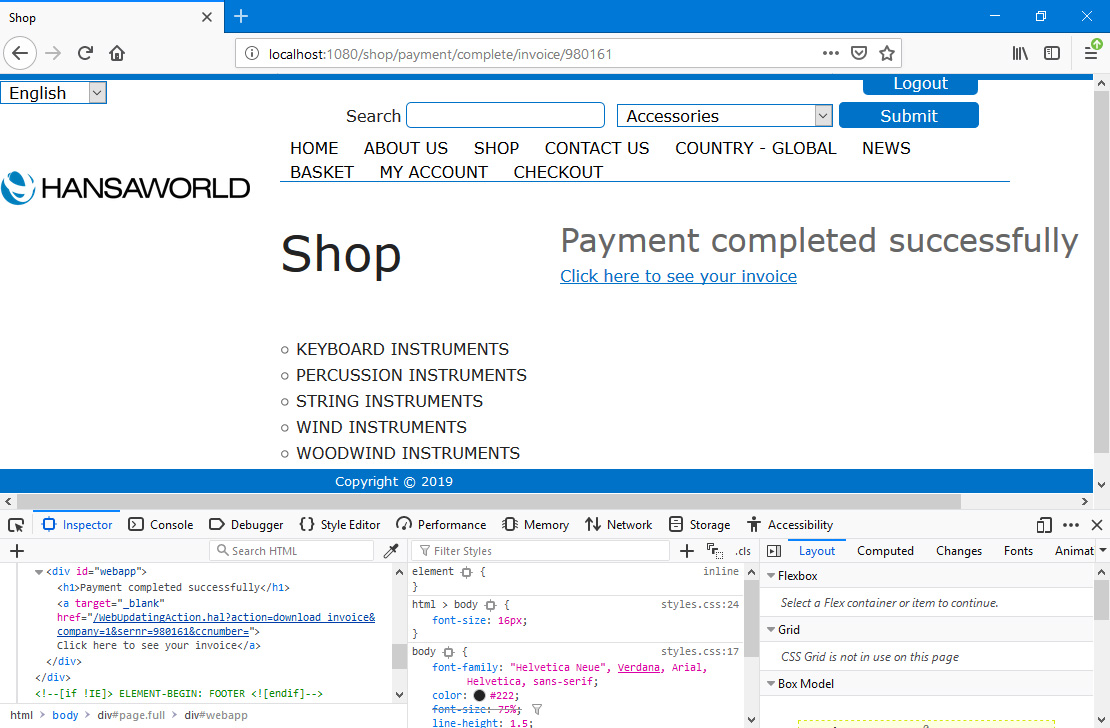
The Customer can follow the "Click here to see your invoice" link to download a PDF version of the Invoice. This will be created using the usual Form Template that you have assigned to the Invoice Form using the 'Define Form' function.
If you selected "Create Order and Receipt" as the Create after Payment option, the user in the browser will be taken to /Webshop_App_Web_structure_name/payment/complete/order/order_number (e.g. http://domainname/shop/payment/complete/order/19001), where they will be shown the following Web Texts:
| Default Text | Web Text Code |
| | |
| Order placed successfully | 25425 |
| Click here to see your order | 25410 |

The Customer can follow the "Click here to see your order" link to download a PDF version of the Order. This will be created using the usual Form Template that you have assigned to the Order Form using the 'Define Form' function.
If the payment failed, the user will be shown Web Text 25020 ("Payment failed") as an <h1> headline, followed on the next line by one of the following Web Texts:
| Default Text | Web Text Code |
| | |
| Your transaction could not be validated | 25009 |
| Invalid payment session | 25040 |
| Could not create a Payment Session | 25022 |
| You must be logged in to checkout and pay. Please log in and try again. | 25023 |
| An unknown error occurred during payment | 25019 |
The record in the Webshop Baskets setting will not be deleted if there is an error.
—
The Webshop in Standard ERP:
Go back to: