External Mail - Activating the Gateway
This page describes how to activate the Gateway so that it will receive external mail (email). Before activating the Gateway, ensure you have registered the
POP3 log-in details of your email account.
---
The method that you should use to activate the Gateway, will depend on the type of Gateway that you are using. The different types of Gateway are described here.
Automatic Gateway
To use the Automatic Gateway, follow these steps:
- Log in to the server from a normal client as a user with access to the Email and Conferences and the Technics modules.
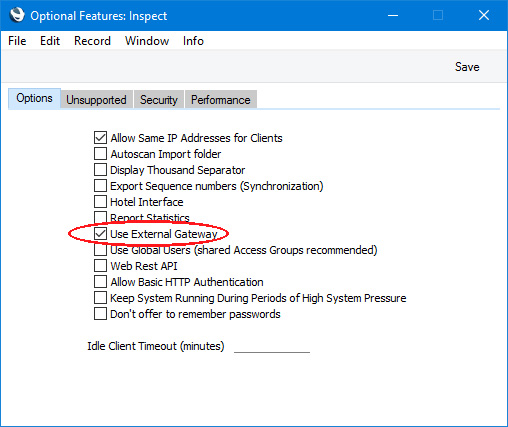
- In the Optional Features setting in the System module, tick the Use External Gateway option.
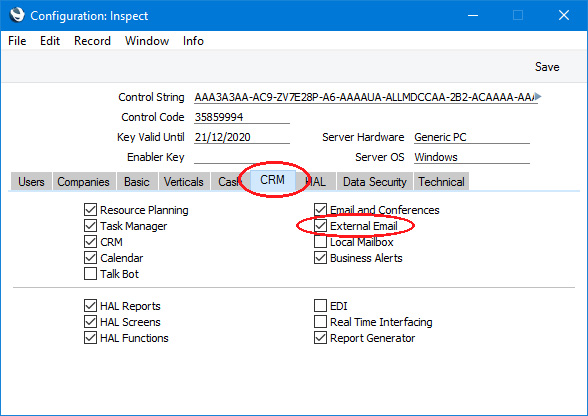
- In the Configuration setting also in the System module, ensure the External Email option on the 'CRM' card is ticked.
- Change to "Admin Client" mode.
- Return to the Email and Conferences module and open the Gateway Settings setting.
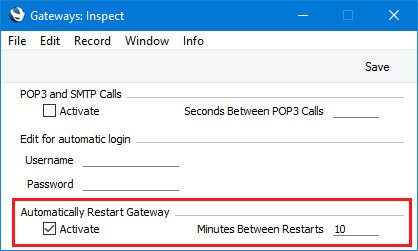
- If you need the Gateway to be restarted periodically, tick the Activate box under the "Automatically Restart Gateway" heading and specify in minutes how often the Gateway is to restart. Do not tick the Activate box under the "POP3 and SMTP Calls" heading or use the Automatic Login fields. This option should only be used with macOS servers.
- Ensure that the folder containing the Standard ERP server application also contains the "slave" version of the application. The slave version of the application is a client that does not have an interface. It is included in the Standard ERP server installer package.
The slave must have the same name as the server application, with "-Slave" or " Slave" as a suffix. If you have changed the name of the server application, you must change the name of the slave as well.
- When you are ready to receive external mail,. ensure that the Database Status is "Live" using the Database Status setting in the Technics module. When the Gateway receives incoming mail from your POP3 account(s), it will empty those accounts to ensure that mail is only received once. If the Database Status is not "Live", the Automatic Gateway will not take incoming mail from your POP3 accounts, to prevent test databases taking this mail by accident.
- Close all clients and restart the server application.
When the server restarts, it will launch the slave version of the application automatically. This will log in to the server as *GATE*. The first time the slave application starts, it will create a folder named "EmailGateway" inside the server folder. The "EmailGateway" folder will contain the slave's HDB file.
- Check the server log or server window to ensure the *GATE* user has logged in to the server. You may need to restart the server application a second time to ensure this happens.
The Gateway will connect to your POP3 server(s) and you will be able to send and receive external mail.
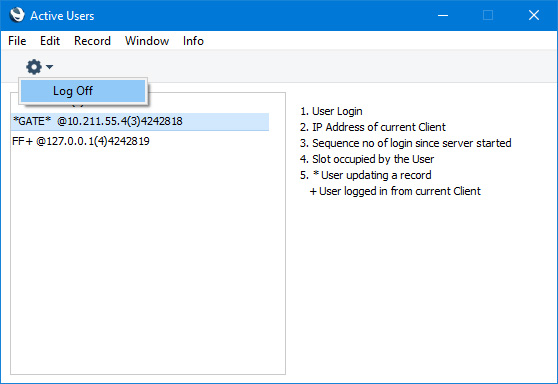
- Some settings (for example, Fiscal Years and Reporting Periods) can only be changed when a single user is logged in. If you need to change one of these settings, you will need to log the Gateway user out. To do this, open the Active Users setting in the System module, highlight the Gateway user in the list and select 'Log Off' from the Operations menu (with 'cog' icon, Windows/macOS) or Tools menu (with 'wrench' icon, iOS/Android).
Change the setting as necessary but note that the slave application will restart automatically within one minute.
External Gateway
If you will not be using an External Gateway, it will usually be because your Gateway is on a different machine to the server. This can give performance benefits in large installations.
If you are using an External Gateway on a separate machine to your main server, the Gateway machine should be connected to the internet and it should be also be able to connect to the main data server. It is not necessary for the Gateway machine to have an interface.
If you are using an External Gateway on the same machine as your main server, the Gateway folder should be separate to the server folder.
Follow these steps: the first three will prepare the main server for the Gateway, while the others will activate the Gateway itself:
- Log in to the server from a normal client as a user with access to the System module.
- In the Optional Features setting in the System module, select the Use External Gateway option.
- In the Configuration setting also in the System module, ensure the External Email option on the 'CRM' card is ticked.
- Make sure that the Person register contains a record (perhaps with a Signature such as "GATE"), as described here. This Person should be a Named User with a Mailbox and should only have access to the External Gateway module. The Person does not need to have a StandardID.
Change to the Gateway machine (or to the Gateway folder if it is on the server machine) for the following steps.
- If the Gateway machine has a graphical interface and is accessible, install the GUI and slave versions of Standard ERP on this machine, in the same folder. Launch the GUI application.
If the Gateway machine does not have a graphical interface and/or is not accessible (e.g. it is in a different building), you should work on a normal client machine to create the Gateway database, which you will then copy to the Gateway machine when the configuration work is complete. Create a new Standard ERP installation on the client machine (install the GUI and slave versions of Standard ERP in the same folder), and then launch the GUI application.
- In both cases, when the 'Welcome to Standard ERP' window appears, click the [Connect to Server] button as described on the Creating a New Database - Client page. The purpose of this database is to allow the Gateway to connect to the server, so log in using the ID created for this purpose in step 3 (e.g. "GATE").
- On logging in, you will be in the External Gateway module. The 'Server Status' window will be open, together with the Navigation Centre. If necessary, bring the Navigation Centre to the front by selecting 'Navigation Centre' from the File menu or using the Ctrl-M/⌘-M keyboard shortcut.
- Open the Gateways register (this register allows you to access the Gateway Settings setting from the External Gateway module) .
- Tick the Activate box and specify in seconds how often the Gateway is to check for incoming and outgoing mail.
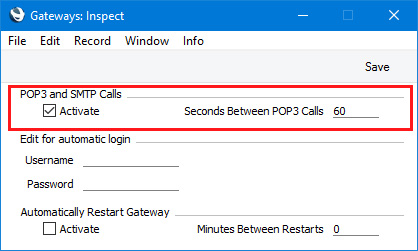
Optionally you can also enter the Signature (log-in ID) (e.g. "GATE") and password of the Gateway user in the Username and Password fields. If you are using the Password Security setting to force users to change their passwords periodically, it is recommended either that you do not enter the log-in ID and password or that you select the Password never expires option in the Person record for the Gateway user. Otherwise, when the Gateway user's password expires, it will no longer be able to log in to the main server, and it will be inconvenient to enter a new password in this setting if the Gateway machine does not have an interface or is inaccessible.
- Close the Standard ERP client application that you were using to configure the Gateways register.
- If you have been carrying out the configuration work from step 4 onwards on the Gateway machine itself, start the slave application as described under the 'Starting the Slave Application' heading below.
If you were not working on the Gateway machine, copy the Standard ERP folder that you were using from step 4 onwards from the client machine to the Gateway machine. Then, remove the folder from the client machine. Finally, start the slave application on the Gateway machine remotely, as described under the 'Starting the Slave Application' heading below.
The Gateway will connect to your POP3 server(s) and you will be able to receive external mail.
- If you need to close the slave application on the Gateway at any time, bring the Command Prompt (Windows) or Terminal (macOS or Linux) window to the front and press the Ctrl-C key combination.
- If you need to restart the main server, you will need to restart the Gateway as well, as described below.
Starting the Slave Application
If the Gateway is a macOS or Linux machine:
- Launch the Terminal application using the Terminal icon in the Panel or Dock (or from the "Utilities" folder in the "Applications" folder).
- Change to the "StandardERPServer" directory by typing:
- cd /Applications/StandardERPServer
(this example assumes you have retained the default directory structure)
- Type:
- ./StandardERPServer-Slave --gateway
This instruction will launch the slave application and cause it to act as a Gateway. This example assumes the application is named "StandardERPServer-Slave". If this is not the case, type the application name after "./".
If you did not fill in the Username and Password fields in the Gateways register as mentioned in step 8, add them to the instruction as parameters:
- ./StandardERPServer-Slave --gateway --autouser GATE --autopassword password
If the password will change from time to time, it will be easier to change it this way rather than in the Gateways register.
You can also use a parameters.txt file as described immediately below.
If the Gateway is a Windows machine, you can work on the machine itself if it has an interface, or otherwise you should use a remote desktop connection. Follow these steps:
- Use Notepad or a similar text-editing program to create a text file named "parameters.txt". Save this file in the directory containing the slave application. The file should contain a single line of text:
- --gateway
If you did not fill in the Username and Password fields in the Gateways register as mentioned in step 8, add them to the parameters.txt file:
- --gateway --autouser GATE --autopassword password
If the password will change from time to time, it will be easier to change it in the parameters.txt file rather than in the Gateways register.
- Start the slave application by double-clicking or by opening the Command Prompt, navigating to the directory containing the slave application and typing:
- standard erp server slave
(where "standard erp server slave" is the name of the slave application).
---
Configuring Mail in Standard ERP:
Go back to: