Restaurant Settings
This page describes the Restaurant Settings setting in the Restaurant module.
---
The Restaurant Settings setting contains some miscellaneous options controlling the behaviour of various aspects of the Bar Tab window. If you have more than one Branch, you can set some of the options separately for each Branch using the Restaurant Setup setting.
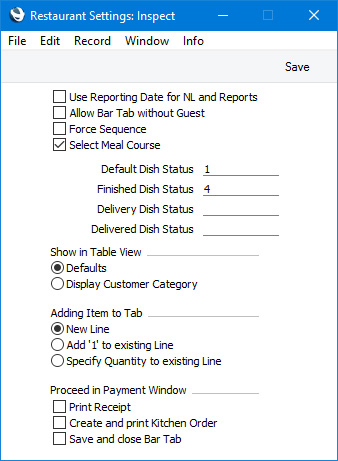
To open the Restaurant Settings setting, first ensure you are in the Restaurant module. Then, if you are using Windows or macOS, click the [Settings] button in the Navigation Centre or use the Ctrl-S/⌘-S keyboard shortcuts and then double-click 'Restaurant Settings' in the 'Settings' list. If you are using iOS or Android, select 'Settings' from the Tools menu (with 'wrench' icon) and tap 'Restaurant Settings' in the 'Settings' list. The 'Restaurant Settings: Inspect' window will open:
When the setting is complete, click the [Save] button (Windows/macOS) or tap √ (iOS/Android) in the Button Bar to save the changes. To close the window without saving changes, click the close box (Windows/macOS) or tap < (iOS/Android).
- Use Reporting Date for NL and Reports
- Use this option to specify what the date will be in a Nominal Ledger Transaction created by the 'Cash Up' Maintenance function when it closes a work session that lasted for more than one day. The 'Cash Up' function will create a POS Balance record in which the Reporting Date is the date when the work session was opened. If you are using this option, this Reporting Date will be used as the date in the Nominal Ledger Transaction. If you are not using this option, the current date (i.e. the date when the work session was closed) will be used as the date in the Nominal Ledger Transaction.
- Force Sequence
- Select this option if you need waiters and members of bar staff to be asked automatically to choose a waiter, table and number of covers whenever they create or open a Bar Tab.
- Select Meal Course
- Select this option if you would like waiters and members of bar staff to choose a Meal Course and seat number whenever they add an Item to a Bar Tab. Please refer to the description of the Meal Courses setting here for more details.
- If you have more than one Branch, you can select this option separately for each Branch in the Restaurant Setup setting.
- Default Dish Status
- Paste Special
Dish Statuses setting, Restaurant module
- If you are using the Workflow Overview to monitor Kitchen Orders, the process of producing dishes in the kitchen should be divided into steps or stages. These steps or stages are known as Dish Statuses. Specify here the Dish Status that is to be assigned to each row in each new Kitchen Order.
- Please refer here for more details about using the Workflow Overview to monitor Kitchen Orders.
- Finished Dish Status
- Paste Special
Dish Statuses setting, Restaurant module
- If you are using the Workflow Overview to monitor Kitchen Orders, specify here the Dish Status that is to be assigned to each row in a Kitchen Order to signify that it has been completed (i.e. that the dish has been prepared). When every row in a Kitchen Order has reached the Finished Dish Status, the Kitchen Order will be removed from the Workflow Overview.
- Show in Table View
- Select one of these options to specify the information about each Table that should be shown in the Table View:
- Defaults
- The following information will be shown for each Table:
- Table Number (or Layout Name if you have specified one for a particular Table).
- Time occupied (if the Table is occupied and assigned to the current user or not assigned to any user).
- Responsible waiter's Signature (if the Table is occupied and assigned to a waiter who is not the current user).
- Display Customer Category
- In addition to the above information, the Customer Category of the Customer will be displayed if a Table is occupied. This can be useful if you need to see Tables occupied by particular types of Customer such as VIPs or corporate Customers.
- Adding Item to Tab
- A waiter or member of bar staff will usually add an Item to a Bar Tab by pressing an "Item" button. Select one of these options to specify how the button should behave if it is pressed more than once to add additional units of the same Item to the Bar Tab:
- New Line
- The second and subsequent units will be added to the Bar Tab in their own lines.
- Add '1' to existing Line
- The quantity in the existing line in the Bar Tab will be increased by 1 each time the waiter presses the "Item" button.
- Specify Quantity to existing Line
- Pressing an "Item" button for a second time will open an 'Add Quantity window:
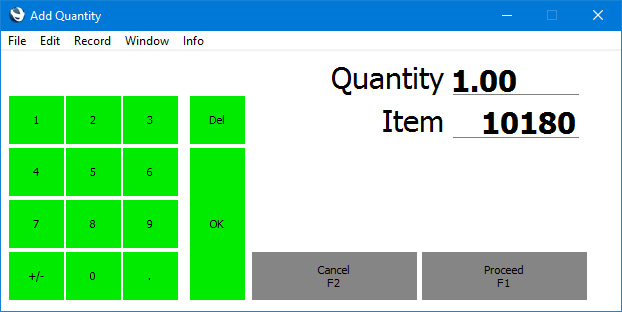
Enter the additional quantity required (not the total quantity) and press [Proceed].
- If you are printing Kitchen Orders and/or you are using Modifiers, you should select the "New Line" option. You should also use the "New Line" option if you have selected Select Meal Course above.
- Proceed in Payment Window
If a waiter or member of bar staff uses the "Pay" button to register a payment for a Bar Tab, the Bar Tab will usually remain on screen after the waiter presses the [Proceed] button. If necessary, select one or more of these options to change this behaviour:
- Print Receipt
- Prints the Bar Tab using the Bar Tab form.
- Create and print Kitchen Order
- Prints the Bar Tab using the Kitchen Order form and creates a Kitchen Order. If a Bar Tab contains Items that are to be printed on different printers (e.g. food Items that are to be printed on the kitchen printer and drinks Items on the bar printer), documents will be printed on the various printers as appropriate. You can specify Printers in the POS Button rows that add "Item" and "Display Page" buttons to the Bar Tab window.
- Save and close Bar Tab
- Closes the Bar Tab and opens a new empty Bar Tab. The Bar Tab will not be marked as finished.
---
Go back to: