POS Button Types in Bar Tabs - Navigation and Appearance
This page describes the following POS Button Types in Bar Tabs:
- All Tabs
- Blank
- Display Page
- Include Page
- Open Record
- Open Unfinished Tabs
- Run Report On Server
- Top Level
Please refer here for an index of all POS Button Types.
---
All Tabs - Function
- Allows the inspection and modification of a previous Bar Tab.
- Workflow
- Click or touch the "All Tabs" button.
- The 'Bar Tabs: Browse' window opens:
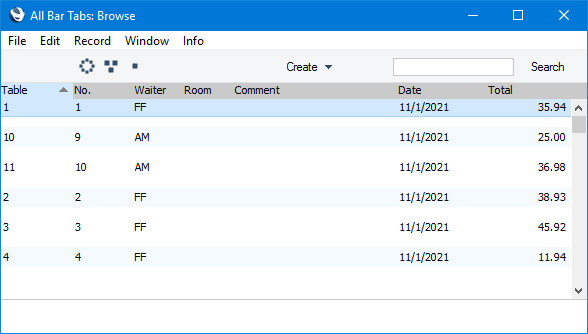
This is a list of all Bar Tabs that have been entered (including both finished and unfinished Bar Tabs). If the till or device has a live-sync connection to the server, the list will only show the Bar Tabs that were entered on that till or device. If the till or device has a live connection to the server, the list will show all Bar Tabs.
- Double-click the Bar Tab that you need to inspect or alter.
- By default, the Bar Tab will be opened in a new window. If you would like the Bar Tab to be opened in the existing window, replacing the one that was previously on screen, select the One Active Bar Tab option on the 'POS' card in the Local Machine setting or each till and device (or, if you are using devices with live-sync connections to the server, in the records for the devices in the Local Settings setting in the Technics module).
- Note
- This button opens a list of all Bar Tabs (including finished and unfinished Bar Tabs), from where you can open a Bar Tab for inspection or modification. If you want to open a list that only shows unfinished Bar Tabs, use the "Open Unfinished Tabs" button described below.
- If you are using a Windows till or device, you may want to select the Wide Scroll Bars option in the Local Machine setting (or, if a till or device has a live-sync connection to the server, in the record for the till or device in the Local Settings setting in the Technics module). This may make scrolling easier on a touch-screen.
Blank- Function
- Adds a dummy button to the Button Page.
- Notes
- A dummy button can help with arranging the buttons in the Bar Tab window.
- The buttons in a Button Page will be shown in the Bar Tab window in the order in which you list them in the POS Button record, usually in rows of four. The first four buttons in the list in a POS Button record will appear in the first row of buttons in a Bar Tab, and so on. If you need the first row of buttons to contain three buttons, you can insert a "Blank" fourth button to ensure that the next button will be the first one on the second row. (The number of buttons in a row in a Bar Tab will depend on the Panel Size option and the Button Width in the Local Machine setting that you are using.)
- "Blank" buttons will be displayed as white space in the Bar Tab window. The Colour and Label that you specify when you define a "Blank" button in a POS Button record will not be used. However, you must choose a Colour or a Label, because you won't be able to save the POS Button record if the Colour field in a row is "Black" and if the Label field in the same row is empty.
Display Page- Function
- Changes the buttons shown in the button area in a Bar Tab.
- Requirements
- In the row in the POS Button record that adds the "Display Page" button to the Bar Tab window, you must enter the Page of the new POS Button record in the Code field. Use 'Paste Special' to choose the Page if necessary.
- You can also specify a Printer in the POS Button row. This allows different Items to be printed on different printers by the "Print Tab to Kitchen" button (e.g. you can specify that the food Items in a Bar Tab will be printed on the kitchen printer, while drinks Items will be printed on the bar printer). If you specify a Printer in the POS Button row, every Item added to a Bar Tab from the new Page will be printed on that printer (unless you have also specified a Printer for the POS Button for an individual Item on that Page).
- Both POS Button records (the one representing the set of buttons you are leaving, and the one representing the set of buttons you are going to) must have the same Window Class and Group.
- Workflow
- Click or touch the "Display Page" button.
- The existing set of buttons will be replaced with a new set.
- Notes
- After pressing the "Display Page" button, a button representing the new set of buttons will appear above the button area, next to the [Page 1] button. The Comment in the POS Button record representing the new set of buttons will be used as the label in this button.
- The [Page 1] button will remain visible above the button area. Waiters and bar staff can click or touch this button to go back to the set of buttons that was originally visible. If you want waiters and bar staff to be able to go to any other set of buttons, include "Display Page" buttons in each POS Button record.
Include Page- Function
- Adds the buttons from another POS Button record to the button area in a Bar Tab.
- Requirements
- In the row in the POS Button record that adds the "Include Page" button to the Bar Tab window, you must enter the Page of the new POS Button record in the Code field. Use 'Paste Special' to choose the Page if necessary.
- Both POS Button records (the one that contains the "Include Page" button, and the one containing the buttons that will be added) must have the same Window Class and Group.
- Note
- The "Include Page" button must be the last button that you list in a POS Button record. Any buttons that you list after the "Include Page" button (including other "Include Page" buttons) won't be displayed in the Bar Tab window.
Open Record- Function
- Allows a waiter or member of bar staff to go back to a previous Bar Tab after searching for it by Bar Tab Number.
- Workflow
- Click or touch the "Open Record" button.
- The 'Open Record' window opens:
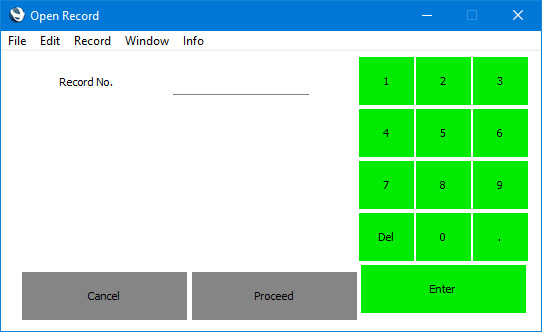
- Enter the Bar Tab Number that you need using the keypad.
- Click or touch [Proceed] to open the specified Bar Tab or [Cancel] to return to the existing Bar Tab without change.
- The specified Bar Tab is opened, replacing the one that was previously on screen.
- Notes
- If you are using the Limited Access feature and you have specified in the Person record for a waiter or member of bar staff that they will only be able to see their own Bar Tabs or those belonging to members of their Sales Group, the 'Open Record' window will not close on pressing [Proceed] if they do not have access to the specified Bar Tab.
- If the till or device uses a live-sync connection to the server, the waiter or member of bar staff will only be able to open Bar Tabs that were entered on that till or device. If the till or device has a live connection to the server, they will be able to open any Bar Tab, subject to the previous paragraph
Open unfinished Tabs- Function
- Allows a waiter or member of bar staff to go back to a previous unfinished (parked) Bar Tab.
- Workflow
- Click or touch the "Open unfinished Tabs" button.
- The Bar Tab currently on screen will be closed (any changes will be saved automatically) and the 'Open Bar Tabs: Browse' window will open:
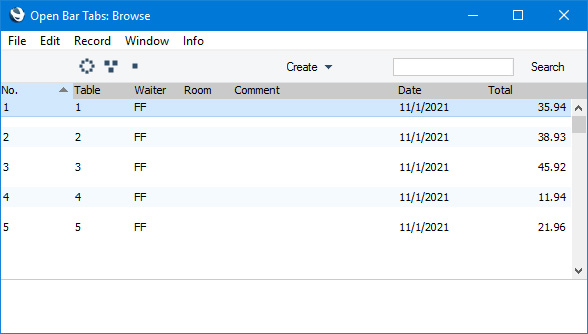
This is a list of unfinished (parked) Bar Tabs. If the till or device uses a live-sync connection to the server, the list will only show the Bar Tabs that were entered on that till or device. If the till or device has a live connection to the server, the list will show all unfinished Bar Tabs.
- Highlight the Bar Tab that you need to alter and click or touch the [Open Tab] button at the top of the window.
- The Bar Tab will be opened on screen.
- Notes
- This button opens a list of unfinished Bar Tabs, allowing you to open and continue processing an Invoice that had previously been parked.
- If you want to open a list of all Bar Tabs (i.e. including finished Bar Tabs), use the "All Tabs" button described above.
- If you are using a Windows till or cash machine, you may want to select the Wide Scroll Bars option in the Local Machine setting (or, if a till has a live-sync connection to the server, in the record for the till in the Local Settings setting in the Technics module). This may make scrolling easier on a touch-screen.
Run Report On Server- Function
- Prints a report on a live-sync client containing information from the server database.
- Requirements
- In the row in the POS Button record that adds the "Run Report On Server" button to the Bar Tab window, you must use the Code field to specify the report that will be produced when the button is clicked or touched. You must specify the specification window and the report name, separated by a comma. For example, if the button will produce a Balance Sheet report, the Code field should contain "BalRClass,BalRn".
- The live-sync client must be connected to the server when you run the report.
- Workflow
- Click or touch the "Run Report On Server" button.
- The specification window for the report will open.
- Complete the specification window as usual.
- Click or touch the [Run] button. The report will be printed to the till's screen or printer (depending on the Media option that you choose).
- If nothing happens when you press the [Run] button, the probable reason is that the client is not connected to the server.
Top Level- Function
- If you have used a "Display Page" button to change the buttons that are visible in a Bar Tab, the "Top Level" button will take you back to the original set of buttons (i.e. the set of buttons that is shown in new Bar Tabs).
- Workflow
- Click or touch the "Top Level" button.
- The existing set of buttons will be replaced with the "Page 1" set of buttons.
- Note
- The "Top Level" button has the same function as the [Page 1] button that is always visible above the button area.
---
Configuring the Bar Tab Window:
Go back to:
|