POS Button Types in Bar Tabs - Item and Pricing Functions
This page describes the following POS Button Types in Bar Tabs:
- Add Discount
- Add Service Charge
- Item
- Item Search
- Modifier
- Price Lookup
Please refer here for an index of all POS Button Types.
---
Add Discount - Function
- Adds a discount percentage to each line in a Bar Tab.
- Requirements
- Requires a supervisor to log in: can only be used by a waiter, member of bar staff or supervisor whose Access Group gives access to the 'Add Discount to Bar Tab' Action.
- Workflow
- Click or touch the "Add Discount" button.
- If the waiter or member of bar staff does not have the necessary access right, the 'Login' window will appear, allowing a supervisor to log in.
- The supervisor should enter the discount percentage in the 'Add Order Discount' window:
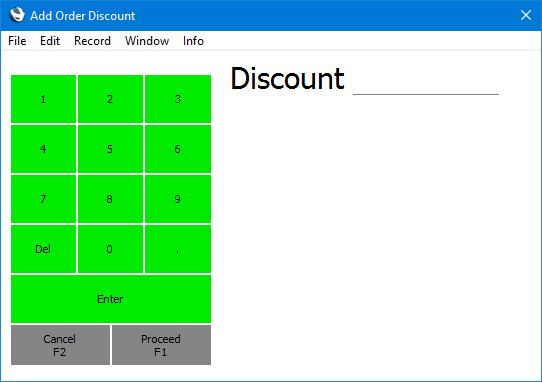
- Click or touch the [Proceed] button in the 'Add Order Discount' window to add the discount percentage to the Bar Tab or [Cancel] to return to the Bar Tab without amending it.
- The discount percentage will be applied to each line in the Bar Tab.
- Control of the till or hand-held device will be passed back to the waiter or member of bar staff.
- Note
- The discount percentage will not be applied to subsequent lines in the Bar Tab, but you can use the "Add Discount" button again.
Add Service Charge- Function
- Adds a Service Charge to a Bar Tab.
- Requirements
- A record for the till or hand-held device must exist in the Service Charges setting. This record will contain the percentage that will be used to calculate the Service Charge.
- You should also specify a Service Charge Item in the Account Usage Restaurant setting. Service Charges will be credited to the Sales Account specified in this Item.
- Workflow
- Click or touch the "Add Service Charge" button.
- The Service Charge will be added to the Bar Tab.
- Notes
- If you add an Item to a Bar Tab after adding the Service Charge, the Service Charge will be removed. Use the "Add Service Charge" button again to add a new Service Charge to the Bar Tab.
- You can configure records in the Service Charges setting so that Service Charges are added to all Bar Tabs automatically. In this case the Service Charge will always be visible in a Bar Tab, and it will be recalculated with every change.
- If you need to remove a Service Charge from a Bar Tab, use the "Delete Row" button (not the "Void Item" button).
Item- Function
- Adds a specific Item to a Bar Tab.
- Requirements
- In the row in the POS Button record that adds the "Item" button to the Bar Tab window, you must enter an Item Number in the Code field, using 'Paste Special' if necessary. This is the Item that will be added to the Bar Tab when the waiter or member of bar staff clicks or touches the button.
- You can also specify a Printer in the POS Button row. This allows different Items to be printed on different printers by the "Print Tab to Kitchen" button (e.g. you can specify that the food Items in a Bar Tab will be printed on the kitchen printer, while drinks Items will be printed on the bar printer). You can also use "Display Page" buttons to specify the printer.
- Workflow
- Click or touch the "Item" button.
- The relevant Item will be added to the Bar Tab.
- Optional Additional Workflow
- If you are using the Select Meal Course option in the record for the Branch in the Restaurant Setup setting or in the Restaurant Settings setting and if you have already specified a Table in the Bar Tab, a 'Select Meal Course' window will open:
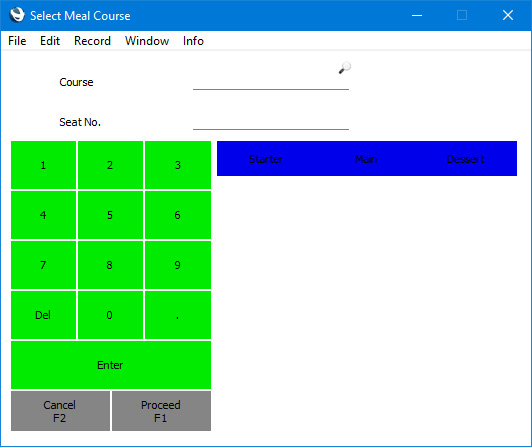
- Choose a Meal Course using 'Paste Special' or by pressing the relevant button and enter the Seat No. of the guest who chose the dish.
- Click or touch [Proceed] to add the Item to the Bar Tab or [Cancel] to leave the Bar Tab as it was.
- Note
- The "Item" and "Item Search" buttons are the only ways to add Items to Bar Tabs.
- If you press a particular "Item" button more than once, the Adding Item to Tab options in the Restaurant Settings setting will determine how the second and subsequent units of the Item will be added to the Bar Tab, as follows:
- New Line
- The second unit will be added to the Bar Tab in its own line.
- Add '1' to existing Line
- The quantity in the existing line in the Bar Tab will be increased by 1 each time you press the "Item" button.
- Specify Quantity to existing Line
- Pressing an "Item" button for a second time will open an 'Add Quantity window:
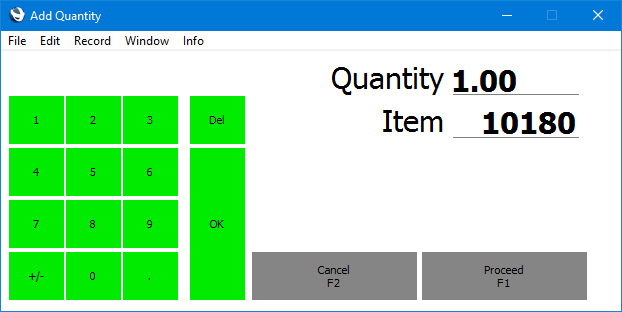
Enter the additional quantity required (not the total quantity) and press [Proceed].
If an Item is temporarily not to be sold but you do not want to remove the relevant "Item" button from the Bar Tab window (for example, the Item is out of stock/sold out but will be available again the next day), create a record for the Item in the Blocked Items setting. Pressing the "Item" button will then result in an "Item blocked" message, and the Item will not be added to the Bar Tab.
Item Search- Function
- Allows a waiter or member of bar staff to add an Item to a Bar Tab by searching for it.
- Requirements
- Can only be used on tills and devices that have keyboards.
- Workflow
- Click or touch the "Item Search" button.
- The 'Paste Item' window appears:
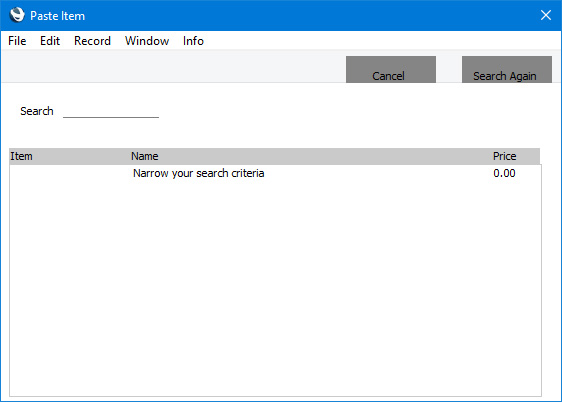
- Enter part of the Item's name or other piece of information (i.e. part of the Item Number, Description, Item Group, Alternative Code, Base Price, Barcode or the first user-defined text field) in the Search field.
Entering more than one word as the search string will be treated as a "Find Exact Phrase" search, not "Find All Words".
- Press the Enter key.
- The results of the search will be listed:
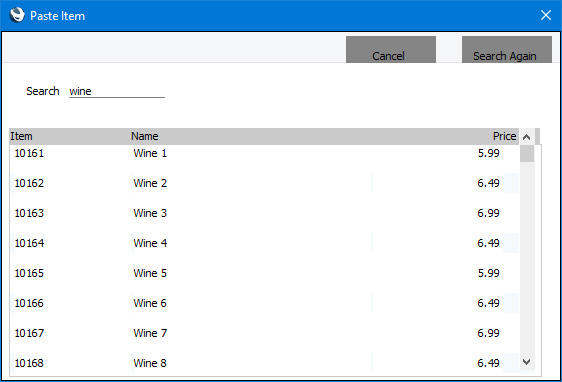
- Click or touch the Item that you need, or highlight it and press the Enter key. The Item will be added to the Bar Tab. If the Item that you need isn't listed, click or touch the [Search Again] button or close the window using the [Cancel] button, the close box or the Esc key.
- Note
- If you need different Items to be printed on different printers by the "Print Tab to Kitchen" button (e.g. you need the food Items in a Bar Tab to be printed on the kitchen printer and drinks Items on the bar printer), do not use the "Item Search" button. Items added to a Bar Tab by the "Item Search" button will not be assigned to a particular printer.
Modifier- Function
- Adds a specific Item together with selected accessories or options to a Bar Tab.
- Requirements
- The relationship between an Item and its accessories or options must be established in the Modifiers setting.
- In the row in the POS Button record that adds the "Modifier" button to the Bar Tab window, you must specify a Modifier record in the Code field, using 'Paste Special' if necessary. This means you should add a separate POS Button for each Item that is sold together with accessories or options.
- Workflow
- When a Customer purchases an Item with Modifiers, the waiter or member of bar staff should click or touch the relevant "Modifier" button. (You should not have provided an "Item" button for the Item.)
- A 'Modifiers' window will appear, containing one button for each option or accessory:
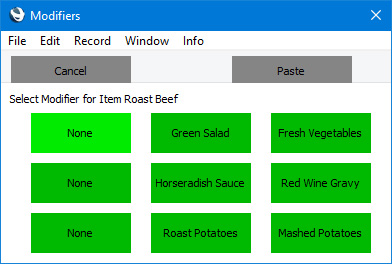
- Click or touch the button representing the option or accessory that the Customer requires. If the window contains more than one row of buttons, click or touch one option in each row.
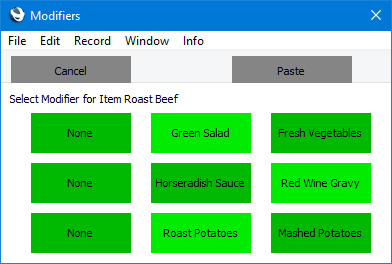
- Click or touch the [Paste] button to add the Item together with the selected options to the Bar Tab, or click or touch [Cancel] to return to the Bar Tab without adding any Items.
- Note
- Please refer here for details about Modifiers.
Price Lookup- Function
- Displays the price of an Item without adding it to a Bar Tab.
- Workflow
- Click or touch the "Price Lookup" button.
- The 'Price Lookup' window appears:
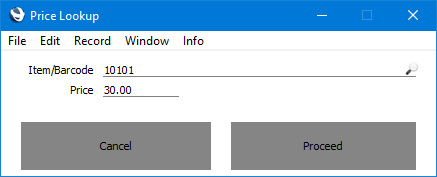
- Scan the Item's barcode, or enter its Item Number, Barcode or Alternative Code and click or touch the [Proceed] button.
- The Item's price will be displayed in the Price field.
- Click or touch the [Cancel] button to return to the Bar Tab.
---
Configuring the Bar Tab Window:
Go back to:
|