POS Button Types in Bar Tabs - Restaurant Functions
This page describes the following POS Button Types in Bar Tabs:
- Bookings
- Free Text Instruction
- Instructions
- Kitchen Order
- Merge Tabs
- Move Items to Table
- Set Covers
- Set Table
- Show Hotel Guests
- Split Tabs
See also:
---
Bookings- Function
- Opens a Restaurant Bookings report listing the Restaurant Bookings for the current date. From here waiters and bar staff can copy details (Customer, Table and number of covers) from a Reservation to a Bar Tab.
- Requirements
- Requires a record in the Restaurant Open Hours setting in which the Machine field is empty. This record will supply the maximum number of guests that will be shown in the header of the report and the hourly columns in the body of the report.
- Workflow
- Click or touch the "Bookings" button.
- A Restaurant Bookings report for the current date will be opened.
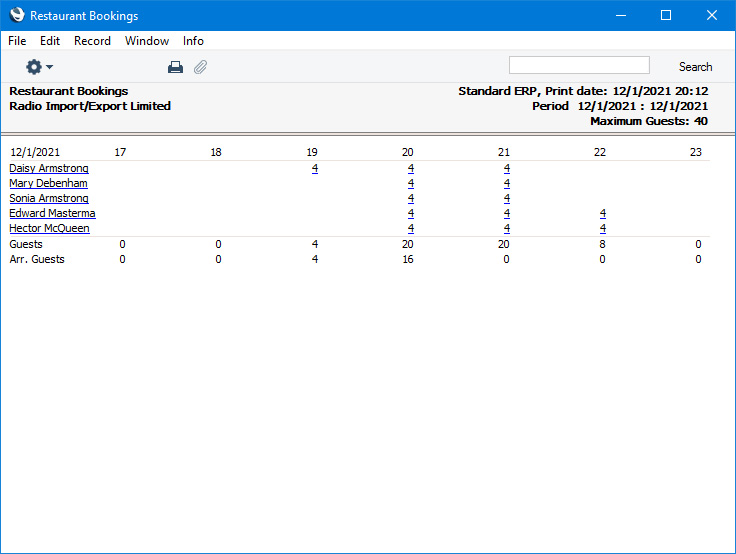
- Click or touch a number of seats in the report to open an individual Booking.
- If you need to copy the Customer, Table and number of covers from a Reservation, click or touch the name of the Customer in the first column. The report will be closed and you will be returned to the Bar Tab. The Customer, Table and number of covers in the Bar Tab will be changed as appropriate (you may need to save the Bar Tab for this change to become visible).
- Click or touch the close box to close the report.
- Notes
- If you need to prevent a waiter or member of bar staff from using the "Bookings" button, assign them to an Access Group in which you have denied access to the 'Use 'Bookings' Button on Bar Tab' Action.
- Restaurant Bookings are not synchronised. Therefore you can only use this button on a till or device that has a live connection with the server. You cannot use it on a till or device that has a live-sync connection with the server.
- Please refer here below for details about the Restaurant Bookings report.
Free Text Instruction- Function
- Allows a waiter or member of bar staff to add a comment or instruction to an Item on a Bar Tab. Examples might be cooking instructions for meat, allergy information or requests for a dish without a particular ingredient.
- Requirements
- Can only be used on tills and devices that have keyboards. If you have tills and devices without keyboards, consider using the "Instructions" button instead.
- Workflow
- Highlight the line in the Bar Tab that requires a comment or instruction. The last line added to the Bar Tab will be highlighted by default.
- Click or touch the "Free Text Instruction" button.
- Enter the comment or instruction in the 'Enter Free Text' window:
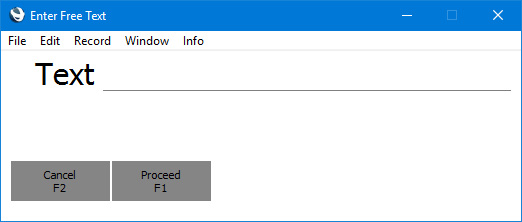
- Click or touch the [Proceed] button in the 'Enter Free Text' window to add the comment or instruction to the Bar Tab or [Cancel] to return to the Bar Tab without amending it.
- A line containing the comment or instruction will be added to the Bar Tab below the Item highlighted in step 1.
- Note
- It is recommended that you add all instructions before using the "Kitchen Order" or "Print Tab to Kitchen" button s to create a Kitchen Order from the Bar Tab. This will ensure the instructions are listed underneath the relevant Items in the Kitchen Order (as in the Bar Tab itself) and, in the case of the "Print Tab to Kitchen" button, printed that way as well.
Instructions- Function
- Allows a waiter or member of bar staff to add a comment or instruction to an Item on a Bar Tab. Examples might be cooking instructions for meat, allergy information or requests for a dish without a particular ingredient.
- Requirements
- Unlike the "Free Text Instruction" button, the "Instructions" button can be used on tills and devices without keyboards. You will need to add separate buttons for each possible button (e.g. separate buttons for "Rare"., "Medium" and "Well Done").
- In the row in the POS Button record that adds the "Instructions" button to the Bar Tab window, you can optionally enter some free text in the Code field. This is the text (i.e. the instruction) that will be added to the Bar Tab when the waiter or member of bar staff clicks or touches the button. If there is no free text in the Code field, the Label of the button will be added to the Bar Tab as the instruction.
- Workflow
- Highlight the line in the Bar Tab that requires a comment or instruction. The last line added to the Bar Tab will be highlighted by default.
- Click or touch the relevant "Instructions" button.
- A line containing the comment or instruction will be added to the Bar Tab below the Item highlighted in step 1.
- Note
- It is recommended that you add all instructions before using the "Kitchen Order" or "Print Tab to Kitchen" button s to create a Kitchen Order from the Bar Tab. This will ensure the instructions are listed underneath the relevant Items in the Kitchen Order (as in the Bar Tab itself) and, in the case of the "Print Tab to Kitchen" button, printed that way as well.
Kitchen Order- Function
- Creates a Kitchen Order for the Items on a Bar Tab.
- Workflow
- When every Item has been added to a Bar Tab, click or touch the "Kitchen Order" button.
- The 'Kitchen Order: New' window appears:
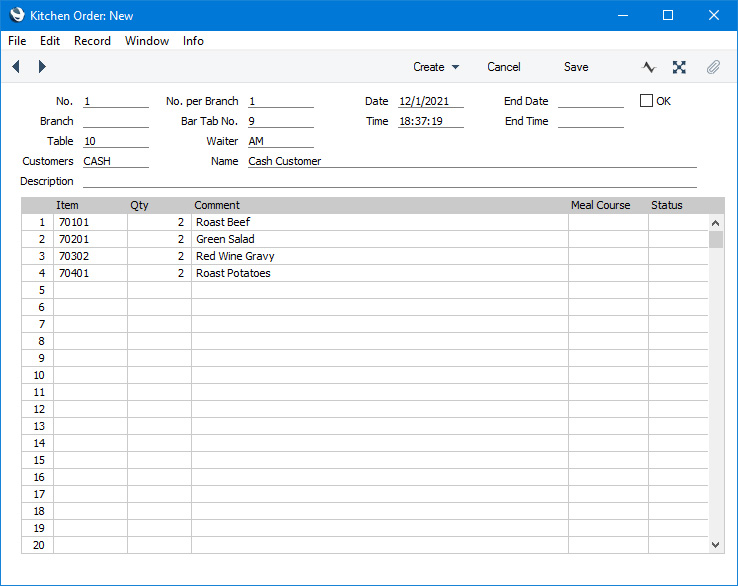
- Click or touch the [Save] button to save the Kitchen Order and close the window, or [Cancel] to close the window without saving.
- Notes
- The "Kitchen Order" button creates a Kitchen Order but does not print it. This will be useful if you are using the Workflow Overview to manage Kitchen Orders. If you need the Kitchen Order to be created and also printed, use the "Print Tab to Kitchen" button.
- If a Customer orders an Item after the Kitchen Order has been created, pressing the "Kitchen Order" button again will create a new Kitchen Order for the additional Item.
- If you press the "Kitchen Order" button in a Bar Tab before you have saved the Bar Tab for the first time, the Bar Tab will be saved before the Kitchen Order is created.
Merge Tabs- Function
- Allows a waiter or member of bar staff to merge two Bar Tabs into one.
- Workflow
- Open the Bar Tab that is to be the active Bar Tab.
- Click or touch the "Merge Tabs" button. The 'Merge Bar Tab' window will be opened:

- Enter the Number of the Bar Tab that is to be merged or open 'Paste Special' if you need to select the Bar Tab by Table Number.
- Click or touch the [Proceed] button in the 'Merge Bar Tab' window to merge the Bar Tabs or [Cancel] to return to the Bar Tab without any changes.
- The Items and any payments in the Bar Tab that is to be merged will be brought in to the Bar Tab that is currently on screen (the Bar Tab that is to continue as the active Bar Tab). The Bar Tab that is to be merged will be marked as Closed, and will not be included in the Cash Up or Update Stock routines.
- Note
- The Bar Tab that is to be merged must be an open Bar Tab i.e. it must not have been finished or already merged.
Move Items to Table- Function
- Moves an Item from one Table to another (i.e. from one Bar Tab to another).
- Workflow
- Highlight the line in the Bar Tab that is to be moved. The last line added to the Bar Tab will be highlighted by default.
- Click or touch the "Move Items to Table" button. The 'Move Item to Table' window opens:
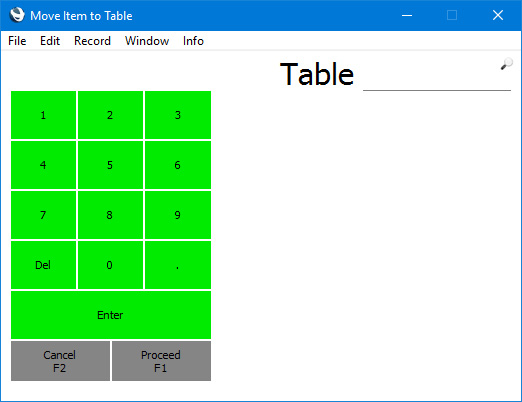
- Specify the Table to which the Item is to be moved, using 'Paste Special' if necessary. The 'Paste Special list will only include occupied Tables.
- Click or touch the [Proceed] button in the 'Move Item to Table' window to move the Item or [Cancel] to return to the Bar Tab without any changes.
- The Item will be moved to the Bar Tab assigned to the chosen Table.
Print Tab to KitchenUse the "Print Tab to Kitchen" button when you need to print a Bar Tab using the Bar Tab Kitchen Order form and create a Kitchen Order for the Items on the Bar Tab. Please refer to the page describing POS Button Types connected with processing Bar Tabs for full details.
Set Covers- Function
- Allows a waiter or member of bar staff to specify the number of guests sitting at a Table.
- Workflow
- Click or touch the "Set Covers" button. The 'Set Covers' window opens:
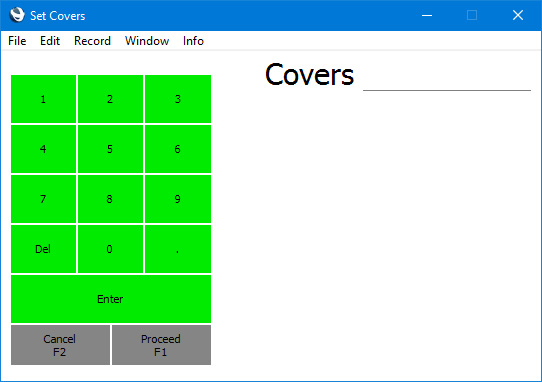
- Enter the number of covers.
- Click or touch [Proceed] to add the number of covers to the Bar Tab or [Cancel] to return to the Bar Tab without adding it.
- Note
- The number of covers will be shown at the top of the Bar Tab:

If you are using the Force Sequence option in the Restaurant Settings setting, you will be asked to specify a waiter, Table and number of covers whenever you create or open a Bar Tab. The Force Sequence option will also mean that you will always be asked to specify a number of covers after changing the Table in a Bar Tab.
Set Table- Function
- Allows a waiter or member of bar staff to assign a Bar Tab to a Table.
- Requirements
- The behaviour of the "Set Table" button will depend on whether you are using Table Views (floor plans).
- Using Table Views requires the following configuration:
- List the Table Views in the Table Views setting.
- Assign each Table to a Table View.
- Assign each device to a Table View using the Local Machine setting in the User Settings module (or, if you have devices that will use live-sync connections to the server, in the records for these devices in the Local Settings setting in the Technics module).
- In the row in the POS Button record that adds the "Set Table" button to the Bar Tab window, you can optionally enter a Table View in the Code field (or choose a Table View using 'Paste Special'). This is the Table View that will be opened when the waiter or member of bar staff clicks or touches the button. If you do not enter a Table View in the Code field, the Table View from step iii will be opened.
- Workflow (without Table Views)
- Click or touch the "Set Table" button. The 'Set Table' window opens:
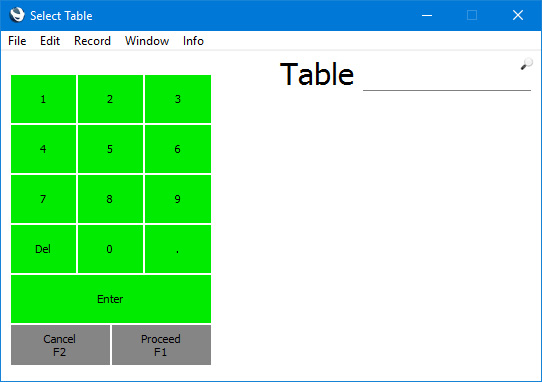
- Enter the Table, using 'Paste Special' if necessary. The 'Paste Special list will only include unoccupied Tables in the current Branch, together with the number of seats at each Table. The current Branch is the one specified in the Local Machine setting on the till or device being used.
- Click or touch [Proceed] to add the Table number to the Bar Tab or [Cancel] to return to the Bar Tab without adding it.
- Workflow (with Table Views)
- Click or touch the "Set Table" button. A Table View selected as described in step iv under Requirements above will be opened:
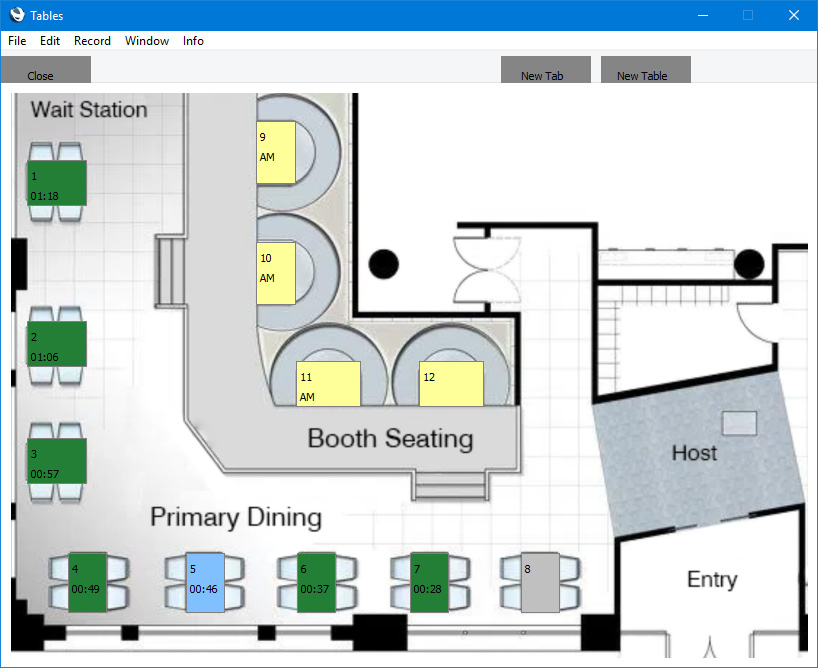
- Tables in the Table View are colour-coded as follows:
- Grey
- The Table has been assigned to the current user (the current user has been specified as the waiter for the Table) or the Table is not assigned to any waiter. The Table is not currently occupied.
- Green
- The Table has been assigned to the current user or has not been assigned to any waiter. The Table is currently occupied (it has been assigned to an open Bar Tab), with the time it has been occupied shown underneath the Table number.
- Yellow
- The Table has been assigned to a different user. The Table may or may not be occupied (if it is occupied, the waiter's Signature will be shown underneath the Table number).
- Blue
- The Table has been assigned to the Bar Tab that the waiter is working from (i.e. the Bar Tab that is open on screen and in which the waiter pressed the "Set Table" button).
- Click or touch a grey Table to select it. The Table View will be closed and the Bar Tab will be assigned to the Table (the Bar Tab will be moved to the selected Table if it was previously assigned to another Table). Alternatively, click or touch the [Close] button to close the Table View without selecting a Table.
- Notes
- The Table number will be shown at the top of the Bar Tab:
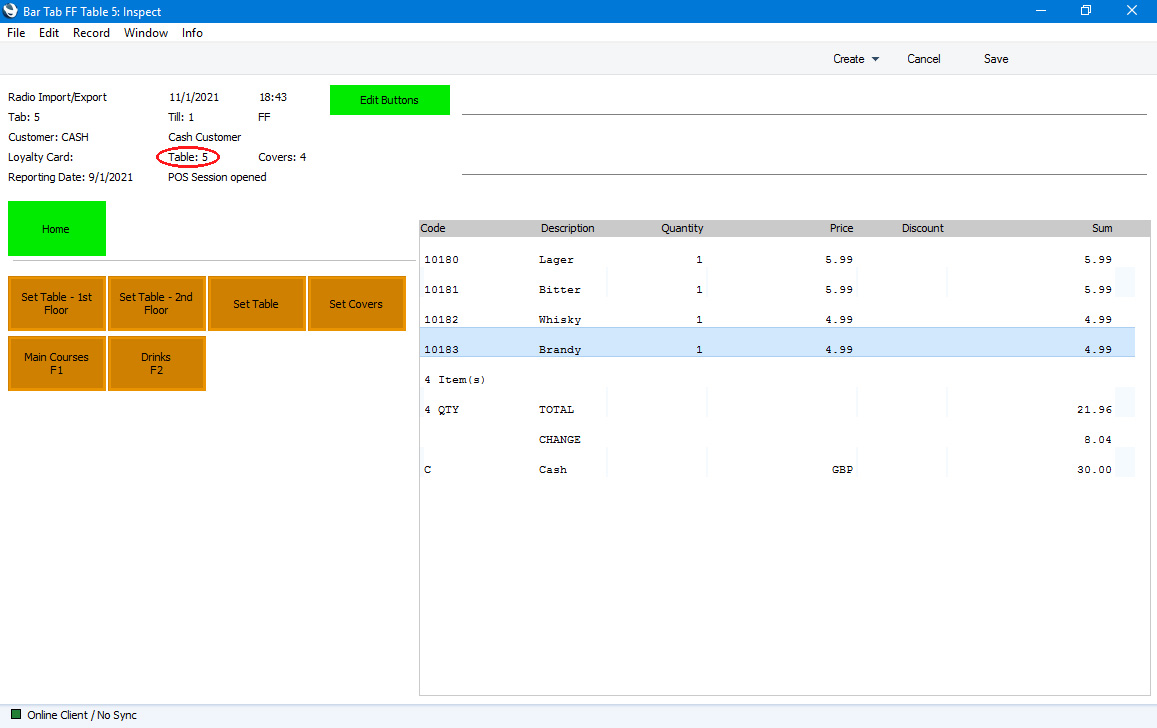
If you are using Table Views, the number of covers will also shown at the top of the Bar Tab, brought in from the relevant Table record. As this is the maximum number of covers for the Table, you may need to change it using the "Set Covers" button.
- If you are using Table Views, a waiter can only select Tables that have been assigned to them or that have not been assigned. A waiter can only assign a single Bar Tab to a particular Table. If you are not using Table Views, a waiter can select any Table, and can assign more than one Bar Tab to a particular Table.
- If you are using the Force Sequence option in the Restaurant Settings setting, you will be asked to specify a waiter, Table and number of covers whenever you create or open a Bar Tab. The Force Sequence option will also mean that you will be asked to specify a Table and then a number of covers after using the "Select Waiter" button to change the waiter in a Bar Tab.
- If you are using the Select Meal Course option in the record for the Branch in the Restaurant Setup setting or in the Restaurant Settings setting, you must specify a Table in a Bar Tab before adding any Items. You may therefore choose to use the Force Sequence option mentioned above as well. If you are using the Select Meal Course option, a 'Select Meal Course' window will appear asking you to specify a Meal Course and Seat No. after adding each Item to a Bar Tab. The 'Select Meal Course' window will not appear if you have not specified a Table.
Show Hotel Guests- Function
- Prints an In-House Guests report to screen. This is a list of guests currently checked in to the hotel. From here waiters and bar staff can charge a Bar Tab to a Hotel Reservation (i.e. to a hotel room account).
- Workflow
- Click or touch the "Show Hotel Guests" button.
- An In-House Guests report listing the guests currently checked in to the hotel will be printed to screen.
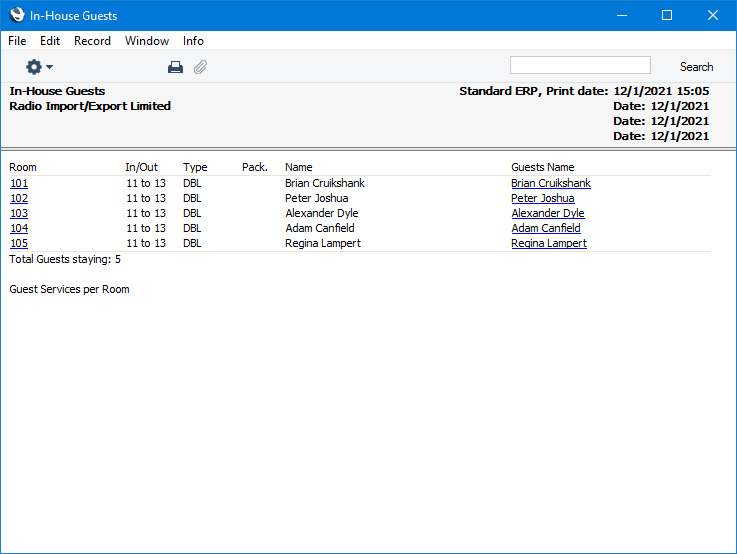
- Depending on the device you are using, you will be able to print the report using the Printer icon at the top of the report window.
- If you are producing the report for reference, close the report by clicking or touching the close box.
- If you need to assign the Bar Tab to a Guest, click or touch the name of the Guest in the last column. The report will be closed and you will be returned to the Bar Tab. The Customer in the Bar Tab will be changed as appropriate (you may need to save the Bar Tab for this change to become visible).
- You will be returned to the Bar Tab.
- Add any further Items to the Bar Tab as needed.
- Click or touch the "Finish" button. The Bar Tab will be saved and closed, and a new one opened. The Items on the Bar Tab will be added to the hotel room account.
- Notes
- By default, the Items on the Bar Tab will be listed individually on the hotel room account. However, if you specify a Tab Item Code in the Tab Item Group register on a particular till or device, a single line with the Tab Item Code and Item Name and the total value of the Bar Tab will be added to the hotel room account.
- If you do not want it to be possible to assign Bar Tabs to a particular Guest, use 'Paste Special' to select "Do not allow" in the Bar Tabs field in the row representing the Guest on the 'Guest' card in the relevant Hotel Reservation. You will be prevented from assigning the Bar Tab to the Guest when you save the Bar Tab.
- An alternative to the "Show Hotel Guests" button that you can use is the "On Hotel Guest Account" button. This you to assign Bar Tabs to hotel guest accounts without necessarily using the In-House Guests report.
- Hotel Reservations are not synchronised. Therefore you can only use this button on a till or device that has a live connection with the server. You cannot use it on a till or device that has a live-sync connection with the server.
Split Tabs- Function
- Allows a waiter or member of bar staff to divide a Bar Tab into two.
- Requirements
- Can only be used on tills and devices that have keyboards.
- Workflow
- Save all changes to the Bar Tab.
- Click or touch the "Split Tabs" button.
- A window will open, listing the Items on the Bar Tab:
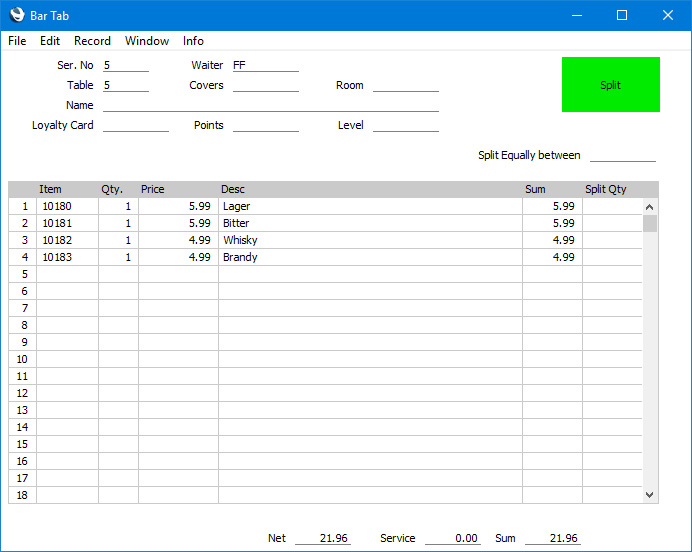
- If you need to split the Bar Tab equally between a number of persons, enter that number in the Split Equally between field and press the [Split] button. An appropriate number of Bar Tabs will be created with the correct quantities. For example, if a Bar Tab includes an Item with quantity 4 and it is split equally between four persons, the quantity in the existing Bar Tab will be changed to 1 and three new Bar Tabs each with quantity 1 will be created.
- If you need to split the Bar Tab on a more ad hoc basis, use the Split Qty field in the matrix, enter the quantities of each Item that are to be transferred to a new Bar Tab and press the [Split] button. The new Bar Tab will be opened on screen.
- Note
- If you need to prevent a waiter or member of bar staff from using the "Split Tabs" button, assign them to an Access Group in which you have denied access to the 'Use 'Split' Button on Bar Tab' Action.
---
Configuring the Bar Tab Window:
Go back to:
|