Assembly in Stages
A single Production record represents the process of removing components from stock and assembling them into the final Item. The removing of components from stock, the adding of the final Item to stock and the updating of the stock valuation in the Nominal Ledger all occur at the same moment. A single Production record cannot therefore represent a complex Production process with several assembly stages, where components are not all removed from stock at the same time. To meet this requirement, you can use Routings and Production Operations to divide a Production into stages, with the following benefits:
- You can record each stage of the Production process separately, so you will always know exactly how each Production is progressing;
- Components will be removed from stock as you use them, not at the end of the entire Production process; and
- You can record Work in Progress in the Nominal Ledger.
We will adapt the example hifi rack to illustrate the use of multi-stage Productions by dividing the assembly process into the following stages:
- The rack will include five shelves. Each shelf will consist of a glass sheet on a metal frame. The glass will sit on rubber seats to isolate it from the metal.
The first stage is to construct the metal frames by welding square-section metal tubes together.
- The left and right sides of the metal frames will each be attached to a metal support, and each support will have two spiked feet.
The second stage is to construct the two metal supports by pressing metal sheet into shape and welding sections together.
- Holes will be drilled in the frames for the rubber seats, and threaded holes will be drilled in the supports for the spiked feet.
- The frames and supports will be painted.
- The rubber seats will be pressed into the frames.
- The spiked feet will be screwed into the supports.
- The final assembly stage will see the frames and supports joined together using hex bolts and the glass shelves will be placed on the frames. Final cosmetic tidying will see plastic end caps being placed on the ends of the supports.
While the first two stages can be completed simultaneously, the others must be completed in order. For example, the components cannot be painted before they have been built, and final assembly cannot take place until the paint has dried.
To divide the Production process into the seven stages, follow these steps:
- The first step is to determine the stage to which each component belongs. Open the Recipe and go to flip B:
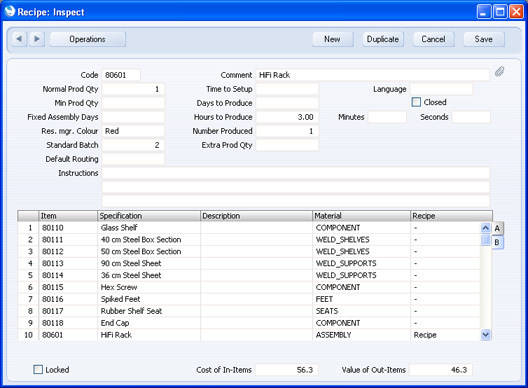
Assign a Material to each Input Item (and to the Output Item as well).
A "Material" is a generic name for the type of Input Item (for example, "FEET" or "SEATS"), or for the task (for example, "WELD_SHELVES"). In essence, the Material indicates the Input Items that will be used during a particular Production stage. In this example, the Input Items marked "WELD_SHELVES" will be used for stage i (constructing the metal shelf frames), while the Input Items marked "WELD_SUPPORTS" will be used for stage ii (constructing the metal supports). When stage i is completed, all Input Items marked "WELD_SHELVES" will be removed from stock, as this stage requires those Input Items to be welded together to produce five shelf frames.
The three Input Items marked "COMPONENT" will all be used (removed from stock) at the same time. If they were to be used at different stages in the Production process, we would need to differentiate their Materials, for example to "COMPONENT_A", "COMPONENT_B" and so on. In fact this has been done in the example: the spiked feet and rubber seats could also be described as components, but they will be needed at different times in the process.
The Output Item should also be given a Material. This Material controls when the Output Item will be added to stock.
In this example, no Input Item has been given a Material such as "PAINT". This is because no Input Items will be used during stage iii (painting the frames and support). This is for illustrative purposes in the example only: in reality it would be necessary to monitor paint usage and therefore paint would be an Input Item in the Recipe.
As shown in the illustration, there is no need to list the Input Items so that those with the same Material are together, and there is also no need to list them in the sequence in which they will be used. This sequence will be determined in the next steps.
- While the Recipe is open, return to flip A and remove the W-cost (Work Cost). When you divide the Production process into stages, you should assign costs to each stage, not to the process as a whole.
- The next step is to define each stage in the Production process. These stages are known as "Operations". In the example, there will be seven Operations, as described at the beginning of this section.
You should define these Operations using the Standard Operations setting. This is the Standard Operation representing the first stage in the process:

Each Standard Operation contains a list of the Materials. These Materials connect the Standard Operation to some of the Items in the Recipe, indicating which of those Items are needed by the Operation. In the example illustrated above, there is one Material, "WELD_SHELVES". This means that when the Standard Operation is completed, all Input Items marked "WELD_SHELVES" in the Recipe will be removed from stock. In our Recipe there are no Output Items marked "WELD_SHELVES" but if there were and if they were Stocked Items, they would be added to stock.
The number of Standard Operations and the Materials that they contain will depend on the particular Production process. For example, in this case we have dedicated an Operation to welding steel box section to produce shelf frames, and we will have a separate Operation representing the drilling of holes in the shelf frames for the rubber seats (stage iii). If the same Person will weld and then drill, we could have a single Operation for these two tasks. If so, however, it would not be possible to account separately for the wear and tear to the various Machines used (e.g. the welder and the drill). This is described in a separate example here.
In the example, we will enter seven Standard Operations representing the seven stages, as follows: | Std Operation | Materials | | MAKE_SHELF_FRAMES | WELD_SHELVES | | | | MAKE_SUPPORTS | PRESS | | WELD_SUPPORTS | | | | DRILL | DRILL | | | | PAINTING_RACK | PAINT | | | | SEATS | SEATS | | | | FEET | FEET | | | | FINAL_ASSEMBLY | COMPONENT | | ASSEMBLY |
- Having entered the seven Standard Operations, the next stage is to specify the sequence in which they should be carried out. This sequence is known as a "Routing", and is defined using the Routings setting:
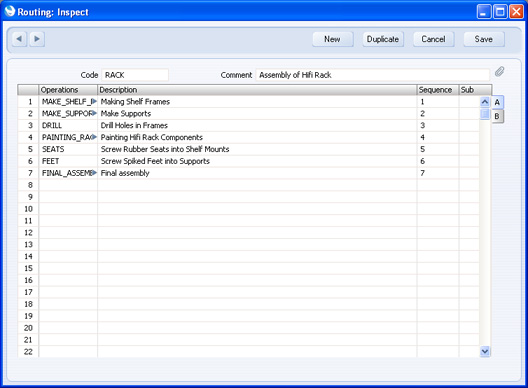
List the Operations in the grid, using the Sequence field to set the order in which they should be completed.
- The final configuration step is to return to the Recipe and enter the Routing in the Default Routing field:

If a Recipe has a Routing, you cannot specify a Work Cost in any of the Input rows. Please refer to the Additional Production Costs with Production Operations page for details about recording the costs associated with Production Operations.
So, in brief:
- The Default Routing determines the order in which the Operations will be carried out; and
- the Materials determine the Input (and Output) Items that will be used (and produced) by a particular Operation.
- As the configuration work is complete, you can now use the Recipe in a Production. When you do so, the Routing will be brought in as well:
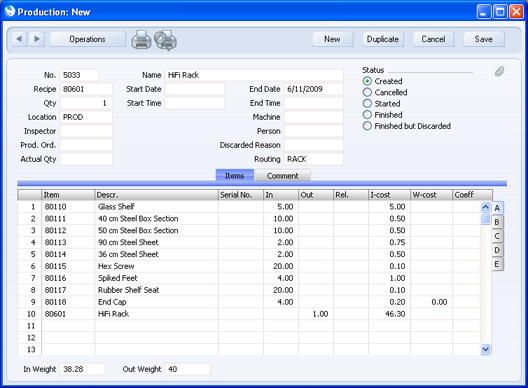
- If necessary, move stock of the Input Items into the Production Location using a Stock Movement.
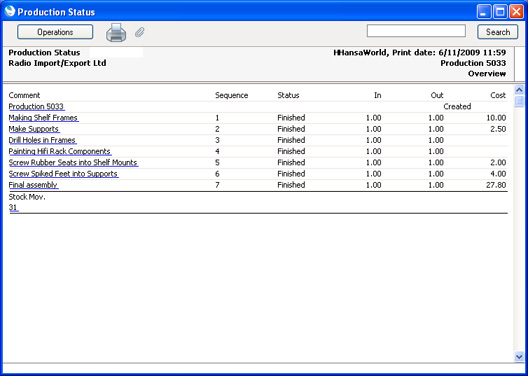
- The next stage is to implement the Routing and its Standard Operations. Save the Production and choose 'Create Production Operations' from the Operations menu. This function uses the Standard Operations listed in the Routing as templates to create Production Operations specific to the Production. One Production Operation will be created from each Standard Operation, to be saved in the Production Operation register. While the Production is still open, you can produce a list of the connected Production Operations by choosing 'Production Status' from the Operations menu:
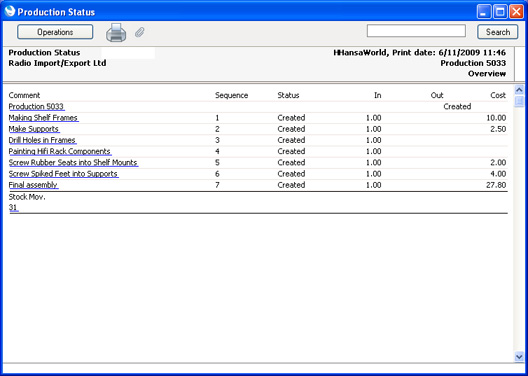
You can open an individual Production Operation from this report:
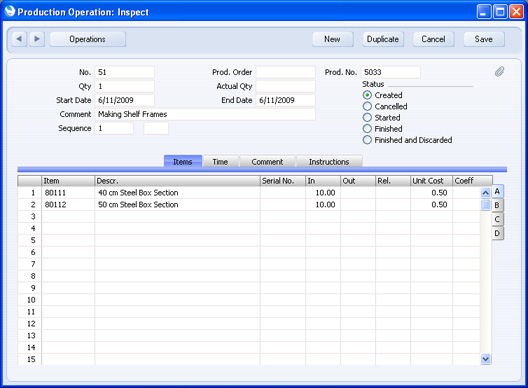
- In effect, each Production Operation is a Production in miniature. As with a Production, when work starts, mark the Production Operation as Started and save it. When work finishes, enter the quantity produced in the Actual Qty field. In the example illustrated, this will be one, even though five shelf frames will have been produced. The Actual Qty does not refer to the number of units produced, but to the number of implementations of the Operation. Then, mark the Production Operation as Finished and save it. The relevant quantities of the Input Items will be removed from stock. If the Production Operation contains an Output Item that is a Stocked Item, the relevant quantity will be added to stock.
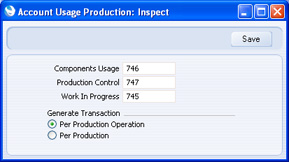
You have a choice about how to update the stock valuation in the Nominal Ledger, as follows:
- You can update the stock valuation in the Nominal Ledger each time you Finish a Production Operation. In this case, the value of the Production so far will be posted to a Work In Progress Account. This will be cleared when you Finish the last Production Operation.
- You can wait until Finishing the Production before updating the stock valuation in the Nominal Ledger, posting every removal and addition to stock at once. All Production Operations must be Finished before you can Finish the Production.
Make this choice and specify the Work In Progress Account using the Account Usage Production setting:
The Production Operation illustrated above will update the stock valuation in the Nominal Ledger by creating the following Transaction:
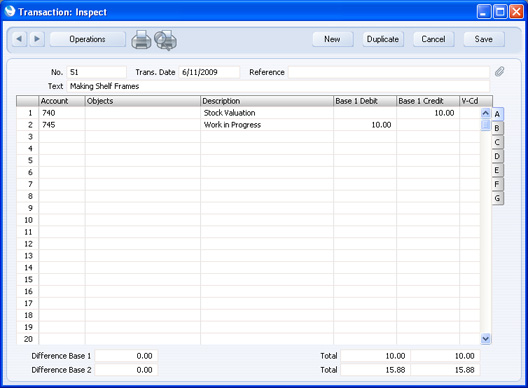
The value of the Input Items is removed from the Stock Account and added to the Work In Progress Account.
The final Production Operation will update the stock valuation in the Nominal Ledger by creating the following Transaction:
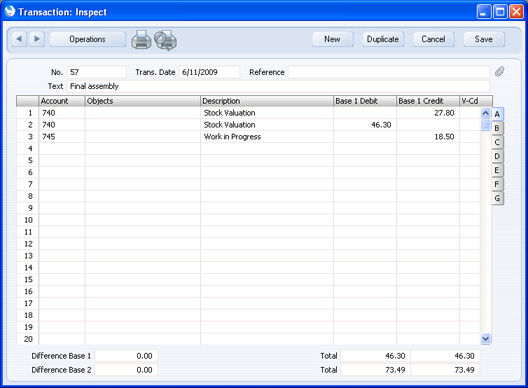
The value of the Input Items used in the final Production Operation is removed from the Stock Account, and the value of the Output Item is added. The value of the previous Production Operations is removed from the Work In Progress Account.
- On returning to the Production, selecting 'Production Status' from the Operations menu once again now shows that all Production Operations have been Finished:
Now you can mark the Production as Finished, and create a Stock Movement to move the Output Item from the Production Location to a storage Location (e.g. warehouse or shop).
---
In this chapter:
See also:
Go back to:
|