POS Button Types in Bar Tabs - Workflow
This page describes the following POS Button Types in Bar Tabs:
- Cash Up Report
- Close Session
- Daily Report
- Daily Z Report
- Get Cash Float
- Open Session
- Park Tab, Suspend Bar Tab
- Put Cash Float
Please refer here for an index of all POS Button Types.
---
Cash Up Report - Function
- Prints to screen a Cash Up report for the current Till Drawer.
- Workflow
- Click or touch the "Cash Up Report" button. A Cash Up report will immediately be printed to screen in a new window.
- Notes
- The report period will depend on the Start from Previous POS Balance option in the POS Settings setting. If you are using this option, the report period will begin on the date of the most recent POS Balance record for the current Till Drawer. If you are not using this option, the period will begin one day before the current day. In both cases, the period will end on the current day.
- Please refer here for full details about the Cash Up report.
Change UserThe "Change User" button allows a new waiter or member of bar staff to sign in and use a till or cash machine. Please refer to the section describing POS Button Types connected with personnel functions here for full details.
Close Session- Function
- Closes the work session for the current Till Drawer.
- Requirements
- If you have tills and devices with live-sync connections to the server, you must have defined Number Series for POS Sessions for each live-sync device in the Synchronised Number Series setting, and separate Number Series for the live devices in the Number Series - POS Sessions setting.
- Workflow
- Click or touch the "Close Session" button. The session will be closed immediately.
- Notes
- If you are using a till or device with a live-sync connection to the server, you must open and close work sessions from the device itself (you can't do this remotely from a desktop client). The easiest way to do this is to use the "Open Session" and "Close Session" buttons, so be sure to add these buttons to the Bar Tab window if you have these devices in your network. An alternative method is to open and close work sessions from the HW0713REPORTS_Cash_Up,Cash Up) report, which requires you to add a "Cash Up Report" button to the Bar Tab window.
- Please refer here for more details about work sessions.
Daily Report- Function
- Instructs a fiscal printer to print a report.
- Requirements
- You must have specified in the Local Machine Serial Port Devices setting in the Technics module that the till or device is connected to one of the fiscal printers listed in the 'Notes' section below.
- Workflow
- Click or touch the "Daily Report" button. The report will be printed by the fiscal printer.
- Notes
- You can also use the Fiscal Printer Reports setting in the User Settings module to instruct fiscal printers to print reports. The table below lists the fiscal printers that will print reports in response to the "Daily Report" button, the reports that will be printed and the buttons in the Fiscal Printer Reports setting that will print the same reports:
| Fiscal Printer | Report | Equivalent button in the Fiscal Printer Reports setting | | | | | Bematech MP-2100 TH FI | X report (Leitura X) | None | Brio FisUSBM with Middle Ware (Latvia) | Daily report (X report) | None | Brio FM32 with Middle Ware (Latvia) | Daily report (X report) | None | CHD Virtual Fiscal Printer (Latvia) | Monthly report (X report) | Monthly Balance | Empirija FB15 (Lithuania) | Periodic report for the current date | Periodic Report | Empirija FB15 with Middle Ware (Lithuania) | Periodic report for the current date | Periodic Report | POSNET (Poland, POSNET Protocol) | Daily report for the current date | Daily Balance (can enter a Date for reports for other dates) | POSNET (Poland, POSNET Protocol w VAT, from 01/10/2013) | Daily report for the current date | Daily Balance (can enter a Date for reports for other dates) | POSNET HD FV EJ (Poland, POSNET Protocol over TCPIP) | Daily report for the current date | Daily Balance (can enter a Date for reports for other dates) |
Daily Z Report- Function
- The "Daily Z Report" button is similar to the "Daily Report" button described above, but it instructs the fiscal printer to print the daily ("Z") report, as follows:
| Fiscal Printer | Report | Equivalent button in the Fiscal Printer Reports setting | | | | | Bematech MP-2100 TH FI | Z report (Redução Z) | None | Brio FisUSBM with Middle Ware (Latvia) | Daily report (Z report) | Daily Balance | Brio FM32 with Middle Ware (Latvia) | Daily report (Z report) | Daily Balance | CHD Virtual Fiscal Printer (Latvia) | Daily report (Z report) | Daily Balance | Empirija FB15 (Lithuania) | Daily report (Z report) | Daily Balance | Empirija FB15 with Middle Ware (Lithuania) | Daily report (Z report) | Daily Balance |
- If you are using the Empirija FB15, specify in the Local Machine or Local Settings settings where the electronic journal files should be stored. Please refer to the description of the Fiscal Printer Reports setting here for more details.
Get Cash Float- Function
- Allows waiters and bar staff to move cash and other takings from the Till Drawer to the back office.
- Requirements
- If you have devices with live-sync connections to the server, you must have defined Number Series for Cash Events for each live-sync device in the Synchronised Number Series setting, and separate Number Series for the live devices in the Number Series - Cash Events setting.
- Workflow
- Click or touch the "Get Cash Float" button.
- The 'Cash Out: New' window will open:

If you have specified a Cash Pay. Mode in the Default Payment Modes setting, this Payment Mode will be shown in the first line of the matrix as a default.
- In each row, choose a Payment Mode (e.g. cash, cheque, credit card etc) (if the till or device has a keyboard, you can use 'Paste Special') and enter an Amount for each one. The Amount should be the value of cash, cheques, credit card payments, etc that is being moved out of the till or device.
- Click or touch the [Proceed] button to save and commit the Cash Out, or the [Cancel] button to return to the Bar Tab without saving. Although the 'Cash Out: New' window contains an OK check box, you do not need to tick it before pressing [Proceed] because this will be done automatically.
- Notes
- If you are using work sessions, ensure the Till Drawer is in open session before using the "Get Cash Float" button.
- Behind the scenes, the Cash Out will be saved in the Cash Events setting. Please refer here for more details about Cash Events.
Open Session- Function
- Opens a new work session for the current Till Drawer.
- Requirements
- If you have devices with live-sync connections to the server, you must have defined Number Series for POS Sessions for each live-sync device in the Synchronised Number Series setting, and separate Number Series for the live devices in the Number Series - POS Sessions setting.
- Workflow A
- Click or touch the "Open Session" button.
- The 'POS Session: New' window will open:
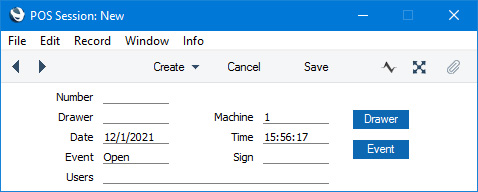
- The Machine field will contain the Local Machine Code of the device you are working on, and the Event will be set to "Open". So, all you need to do is choose a Drawer using 'Paste Special' or by clicking or touching the [Drawer] button on the right.
- Save the POS Session record. The 'POS Session: New' window will close. The work session is now open.
- Workflow B
- Click or touch the "Open Session" button. The session will be opened immediately.
- Notes
- Workflow A will be used the first time you try to open a work session on a new till or device. The 'POS Session: New' window will open to allow you to specify a Drawer. This will connect the Drawer to the device. The next time you open a work session, Workflow B will be used. The same Drawer will be used, so there will be no need for the 'POS Session: New' window to open.
- If you are using a till or device with a live-sync connection to the server, you must open and close work sessions from the till itself (you can't do this remotely from a desktop client). The easiest way to do this is to use the "Open Session" and "Close Session" buttons, so be sure to add these buttons to the Bar Tab window if you have these tills in your network. An alternative method is to open and close work sessions from the Cash Up report, which requires you to add a "Cash Up Report" to the Bar Tab window.
- Please refer here for more details about work sessions.
Park Tab, Suspend Bar Tab- Function
- Saves the current Bar Tab, closes it and opens an empty new one (i.e. it "parks" the current Bar Tab).
- Requirements
- If you add a "Park Tab" button to the Bar Tab window, you should also add an "All Tabs" or "Open Unfinished Tabs" button to allow a waiter or member of bar staff to return to the saved Bar Tab at a later time.
- Workflow
- Click or touch the "Park Tab" button.
- The Bar Tab currently on screen will be saved and closed and an empty new Bar Tab will be opened in its place.
- Notes
- A waiter or member of bar staff can use the "Park Tab" button after adding a Customer's Items to a Bar Tab, when it is likely that more Items will be added later before payment will be made. The waiter or member of bar staff can "park" the Bar Tab until it is needed again.
- To go back to the parked Bar Tab, click or touch the "All Tabs" or "Open Unfinished Tabs" button.
Put Cash Float- Function
- Allows waiters and bar staff to move cash into the Till Drawer from the back office.
- Requirements
- If you have devices with live-sync connections to the server, you must have defined Number Series for Cash Events for each live-sync device in the Synchronised Number Series setting, and separate Number Series for the live devices in the Number Series - Cash Events setting.
- Workflow
- Click or touch the "Put Cash Float" button.
- The 'Cash In: New' window will open:
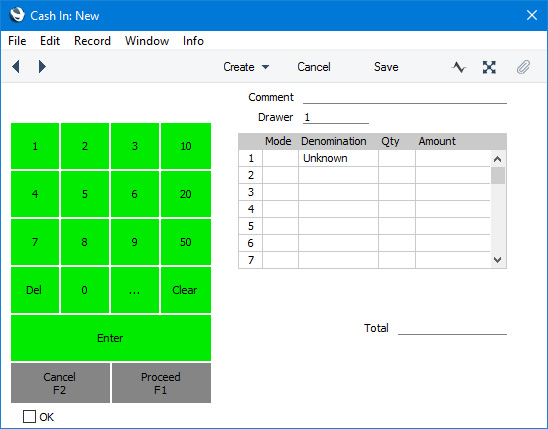
If you have specified a Cash Pay. Mode in the Default Payment Modes setting, this Payment Mode will be shown in the first line of the matrix as a default.
- In each row, choose a Payment Mode (e.g. cash, cheque, credit card etc) (if the till or device has a keyboard, you can use 'Paste Special') and enter an Amount for each one. The Amount should be the value of cash or other payments that is being moved in to the till or device.
- Click or touch the [Proceed] button to save and commit the Cash In, or the [Cancel] button to return to the Bar Tab without saving. Although the 'Cash In: New' window contains an OK check box, you do not need to tick it before pressing [Proceed] because this will be done automatically.
- Notes
- If you are using work sessions, ensure the Till Drawer is in open session before using the "Put Cash Float" button.
- Behind the scenes, the Cash In will be saved in the Cash Events setting. Please refer here for more details about Cash Events.
---
Configuring the Bar Tab Window:
Go back to:
|