Using the Resource Planner - The 'Overview Rooms' Window
This page describes using the 'Overview Rooms' window in the Resource Planner to manage Reservations in the Hotel module. Please refer to the following pages for more details about using the Resource Planner with Reservations:
---
The 'Overview Rooms' window is the second Resource Planner window. You can open this window using two methods:
- Depending on how you have configured the Login Shortcuts register in the User Settings module on the machine you are using, the 'Overview Rooms' window can be opened automatically when you log in. In this case, every Room will be listed in the window (if you have more than one Room Location, every Room in the Room Location specified in the Local Machine setting will be listed). Please refer to step 8 on the Configuration page for details about the Login Shortcuts register and step 9 for details about specifying a Room Location in the Local Machine setting.
- You can open the 'Overview Rooms' window by double-clicking (Windows/macOS) or tapping (iOS/Android) a Room Type in the 'Month Overview of Room Types' window (the first Resource Planner window). In this case, the Rooms belonging to the specified Room Type will be listed in the window. A Room Location that was specified in the 'Month Overview of Room Types' window (i.e. the default or one that you entered yourself) will be carried over to the 'Overview Rooms' window.
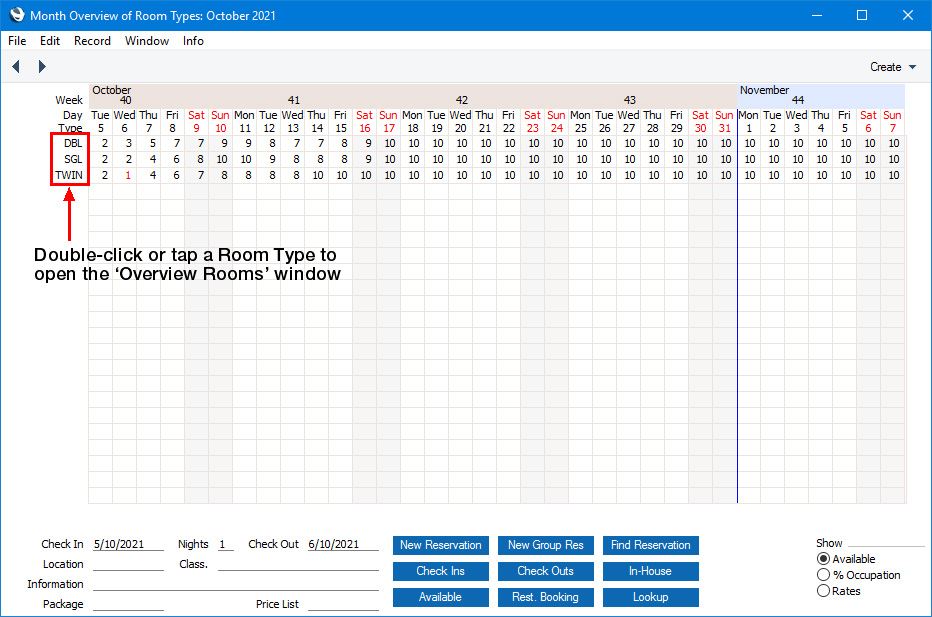
In both cases the 'Overview Rooms' window will be opened. This window will list the Rooms, showing the Reservations for each Room on each date. Reservations for the Room Type in which you have not specified a Room will be shown below the Room listing:

Rooms
If you are using macOS, Room Numbers will be colour-coded as follows:
- Green
- A green Room is one that is occupied or is available for occupation i.e. it is a Room whose Status is the Available Status specified in the Hotel Settings setting.
- Pale Blue
- A pale blue Room is one that has not yet been cleaned after the previous Guests have checked out i.e. it is a Room whose Status is the Dirty Status specified in the Hotel Settings setting. It is not possible to check new Guests in to a pale blue Room until it has been cleaned (i.e. until its Status has changed to Available).
- Red
- A red Room is a Room that is not available i.e. it is a Room whose Status is the Closed Status specified in the Hotel Settings setting.
- Rooms that have been marked as Closed will not be shown at all.
If you need to see particular Rooms, you can use the following fields below the main display to specify the Rooms that are listed:
- Room Type
- Paste Special
Room Types setting, Hotel module
- Allows you to list Rooms belonging to a different Room Type (e.g. to change from double Rooms to single Rooms).
- If you need to see all Rooms, empty the Room Type field.
- Location
- Paste Special
Room Locations setting, Hotel module
- Allows you to list Rooms in a particular Room Location (e.g. in a single building).
- If you need to prevent particular users from changing the Room Location, assign them to an Access Group in which you have denied access to the 'Change Hotel Room Location in Overview of Rooms' Action.
- Class
- Paste Special
Room Classifications setting, Hotel module
- Allows you to list Rooms with a particular Classification.
- Room Classifications allow you to record features about particular Rooms that Guests might request, such as Rooms where smoking is allowed, Rooms with sea views, Rooms with wheelchair access etc. You can enter more than Classification separated by commas (e.g. to show the availability of Rooms that are both non-smoking and with wheelchair access).
- If you need to prevent particular users from changing the Room Location, assign them to an Access Group in which you have denied access to the 'Change Hotel Room Classification in Overview of Rooms' Action.
The Available field below the main display shows the number of Rooms with the specified Room Type that are available for booking.
A Room will not be included in the Available figure if it has a Reservation without a Status or a Reservation with a Normal (not checked in) or Normal (checked in) Status. If you have selected the Include Unconfirmed in Availability option in the Hotel Settings setting, a Room will also be excluded from the Available figure if it has a Reservation with an Unconfirmed Status. Any Reservations without a Status or with a Normal (not checked in) Status (or an Unconfirmed Status if you are using the Include Unconfirmed in Availability option) in which you have not specified a Room will also be subtracted from the Available figure as these will require Rooms on check-in.
Reservations
Reservations will be displayed as follows:
- The colour of a Reservation will depend on its Reservation Status.
- The Reservation will be shown running from its Start Date/Time to its End Date/Time.
- The text in each Reservation will be controlled by the Show in Resource Planner options on the 'Defaults' card in the Hotel Settings setting. The text may be truncated, depending on the duration of the Reservation.
If you need to see Reservations with a particular Status, specify that Status in the Status field below the main display.
Moving Reservations by Drag and Drop
If the Status of a Reservation is Unconfirmed or Normal (not checked in), you can move it by dragging and dropping as follows:
- You can move it to a different Room
- You can move it to different dates
- By dragging the beginning or the end of the coloured bar you can change the duration of the Reservation. This is only possible if the Reservation has been assigned to a Room.
If you assign users to
Access Groups in which you have denied access to the 'Change Dates in Resource Planner' Action, those users will be able to move a Reservation to a different Room but they will not be able to change the dates or the duration. This can help prevent accidental date changes caused by inaccurate dragging. These users will need to open the Reservation in a record window to change the dates or the duration.
Changing the Period and Dates in the Display
By default, the period shown in the 'Overview Rooms' window will begin at the current date and will extend for the next six weeks or so. This is a monthly view. Each day will have its own cell. If you opened the 'Overview Rooms' window from the
'Month Overview of Room Types' window and you had specified a Check In date in that window, the period shown in the 'Overview Rooms' window will begin on that Check In date.
You can change the period shown in the 'Overview Rooms' window using the [M], [W] and [D] buttons above the main display. These buttons will change the display to a monthly view, a weekly view or a daily view respectively. In the daily view, each hour will have its own cell.
If you need to change the beginning of the period, use the < and > buttons at the top of the window or change the Check In date:
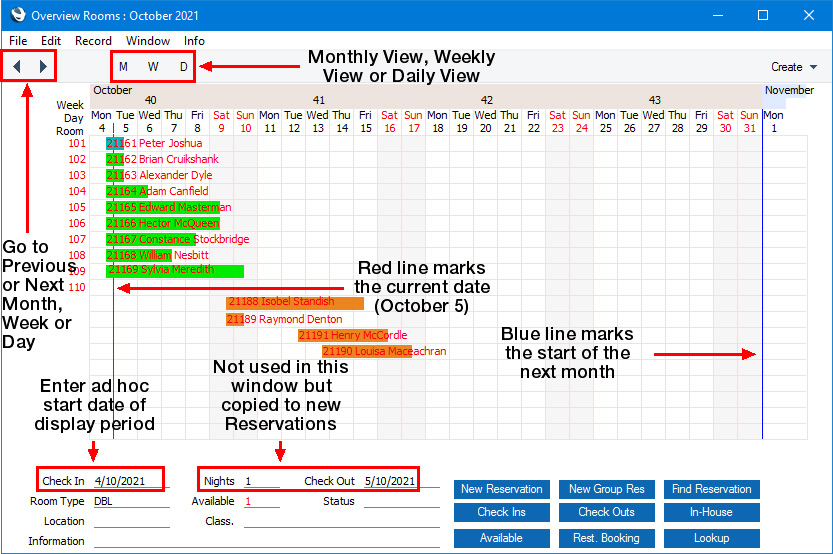
The arrow buttons will first go forward or back to the next or previous month, week or day depending on the view.
Buttons and Create Menu/+ Menu
The buttons and Create menu (Windows/macOS)/+ menu (iOS/Android) in the 'Overview Rooms' window are common to both Resource Planner windows (the 'Month Overview of Room Types' window and the 'Overview Rooms' window). Please refer
here for details about each one.
---
Go back to: