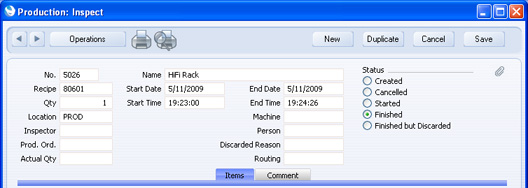
Entering a Production Record - Header
- No.
- Paste Special
Select from another Number Series
- The number of the Production record. The default is the first unused number in the number sequence in the first valid row in the Number Series - Productions setting. You may change this number, but not to one that has already been used. If you are working in a multi-user system, the Production Number is assigned when you first save the Production record.
- Name
- The name of the Recipe appears here after you specify a Recipe in the field below.
- Status
- At any time a Production record can be in one of five states, to help with the work flow and for reporting purposes. These states are as follows:
- Created
- When you first enter a record in the Production register, it will be marked as Created. Created Productions are marked with a blank in the Status column in the 'Productions: Browse' window.
- Cancelled
- In the case where you raise a Production record in error or the job is cancelled before work has started, you should change the Status of the Production to Cancelled to signify that no work should be carried out. Once a Production record has been marked as Cancelled and saved, it can no longer be modified. Cancelled Production records are marked with a "√" in the 'Productions: Browse' window.
- If the Production has a Routing, you must mark all connected Production Operations as Cancelled before you can Cancel the Production itself.
- Started
- As soon as work starts, you should change the Status of the Production record to Started. When you save the record, the Start Date and Time (below) will be updated, if they are blank. Started Production records are marked with a "-" in the 'Productions: Browse' window.
- If you are accounting for the running costs of the Machine used for the Production (i.e. you have a record in the Asset register in the Assets module representing the Machine in which you have entered a Running Cost per Hour, you are using the Auto Calculate Cost of Produced Items option in the Production Settings setting and you have specified a Machine Cost Item in the same setting), you should take care to mark each Production as Started when you start work, to update the Start Date and Time. This will help ensure the duration of the Production and therefore the running costs of the Machine are correct.
- Finished
- Check this box to confirm that the Production work has been completed and the assembled Items delivered to stock. The stock levels of the assembled Items and the components will be updated when the record is saved. The Start and End Times will be updated, if they are blank. Once you have marked a Production record as Finished and saved it, you will no longer be able to modify it. Finished Production records are marked with a "√" in the 'Productions: Browse' window.
- Switch on the Do Not Allow Over Delivery option in the Stock Settings setting if you do not want to be able to create negative stock of the components. If you are using this option, you will not be able to save a Production record marked as Finished if there is not enough stock of any of the components to carry out the assembly.
- If you have so determined in the Sub Systems setting in the Nominal Ledger, a Nominal Ledger Transaction will be created in the Transaction register when a Production record is marked as Finished and saved. The nature of this Transaction is described on the Nominal Ledger Transactions from Production Records page.
- When you mark the Production record as Finished and save it, the I-cost of each Input Item will be updated with the appropriate unit stock value and the cost of the Output Item(s) will be recalculated accordingly, taking the Rel. field into account if appropriate. These figures will be used in the resulting Nominal Ledger Transaction to update the Nominal Ledger stock valuation of each Item. The unit stock value of each Input Item will be calculated using the Cost Model specified in the relevant Item or Item Group record. If that Cost Model is Default, the Primary Cost Model specified in the Cost Accounting setting will be used.
- If you are accounting for the running costs of the Machine used for the Production as described in the Started section immediately above, be sure to check the End Date is correct before marking the Production as Finished. This will ensure the correct running cost will be posted.
- If the Production has a Routing, you must mark all connected Production Operations as Finished before you can Finish the Production itself.
- Finished but Discarded
- Check this box to confirm that the Production work has been completed and that for some reason the assembled Items were discarded. You must specify a Reason for Discarding. When you save the Production, the End Time (below) will be updated, as will the Start Time if it is empty. Once a Production record has been marked as Finished but Discarded and saved, it can no longer be modified. Discarded Production records are marked with a "√" in the 'Productions: Browse' window.
- If you are not using the Create Stock Depreciation from Discarded Production option in the Production Settings setting, the Out Qty in each Output row will be set to zero immediately you mark a Production as Discarded. When you save the Production, stock levels of the components will be updated, but no assembled Items will be added to stock.
- If you are using the Create Stock Depreciation from Discarded Production option, stock levels of the components will be updated, and the assembled Items will be added to stock when you save. An approved Stock Depreciation will then be created automatically, removing the assembled Items from stock.
- In other respects, this option is similar to Finished, described above. For details about the resulting Nominal Ledger Transaction, please refer to the Nominal Ledger Transactions from Production Records page.
- Recipe
- Paste Special
Recipe register, Production module
- When you specify the Recipe to be used by the Production record, the appropriate Input and Output Items together with quantities and Cost Prices will be listed in the grid below.
- Start Date, End Date
- Paste Special
Choose date
- The dates between which the work represented by this Production record is to be carried out.
- These fields are important in Production records created by the 'Create Planned Records' Maintenance function in the Sales Orders module. This function schedules Productions for Items on Sales Orders, so that the assembly work is carried out just before the Items are scheduled for delivery to the Customer. The Start and End Dates are calculated from the Planned Delivery Date of Sales Orders and the Fixed Assembly Days and Days to Assemble Each Unit from the Recipe. If it is necessary to create Purchase Orders for any components, these will be dated using the Delivery Days specified for the Default Purchase Items for the components, ensuring they arrive in time for the assembly process to be completed.
- In Production records that you enter directly to the Production register, by default the Start Date will be blank and the End Date will be the current date. If the Start Date field is still empty, the current date will be placed there automatically when you mark a Production as Started and save it.
- You can use these dates to calculate the running cost of the Machine used in the Production: please refer to the description of the Machine field below for details.
- Qty
- The number of applications of the Recipe required by the Production.
- The way this field interacts with the In and Out Quantities in the rows depends on the Production Lines hold Actual Qty option in the Production Settings setting. For example, a Recipe states that two components are required to produce one final Item. When you use this Recipe in a Production with the requirement to produce two final Items, you will enter "2" in this field. If you are using the Production Lines hold Actual Qty option, the In Qty of the component will change from "2" to "4", and the Out Qty of the final Item will change from "1" to "2". If you are not using this option, the In Qty of the component will stay at "2", and the Out Qty of the final Item will stay at "1". In both cases, when you Finish the Production, four components will be removed from stock, and two final Items will be added.
- In a new Production, the default will be as follows:
- Production entered directly to the Production register
- The default Qty will be the Normal Prod. Qty from the Recipe.
- Production created from a Production Order
- The default Qty will be the Standard Batch quantity from the Recipe. If the Standard Batch is blank, the Qty in the Production will also be blank by default.
- Production created from a Sales Order using the 'Create Planned Records' or 'Create Planned Records from Orders' Maintenance functions
- The default Qty will be the Sales Order quantity (or the Min Prod. Qty in the Recipe if this is greater). If this default is less than the Normal Prod. Qty from the Recipe and you are using the Always create Normal Production Qty from Planned option in the Production Settings setting, the Normal Prod. Qty will be the default.
- Production created from a Production Order using the Production Time Entry interface
- The default Qty will be the Qty from the Production Order, less any quantity that has already been produced. When work on the Production finishes, this Qty will be updated to the quantity produced, as entered in the 'Specify Produced Quantities' window.
- If you are not using the Production Lines hold Actual Qty option, you must set this field to "1" if the Output Item or any of the components are Serial Numbered at unit level. If you need several applications of the Recipe, increase the number of rows containing the Serial Numbered Items (each should have an In or Out Qty of one), and multiply the In and Out Quantities of the non-Serial Numbered Items appropriately. If you are using the Production Lines hold Actual Qty option and at least one of the Items is Serial Numbered at unit level, you can enter any quantity in this field. The In and Out Quantities in each row will be updated. Then, list the Serial Numbered Items individually in the grid: do not do this before changing the quantity in the header because then the In and Out Quantities in the individual rows will be updated incorrectly.
- You cannot enter a negative quantity here. If you need to dismantle an assembled Item, you should find the original Production and use the 'Disassemble' function on the Operations menu. This will ensure the assembled Item is correctly removed from stock and the components are put back into stock.
- If the Production has a Routing and you create Production Operations from it, this Qty will be copied to each Production Operation. Afterwards, you will not be able to change this figure, in the Production or in the Production Operations.
- Start Time
- Paste Special
Current Time
- The time when the work represented by this Production record began. If this field is empty, the current time will be placed here automatically when you mark a Production as Started and save it.
- You can use this Start Time to calculate the running cost of the Machine used in the Production: please refer to the description of the Machine field below for details.
- End Time
- Paste Special
Current Time
- The time when the work represented by this Production record finished. If this field is empty, the current time will be placed here automatically when you mark a Production as Finished and save it.
- You can use this End Time to calculate the running cost of the Machine used in the Production: please refer to the description of the Machine field below for details.
- Location
- Paste Special
Locations setting, Stock module
- Default taken from Production Order or Person record for the current user
- The stock Location from where the components are taken and where assembled Items are to be stored. If you leave the field empty, stock from all Locations will be available.
- If you have specified a Main Location in the Stock Settings setting, leaving this field blank means that stock from the Main Location will be used. However, if you are using the Require Location option in the same setting, you must enter a Location before you can mark the Production as Finished and save it. If the Production has a Routing and you are using the Require Location option, you must enter a Location before you can mark the Production as Started: this Location will be copied to the Production Operations when you create them.
- Machine
- Paste Special
Asset register, Assets module
- The machine or tool that you used to carry out the work.
- If you are using the Auto Calculate Cost of Produced Items option in the Production Settings setting, you have specified a Machine Cost Item in the same setting, and you have specified a Running Cost/hr in the Asset record for the Machine ('Costs' card), then an extra row for the running costs will be added to the Production when you first save it. This row will use the Start and End Time of the Production (above) to record the running cost of the Machine. When you approve the Production (mark it as Finished, or Finished but Discarded) and save it, the running cost will be added to the value of the final Item and so will be debited to the Stock Account, and will be credited to the Production W-cost Account. If you are using this feature, you should mark every Production as Started at the relevant moment (to ensure the Start Date and Time are correct) and also check the End Date is correct before approving each Production, as this field will not be updated automatically.
- If the Machine is an Asset that has Production Objects specified on its 'Costs' card, those Objects will be copied to the field on the 'Comment' card.
- Inspector
- Paste Special
Person register, System module
- If the result of the Production is to be inspected before the Production record can be marked as Finished, specify the initials of the inspector here.
- Person
- Paste Special
Person register, System module
- You can use this field to record the Person responsible for this Production or the Person carrying out the work.
- Prod. Ord.
- If the Production was created from a Production Order, the Production Order Number will appear here. This field cannot be modified.
- Discarded Reason
- Paste Special
Standard Problems setting, Production/Service Orders modules
- If you have marked the Production as Finished but Discarded, specify here the reason for the discarding. Discarded Productions must have a Reason before they can be saved.
- Routing
- Paste Special
Routings setting, Production module
- Default taken from Recipe or Production Order
- If the Recipe represents a Production process that has been divided into stages, the Default Routing specified in that Routing will be copied here. This is effectively a schedule of the process, specifying the stages and the order in which they should be carried out.
- If the Production has a Routing, each of the Input and Output Items will take a Material from the relevant Recipe row (visible on flip B of the Production). The Material is the mechanism that connects each Item to a stage (i.e. to an Operation) in the process. In the case of an Input Item, the Material determines the stage in the process when it will be removed from stock. In the case of an Output Item, the Material determines when the completed Item will be added to stock.
- If the Production has a Routing, you cannot simply mark the Production as Finished in order to remove the components from stock and add the assembled Item to stock. Instead, you need to use the 'Create Production Operations' Operations menu function to create the Production Operations that represent each stage in the process, and then mark each Operation as Finished in turn. Only once you have done this can you return to the Production to mark it as Finished.
- When you enter a new Production, the Routing will usually be copied from the Recipe or originating Production Order. You can change to another Routing, and, in the case of an ad hoc Production that does not have a Recipe, you can specify the Routing yourself. However, you can only do this before you have saved the Production for the first time and, after saving, if the Status is Created. After changing the Status to Started and saving, you will no longer be able to change the Routing.
- Please click here for more details about Routings and Production Operations and an example.
---
In this chapter:
See also:
Go back to:
|