Entering a Work Order
You will use Work Orders to keep the company's technicians informed about the work that is to be done. Follow these steps to create Work Orders:
- To begin the repair process, enter a Service Order that lists the Items that are to be repaired together (sometimes termed "repair Items" or "Main Items") with details about the faults and, if needed, a deadline and maximum repair cost. Please refer here for full details about Service Orders.
- If you have listed more than one repair Item in a Service Order, you should decide whether you will need to create a single Work Order that includes all the repair Items in the Service Order, separate Work Orders for each repair Item (possibly allocated to different technicians) or any combination.
If you will need to create more than one Work Order from the Service Order, use the No. field on flip A on the 'Items' card to allocate each row to a different Work Order. You can do this by entering arbitrary numbers in the No. field in each row. Separate Work Orders will be created for each No., and rows with the same No. will be copied to the same Work Order. For example, if there are seven rows in a particular Service Order, enter "1" in the first two rows and "2" in the other five rows if you will need two separate Work Orders to be created.
- After saving the Service Order, you can create the Work Orders using any of the following methods:
- If the Service Order is already open in a record window, select 'Work Orders' from the Create menu (Windows/macOS) or + menu (iOS/Android).
- Highlight one or more Service Orders in the 'Service Orders: Browse' window, select the 'Work Orders' command from the Create or + menu. Work Orders will be created for all of the highlighted Service Orders.
If you are using Windows or macOS, you can highlight several Service Orders in the list by holding down the Shift key while clicking. If you are using iOS or Android, you can highlight a single record in the browse window by searching for it, so you can only create Work Orders from a single Service Order at a time.
- Use the 'Create Work Orders' Maintenance function to create Work Orders from more than one Service Order.
You must use one of these methods to create Work Orders as you cannot enter them directly to the Work Order register.
In all cases, the following window will appear:
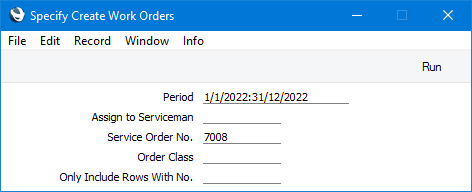
Please follow the links in the numbered points above for descriptions of each of the fields in this window. Press the [Run] button to create the Work Orders.
- Use the following methods to locate the new Work Orders:
- You will be able to find them in the Work Order register.
- Each Work Order will be placed in the Link Manager of the originating Service Order. You will therefore be able to open the relevant Work Orders from a Service Order after opening it in a record window.
To open the Work Order register, first ensure you are in the Service Orders module. Then, if you are using Windows or macOS, click the [Registers] button in the Navigation Centre and double-click 'Work Orders' in the resulting list. If you are using iOS or Android, tap the [Registers] button in the Navigation Centre and then tap 'Work Orders' in the 'Registers' list. In both cases, the 'Work Orders: Browse' window will be opened, listing the Work Orders that you have already entered.
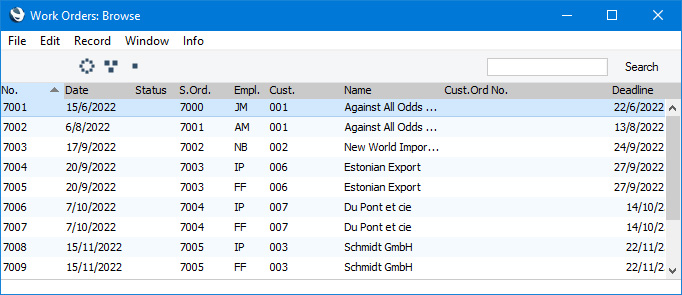
In this window, the Work Order Number of each Work Order will be shown in the left-hand column, followed by the Date, the Status, the Number of the originating Service Order, the Signature of the employee responsible for the work, the Customer Number and Name, the Customer Order Number and the Deadline. The Status column will be blank if the Status of a Work Order is Issued, or will contain a "√" for a Finished Work Order, "+" for a Started Work Order or "-" for a Cancelled Work Order.
You can set this Status in a Work Order using the options on the 'Date' card of the Work Order window.
If you are using Windows or macOS, you can change the sort order by clicking on a column heading. To reverse any sort, simply click once again on the column heading. The current sort order is marked by the column heading being coloured blue. If you are using iOS or Android, tap on the column heading and choose the sort order you need. Repeat the procedure to reverse the sort.
To search for a particular Work Order first sort the list by the column that you want to use for the search. Then, enter the text that you want to find in the Search field in the top of the window (in the top right-hand corner if you are using Windows/macOS) and press the Return key (macOS) or Search (iOS/Android). The first record containing a match for your search string will be highlighted (if you are using Windows, a match will be highlighted as you type each character). For example, to search for a particular Customer Name, sort by Name before entering a Customer Name (or the first few characters) in the Search field.
If you are using Windows or macOS, there will be three buttons in the top left-hand corner of the 'Work Orders: Browse' window. These are part of the Limited Access feature. You can use them as follows (Windows versions of the buttons illustrated on the left, macOS on the right):

- Lists all Work Orders.

- Lists Work Orders belonging to members of the same Sales Group as the current user (i.e. Work Orders in which the Salesman belongs to the same Sales Group as the current user).

- Lists Work Orders belonging to the current user (i.e. Work Orders where the Salesman field contains the Signature of the current user).
You can also prevent a user from seeing all Work Orders in the list by restricting their view to their own Work Orders or to those of their Sales Group.
Please refer to the page describing the 'Access' card in the Person register for full details about the Limited Access feature.
To work with a Work Order, double-click (Windows/macOS) or tap (iOS/Android) it in the browse window to open it in a record window.
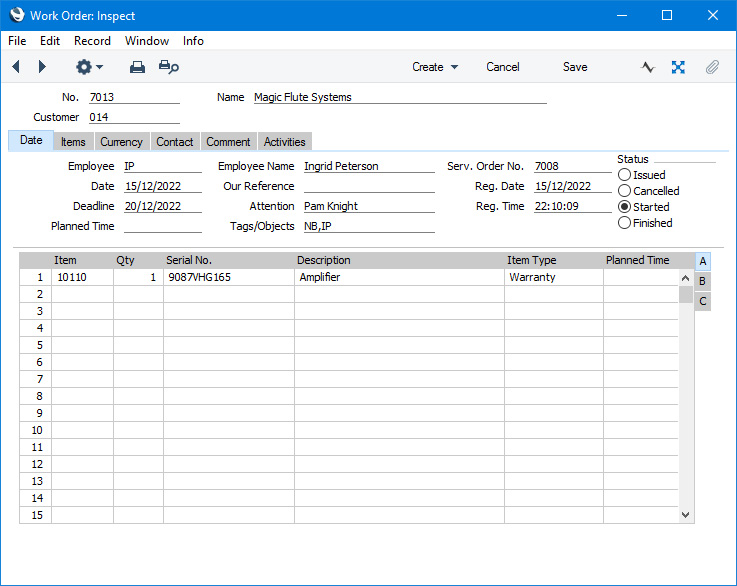
Since the amount of information stored about each Work Order will not fit on a single screen, the Work Order window has been divided into six cards. At the top of each is the header. This contains the Work Order Number, the Service Order Number, the Date and the Customer Number and Name. There are six named buttons ('tabs') in the header.

By clicking the tabs you can navigate between cards. The header is always visible, as a reminder of the Customer whose Work Order you are working with.
If you are using iOS or Android, there will only be two tabs, marked 'Items' and 'Details'. If you tap 'Details', you will see every card except 'Items' arranged vertically on screen. You can scroll down to see each one, or you can jump to any card by tapping on any tab and selecting the tab you want to go to.
After entering a Work Order, you can proceed as follows:
Please refer to the following pages for details about the fields on each card in the Work Order window:
---
The Work Order register in Standard ERP:
---
Go back to: