Entering a Production Plan
You can create Production Plans in two ways:
- You can create them using the 'Create Production Plan' Maintenance function as outlined here.
- You can enter them directly to the Production Plan register.
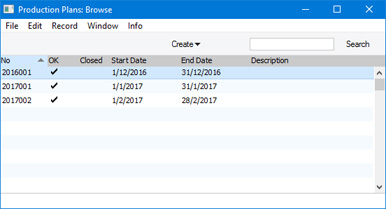
To open the Production Plan register, first ensure you are in the MRP module. Then, if you are using Windows or Mac OS X, click the [Registers] button in the Navigation Centre and then double-click 'Production Plans' in the resulting list. If you are using iOS or Android, tap the [Registers] button in the Navigation Centre and then tap 'Production Plans' in the 'Registers' list The 'Production Plans: Browse' window is opened, showing Production Plans already entered.
If you need to enter a new Production Plan record directly to the Production Plan register, select 'New' from the Create menu (Windows/Mac OS X) or the + menu (iOS/Android). You can also use the Ctrl-N (Windows) or ⌘-N (Mac OS X) keyboard shortcut. Alternatively, highlight or open a Production Plan similar to the one you want to enter and select 'Duplicate' from the same menu. If you don't want to open the 'Production Plans: Browse' window before creating a new record, you can also use the + menu in the Navigation Centre (all platforms).
The 'Production Plan: New' window will be opened, empty if you selected 'New' or containing a duplicate of the selected Production Plan. Complete the Production Plan as appropriate and as described below, then save it using the [Save] button (Windows/Mac OS X) or by tapping √ (iOS/Android).
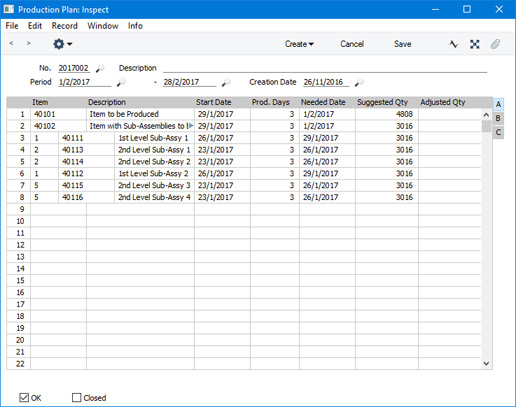
The Production Plan record window is illustrated below:
- No.
- Paste Special
Select from another Number Series
- The unique identifying number of the Production Plan. The default will be chosen as follows:
- It will be taken from the first valid row in the Number Series - Production Plans setting.
- It will be the next number following on from the last Production Plan entered.
You may change the default, but not to a number that has already been used. If you have defined at least one number sequence in the Number Series - Production Plans setting, the number you change to must be inside a valid number sequence.
- You will not be able to save a Production Plan if the No. does not belong to a valid number sequence. A valid number sequence is one for the period in which the Start Date of the Production Plan falls and with unused numbers, so this problem will most usually occur at the beginning of a new calendar or financial year.
- If you are working in a multi-user system, the Production Plan Number will be assigned when you save the record for the first time, chosen as described above and providing you have not already specified a number yourself.
- Description
- Enter a description of the Production Plan, to be shown in the 'Production Plans: Browse' window.
- Period
- Paste Special
Choose date
- If you are entering a Production Plan yourself, use these two fields to specify the Start and End Dates of the period covered by the Production Plan record.
- The default Start Date will be the first date of the current week (i.e. Monday) or the current month, depending on the Period Type that you have chosen in the Forecast Settings setting. The default End Date will be the last date of the current week or month. If you change the Start Date, the End Date will be updated automatically.
- Every Period must begin on the first day of a week (i.e. Monday) or month, and every Period should be a single week or month in duration (again, depending on the Period Type that you have chosen in the Forecast Settings setting).
- You can use the same Period in more than one Production Plan record, providing there is no common Item.
- If you used the 'Create Production Plan' Maintenance function to create the Production Plan from a Sales Forecast, the Period will be copied from that Sales Forecast. If you have more than one Sales Forecast for the same Period (with different Items and/or different Classes), they will be combined into a single Production Plan.
- Creation Date
- This field automatically records when the Production Plan record was added to your Standard ERP database and cannot be changed.
Matrix
Use the grid to list the Items that you need to produce during the Period. In a Production Plan created by the
'Create Production Plan' Maintenance function, the Items will be taken from the
Sales Forecast for the same Period, with quantities being calculated from the Sales Forecast, the quantity in stock (or estimated to be in stock) at the beginning of the Forecast period and the quantity that is required to be in stock at the end of the period (taken from the
Stock Policies setting).
If you are using Windows or Mac OS X, you can add rows to a Production Plan, click in any field in the first blank row and enter appropriate text. To remove a row, click on the row number on the left of the row and press the Backspace key. To insert a row, click on the row number where the insertion is to be made and press Return.
You can also bring Items into a Production Plan by opening the 'Items: Browse' window, selecting a range of Items by clicking while holding down the Shift key, and then dragging them to the Item field in the first empty Production Plan row.
If you are using iOS or Android, you can add rows by tapping the + button below the matrix. To remove a row, long tap on the row number on the left of the row and select 'Delete Row' from the resulting menu. To insert a row, long tap on the row number where the insertion is to be made and select 'Insert Row' from the resulting menu.
Flip A
- Item
- Paste Special
Item register
- Specify an Item to plan its Production. This must be a Stocked Item with a Recipe (i.e. an Item that you can build using a Production).
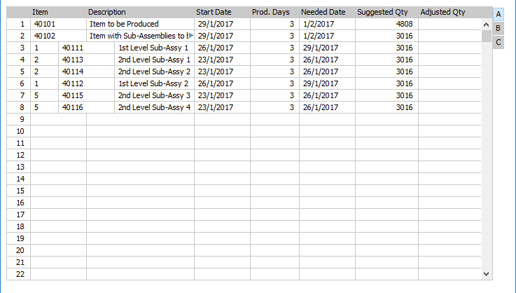
- If the Item is one that is built from sub-assemblies (i.e. the Recipe contains at least one Item that itself has a Recipe), the Item Numbers of the sub-assemblies will be listed on the rows below, indented to show that they are sub-assemblies. This is shown in the illustration above. In a Production Plan that you are entering yourself, the sub-assemblies will be brought in automatically when you specify the top-level Item. When you enter a quantity for the top-level Item, quantities for the sub-assemblies will again be calculated and brought in automatically.
- Description
- Default taken from
Item
- This field shows the name of the Item, brought in from the Item register.
- Start Date
- The date work should start to produce the Item, calculated by subtracting the Prod. Days from the Needed Date (both below).
- Prod. Days
- The number of days required to produce the Item. This is calculated using the Time to Setup, Fixed Assembly Days, Time to Produce and the Days to Produce in the Recipe, the working hours of the Machine (from the Production Item Alternative and Machine Hours registers in the Production module) and the Suggested or Adjusted Qty. Please refer to the Start Dates in Production Plans page for more details about this calculation.
- In a Production Plan that you are entering yourself, the Prod. Days (and the Start Date) will be calculated when you enter the Suggested or Adjusted Qty.
- Needed Date
- The date when the Item is required. This will be the first date of the Period of the Production Plan and cannot be changed.
- If the row is an indented one containing a sub-assembly, the Needed Date will be the Start Date from the row above (i.e. the date the sub-assembly should be ready, to allow work on the next level assembly to begin).
- Suggested Qty, Adjusted Qty
- In a Production Plan created by the 'Create Production Plan' Maintenance function, the Suggested Qty field will contain the quantity of the Item that you need to build in order to satisfy the Sales Forecast for the relevant Period, taking the stock level at the beginning of the Period (and the Stock Policy for the Item) into account.
- In a Production Plan that you are entering yourself, enter the quantity of the Item that you think you need to build during the Period.
- You will not be able to change the Suggested Qty in an existing row or specify a Suggested Qty in a new row after you have saved the Production Plan for the first time. In both cases, enter the new figure in the Adjusted Qty field.
- When you create a Production or Production Order from the Production Plan row, the quantity in the Production or Production Order will be the Adjusted Qty if there is one, or the Suggested Qty if there is no Adjusted Qty.
Flip B
- Sug. Date
- In a Production Plan created by the 'Create Production Plan' Maintenance function, this field will contain the date the record was created, shown for information only. You can change this date if necessary.
- Adj. Date
- Each time you enter an Adjusted Qty, the date of the adjustment will be placed here automatically.
Flip C
- Prod. No
- When you create a Production or Production Order from the Production Plan, its Production Number or Production Order Number will be placed here automatically.
- Recipe
- The Recipe that will be used to build the Item will be shown here.
If you have entered a record in the Production Item Alternative register for the Item with Start and End Dates, and the period in the Production Plan falls between those dates, the Recipe in the header of that Production Item Alternative record will be brought in. Otherwise (i.e. if the relevant Production Item Alternative record does not have Start and End Dates, or there is no Production Item Alternative record), the Recipe will be taken from the Item record.
- This Recipe will be used in Productions created from the Production Plan and cannot be changed after the record has been saved for the first time.
Footer

- OK
- When the Production Plan record is complete and correct, approve it by marking it as OK and saving it. When you use the 'Create Productions' Maintenance function to create Productions or Production Orders from Production Plans, you will have the option to create them only from Production Plans that have been marked as OK.
- When you create Productions or Production Orders from a Production Plan using either the 'Productions' function on the Create menu or the 'Create Productions' Maintenance function, the Production Plan will be marked as OK automatically.
- If you need to create a Purchase Order Plan for the components in a Production Plan (using the 'Create Purchase Order Plan' Maintenance function), you must mark the Production Plan as OK first.
- Once you have marked a Production Plan record as OK and saved it, you will no longer be able to change it.
- You can use Access Groups to prevent certain users from marking Production Plans as OK. To do this, deny them access to the 'OK Production Plan' Action. This will also prevent those users from using the 'Productions' function on the Create menu and from using the 'Create Productions' Maintenance function, since these functions will mark Production Plans as OK automatically.
- Closed
- If you mark a Production Plan as Closed and save it, you will not be able to create Productions or Production Orders from it.
---
The Production Plan register in Standard ERP:
Go back to: