Introduction
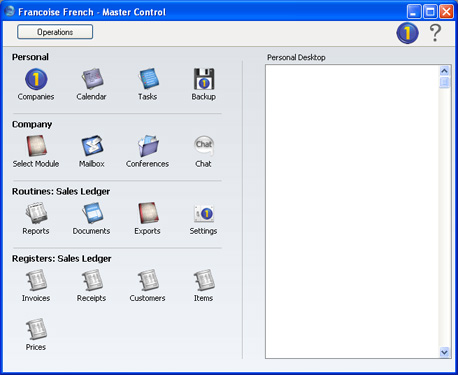
FirstOffice's work area contains a single movable, tool palette, the Master Control panel, located by default in the centre of the screen. This contains the Personal Desktop and four rows of buttons. The buttons in the first two rows (entitled 'Personal' and 'Company') mostly control functions that cannot be operated in any other way. Those in the third row (entitled 'Routines') duplicate some of the functions on the
File menu, while those in the fourth row (entitled 'Registers') can also be activated at all times using the keyboard shortcuts Ctrl-1-5 (Windows and Linux) or ⌘-1-5 (Macintosh). These registers vary with the selected module. Since the Master Control panel is always visible, it is often simpler to use the buttons it contains than to select functions from the menus.
You can bring the Master Control panel to the front at any time using the 'Master Control' item on the File menu. Windows and Linux users can use the keyboard shortcut Ctrl-M, while Macintosh users can use ⌘-M. To close the Master Control panel, click the close box or use the keyboard shortcuts Ctrl-F4/⌘-W.
The panel contains four rows of buttons:
- Personal
- These buttons allow you to communicate with other users of your FirstOffice system and to organise your diary. This provides a means of recording appointments and other tasks. Some of these buttons have a keyboard shortcut, as noted below, which you can use when the Master Control panel is the active (front) window.
- [Companies]
- Windows/Linux keyboard shortcut: Ctrl-O
- Macintosh keyboard shortcut: ⌘-O
- If you have more than one Company in your database, use this button to move between Companies. For more information about using a multi-Company database, refer to the Working with Companies page.
- [Calendar]
- Click this button to open the Calendar: a graphic representation of your completed Activities and those of other users. Full details can be found on the Calendar page.
- [Tasks]
- This button allows you to organise your diary, providing a means of recording appointments and other tasks. Full details can be found on the Task Manager page.
- [Backup]
- In a single-user system, you can use this button to back up your entire database. Please refer to this page for details about backing up.
- Company
- These buttons provide more tools to help you communicate with other users of your FirstOffice system. Some of these buttons have a keyboard shortcut, as noted below, which you can use when the Master Control panel is the active (front) window.
- [Select Module]
- Windows/Linux keyboard shortcut: Ctrl-0
- Macintosh keyboard shortcut: ⌘-0
- Click this button if you need to work in a different module or area of the program (e.g. when you want to change from the Nominal Ledger to the Sales Ledger). Each time you change module, the Register buttons in the lower part of the Master Control panel will be changed to show the Registers in the new module.
- [Mailbox]
- Windows/Linux keyboard shortcut: Ctrl-Shift-M
- Macintosh keyboard shortcut: ⌘-Shift-M
- If you are using FirstOffice's Mail facilities, click this button to open your Mailbox. From here, you can send mail to other users in your FirstOffice system and read mail that has been sent to you. Your Mailbox is also used to send and receive external mail (i.e. to communicate with people outside your FirstOffice system who use standard email programs). Mailboxes require you to have the CRM and Mail Value Pack.
- [Conferences]
- If you are using FirstOffice's Mail facilities, Conferences are addresses to which mail can be sent from where it can be read by all users (subject to access restrictions). Click this button to open a window showing the available Conferences. These require you to have the CRM and Mail Value Pack.
- [Chat]
- Click this button to produce a list of users currently logged in to your FirstOffice system. Only those users that have Mailboxes will be listed. Click on a user's initials to chat with that person.
- Routines
- These buttons are equivalent to some of the commands on the File menu. In each case, clicking the button produces a list of options from which the required one can be selected by double-clicking. These options will vary depending on the current module. Each of these buttons has a keyboard shortcut, as noted below, which you can use at any time.
- [Reports]
- Windows/Linux keyboard shortcut: Ctrl-R
- Macintosh keyboard shortcut: ⌘-R
- Click this button to produce reports. You can define some of the reports and choose where they are to be printed (e.g. to screen, to a printer or to a text file). General details about producing reports can be found on the Report Window and File Menu pages, while the reports themselves are described in detail in the appropriate sections of these web pages.
- [Documents]
- Windows/Linux keyboard shortcut: Ctrl-D
- Macintosh keyboard shortcut: ⌘-D
- Use this button when you want to print documents intended for external use (e.g. Invoices or Sales Orders). Details about printing documents can be found on the File Menu page, while the documents themselves are described individually in the appropriate sections of these web pages.
- [Exports]
- Windows/Linux keyboard shortcut: Ctrl-E
- Macintosh keyboard shortcut: ⌘-E
- This is the button you use when you need to back up your FirstOffice database and to export data from FirstOffice. Exports are described individually in the appropriate sections of these web pages, and details about backing up can be found here.
- [Settings]
- Windows/Linux keyboard shortcut: Ctrl-S
- Macintosh keyboard shortcut: ⌘-S
- Settings allow you to set operating preferences within FirstOffice, to tailor its operations to your requirements. The settings available vary with the different modules. Before you start working with each module, you should consider its settings, since its functions depend on the settings being correct. Many settings take the form of options or preferences. Others require information or a number of records to be entered. Click the button to open the 'Settings' list window where you will find an alphabetical list of the settings that are available in the current module. Double-click an item in this list to add to or change a particular setting. Settings are described individually in the appropriate sections of these web pages.
- Registers
- These buttons vary according to the current module: one is provided for each register in that module. Separate registers are used for the different types of information stored in and used by the module. Click on a register button to open the browse window for the register. This window lists all the records contained in the register. Each register is explained in separate sections throughout these web pages.