Introduction
FirstOffice keeps all information about Customers and Suppliers together in a single register, the
Customer register, with one record for each company. All other companies (e.g. leasing companies, factoring companies, sales leads, etc) should be stored here as well.
Before recording companies in the Customer register, you should first make sure all relevant Payment Terms (used to calculate Due Dates and settlement discounts in Invoices) have been entered in the Payment Terms setting. You may also wish to define Customer and Supplier Categories (used to group together companies of a similar type).
To enter your first record in the Customer register, follow these steps:
- Select the Sales or Purchase Ledger or the Sales Support module using the [Select Module] button in the Master Control panel. The same Customer register is available in all three modules.
- Open the Customer register by clicking the [Customers] button in the Master Control panel. If you are using a new database, a blank browse window will appear. Otherwise, it will list all Customers previously entered.
- Click the [New] button in the Button Bar at the top of the browse window.
Use the 'Customer: New' window shown below to enter data about the company. For full details about each field on the screen, please refer to the Customers and Suppliers page.
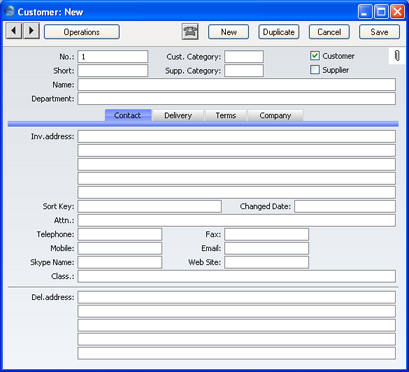
If in step 1 you opened the Customer register from the Sales Ledger or the Sales Support module, the new record will be marked as a Customer automatically. If you opened the Customer register from the Purchase Ledger, the new record will be marked as a Supplier automatically.
- Click the tabs (named 'Contact', 'Delivery', 'Terms' and 'Company') to enter more information about the Customer.
- Click the [Save] button in the top right-hand corner of the window. The Customer is saved in the Customer register.
- The window title changes to 'Customer: Inspect', giving you a chance to check you have not made any mistakes in entering the record.
- Close the record by clicking the close box or using the Ctrl-F4 (Windows and Linux) or ⌘-W (Macintosh) keyboard shortcut.
- If you have a number of Customers to enter, click [New] instead of [Save] at step 5 above (or use the Ctrl-N/⌘-N keyboard shortcut). The Customer is saved and closed, and a blank window is opened, allowing you to enter another Customer straight away. If you need to enter Customers, it's a good idea at step 1 above to open the Customer register from the Sales Ledger or the Sales Support module. All new records will be marked as Customers automatically. If you need to enter Suppliers, open the Customer register from the Purchase Ledger to ensure all new records are marked as Suppliers automatically.
It is a good idea to repeat the above process for a few Customers in order to familiarise yourself both with the data entry process and with the Customer entry screen. However, if you are changing to FirstOffice from another computer program, it is likely that you will want to import your Customers from a text file created by your old system. If you wish to do this, please follow the import instructions described on the
Setting up a Basic Accounts System page to import your text file. This procedure, although described there as being used to import a Chart of Accounts, is in fact an all-encompassing import function which will bring in whatever is in the selected text file and save it in the appropriate place in FirstOffice. For details of the composition of the text file (field order, etc), please refer to your FirstOffice representative.