POS Button Types in POS Invoices - Miscellaneous Functions
This page describes the following POS Button Types in POS Invoices:
- Connect to CC Terminal
- Send Email
- Senior Citizen Discount
Please refer here for an index of all POS Button Types.
---
Connect to CC Terminal - Function
- In Sweden, if you are processing credit card payments through Bambora, allows a cashier to attempt to reconnect a till to its credit card terminal if connection is lost.
- Requirements
- In the Local Credit Card Terminal setting on the till, you must have specified that the Terminal Type is "Bambora".
- Workflow
- If you know that the connection between the till and the credit card terminal has been broken, click or touch the "Connect to CC Terminal" button to attempt to re-establish the connection.
Send Email- Function
- Allows a cashier to send an email to a Customer.
- Configuration
- The Mail must have a sending address. This will be chosen as follows:
- If the cashier has a Mailbox, the cashier will be the sender of the Mail and the sending address will be taken from the cashier's Global User or Person record.
- If the cashier does not have a Mailbox, the From System Mailbox specified in the Mail and Conference Settings setting in the Email and Conferences module will be the sender of the Mail. The sending address will be taken from the Global User or Person record belonging to the owner of the From System Mailbox.
The Mail will be sent to an address belonging to the Customer. This will be chosen as follows: - If the Customer has a record in the Additional Email Recipients setting in the CRM module, the Mail will be sent to the Contact Persons listed with the Form Type "POS Invoice" in that record.
- If the Customer does not have a record in the Additional Email Recipients setting or its record in that setting has no Contact Persons with the Form Type "POS Invoice", the Mail will be sent to the Email Address of the Contact Person quoted in the Primary Contact field in the Contact record for the Customer.
- If the Primary Contact does not have an Email Address or there is no Primary Contact, the Mail will be sent to the Email Address specified in the Contact record for the Customer.
The Subject and Text of the Mail will be taken from the record in the Mail Texts setting in the Email and Conferences module in which the Form is "POS Invoices". If the POS Invoice has a Language and the Mail Text record contains a row for that Language, the Subject and Text will be determined by the fields in that row. Otherwise, they will be determined by the fields in the Mail Text header, as follows: To send Mails to Customers, you must be using the External Gateway module, and you must have configured the Email SMTP Server setting. Please refer here for full details about the mailing facilities in Standard ERP.
- Workflow
- Ensure the POS Invoice has been saved. If you have received payment, the POS Invoice will have been saved automatically. Otherwise, save it using the [Save] button (Windows/Mac OS X) or the √ button (iOS/Android).
- Click or touch the "Send Email" button.
- A Mail will be opened in a new window entitled 'Mail: Inspect'. This means that it has already been saved and is being opened for checking.
- Edit the Mail if necessary.
- When you are ready to send the Mail, tick the Sent box and save the Mail by clicking or touching the [Save] button (Windows/Mac OS X) or tapping √ (iOS/Android) in the Button Bar. If you are using the Lock and Send emails Automatically option in the Mail and Conference Settings setting in the Email and Conferences module and the Mail contains an external email address (i.e. one with the @ sign), it will now be sent automatically. If you are not using this option, select 'Send email' from the Mail's Operations menu after you have saved the Mail.
- Close the Mail using the close box (Windows/Mac OS X) or by tapping < (iOS/Android). You will be returned to the POS Invoice window.
If you are using the Use External Mail Software option in the Mail and Conference Settings setting, the Mail will not be created inside Standard ERP as described above. Instead, it will be created in your default mail application (e.g. Eudora, Outlook, etc).
- Note
- You can only send Mails to Customers from a till or cash machine that has a live connection to the server. You cannot use the "Send Email" button from a till or cash machine that has a live-sync connection to the server because the required settings are not sent to the client by the synchronisation process.
Senior Citizen Discount- Function
- Adds a Senior Citizen Discount to a POS Invoice.
- Requirements
- You must have specified a Senior Citizen Discount Item in the POS Settings setting. This Item must contain an Item Formula that will be used to calculate the Senior Citizen Discount.
- Workflow
- When every Item has been added to a POS Invoice, click or touch the "Senior Citizen Discount" button.
- The 'Senior Citizen Discount' window appears:
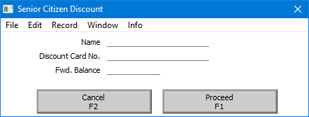
- From the discount entitlement card offered by the senior citizen, enter their name, card number and forward balance. You must enter all three pieces of information. Please refer to the note below for details about the forward balance.
- Click or touch [Proceed] to add the discount to the POS Invoice, or [Cancel] to return to the POS Invoice without adding the discount.
- The discount will be added to the end of the POS Invoice, calculated using the Item Formula specified in the Senior Citizen Discount Item.
- Notes
- If you need to include additional Items in a POS Invoice after having added a Senior Citizen Discount, you can simply repeat the process described above. The previous discount will be removed from the POS Invoice and the new one added to the end.
- The Senior Citizen Discount feature is designed to satisfy a requirement in the Philippines, where each senior citizen is given a weekly discount allowance. Enter the unused portion of this allowance in the Fwd. Balance field in the 'Senior Citizen Discount' window, taken from the discount entitlement card. The discount given in the POS Invoice will be calculated using the Item Formula from the value of the POS Invoice (including VAT) or from the Fwd. Balance, whichever is the lower.
---
Configuring the POS Invoice Window:
Go back to:
|