Cash Book Settings
This setting contains some miscellaneous options controlling the behaviour of the Cash In and Cash Out registers.
To open the Cash Book Settings setting, first ensure you are in the Cash Book module and click [Settings] in the Master Control panel or select 'Settings' from the File menu. Then, double-click 'Cash Book Settings' in the 'Settings' list. The 'Cash Book Settings: Inspect' window is opened.
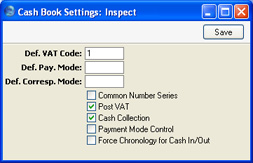
- Def. VAT Code
- Paste Special
VAT Codes setting, Nominal Ledger
- VAT Codes control the VAT Accounts that will be credited (Cash In) or debited (Cash Out) when cash transactions are posted to the Nominal Ledger, and the rate at which VAT will be calculated. VAT Code records are set up using the VAT Codes setting in the Nominal Ledger.
- Enter here the VAT Code that you wish to be used as a default when you enter new records directly to the Cash In and Cash Out registers. Normally, if your company is registered for VAT, this will be the VAT Code representing the standard rate. Otherwise, it will be a zero rate VAT Code.
- As well as entering a default here, you should also check the Post VAT box below. If you do not check this box, Nominal Ledger Transactions created from Cash In and Cash Out records will not include a separate VAT element, irrespective of the VAT Code.
- Def. Pay. Mode
- Paste Special
Payment Modes setting, Sales/Purchase Ledger, Cash Book module
- The Payment Mode determines the Nominal Ledger Account to be debited (Cash In) or credited (Cash Out) by the value of the cash transaction. Usually this will be a Cash or Bank Account.
- Enter here the Payment Mode that you wish to be used as a default when you enter new records directly to the Cash In and Cash Out registers and when you create Cash In and Cash Out records from Sales and Purchase Invoices and from Receipts. When you create Cash Out records from Payments, the Payment Mode in the Cash Out will be copied from the Payment and so the default will not apply.
- If you want to use the 'Create Collection Cash In' and 'Create Collection Cash Out' Maintenance functions, you must enter a Default Payment Mode first. Otherwise, the functions will have no effect.
- Be careful in choosing a default if you are using the Single Transaction method to create cash transactions from Invoices and Purchase Invoices. Please refer to point 9 of the description on this page for details.
- Def. Corresp. Mode
- Paste Special
Corresponding Modes setting, Cash Book module
- The Corresponding Mode determines the Nominal Ledger Account to be credited (Cash In) or debited (Cash Out) by the value of the cash transaction (or by the value of the cash transaction less VAT if a separate VAT posting is being made). In the case of transactions that you enter directly to the Cash In and Cash Out registers, this may be a Sales (Cash In) or Purchase (Cash Out) Account, or, in the case of cash payments made to or received from members of staff, an Expense Account. For payments of cash between your bank and petty cash, it will be your Bank Account (the Petty Cash Account will come from the Payment Mode). In the case of cash transactions that you create from Invoices, especially if you are using the Double Transaction method to create cash transactions from Invoices and Purchase Invoices as described in the introduction, this may be a temporary holding Account for cash.
- Enter here the Corresponding Mode that you wish to be used as a default when you create new records in the Cash In and Cash Out registers. This default will be used in all cases i.e. when entering records directly to the Cash In and Cash Out registers, and when creating them using the 'Create Cash In' and 'Create Cash Out' Operations menu functions and the 'Create Collection Cash In' and 'Create Collection Cash Out' Maintenance functions. If you want to use these Maintenance functions, you must enter a Default Corresponding Mode, otherwise, the functions will have no effect.
- Common Number Series
- In the Baltic States, all incoming cash transactions must use the same number sequence, irrespective of the originating register (i.e. Cash In and Receipts). Similarly, all outgoing cash transactions (i.e. Purchase Invoices, Cash Out, Payments and Personnel Payments) must use the same number sequence. Check this box if you want to use this feature.
- You should define the number sequences using the From and To fields on flip C of the Payment Modes setting. Inward cash transactions use the number sequence in the left-hand From and To fields, while outward transactions use those in the right-hand fields. You should use separate sequences for each Payment Mode. These will be used in preference to any that have been defined in the Number Series settings, which will only be used if you use a Payment Mode that does not have its own number sequence. The number sequences in Number Series - Cash In, Number Series - Cash Out, Number Series - Invoices, Number Series - Purchase Invoices, Number Series - Receipts, Number Series - Payments and Number Series - Personnel Payments should not overlap with any number sequence in the Payment Modes setting.
- If you change the Payment Mode in any transaction record, the serial number for that record will change to the next unused one in the correct number sequence for the new Payment Mode. In the case of Purchase Invoices, you should enter the Payment Mode to the Payment Terms field. When you approve the Purchase Invoice, it will be treated as paid and no posting to a Creditor Account will be made. A consequence of this is that you should use different Codes in the Payment Modes and Payment Terms settings. For example, if you have used "C" as a Code in both settings and you enter it to the Payment Terms field in a Purchase Invoice, it will be treated as a reference to the Payment Term and not to the Payment Mode. Consequently, the Invoice Number will not be changed as expected and, depending on the nature of the Payment Term, the Purchase Invoice might not be treated as paid.
- If you are not using this option, any number sequences in the From and To fields on flip C of the Payment Modes setting will not be used in Cash In and Cash Out records and Personnel Payments, and the number sequences in the appropriate Number Series setting will be used instead. It is recommended that you do not define number sequences in the Payment Modes setting if you are not using this option. It is also recommended that you do not use this option if you will be using the 'Create Cash In' and 'Create Cash Out' Operations menu functions and the 'Create Collection Cash In' and 'Create Collection Cash Out' Maintenance functions. These functions gather all cash transactions together in the Cash In and Cash Out registers, thereby achieving the use of common number sequences using a different route.
- Post VAT
- When you approve Cash In and Cash Out records, they will usually cause Nominal Ledger Transactions to be created (if so determined in the Sub Systems setting in the Nominal Ledger). If you want these Transactions to include a separate VAT element, check this box. The Account used for this VAT posting will be determined by the VAT Code specified in the Cash In or Cash Out record (you can specify a default VAT Code in the field above).
- This option has no effect in the case of Cash In and Cash Out records created from Invoices, Purchase Invoices, Receipts and Payments. VAT will already have been posted from the originating Invoices (and from Receipts and Payments if you are using the Book Receipt VAT and Book Payment VAT options respectively), so VAT will not be posted again from the consequent cash transactions.
- Cash Collection
- You can enter cash transactions directly to the Cash In and Cash Out registers, and you can also create them from Invoices and Purchase Invoices using the 'Create Cash In' and 'Create Cash Out' functions on the respective Operations menus. In this second case, you can create cash transactions from Invoices of all kinds. If you would like to be able to create them from Cash Notes (Invoices with Payment Terms of the "Cash" type) only, switch on this option.
- You can also create cash transactions from Receipts and Payments using the 'Create Cash In' and 'Create Cash Out' functions. Again, you can create cash transactions from Receipts and Payments of all kinds. If this option is on, you will only be able to create them from Receipts and Payments with Payment Modes of the "Cash" type.
- The Cash Collection option will also stop you from creating more than one cash transaction from an Invoice, Receipt or Payment, it will prevent you from changing the value of the cash transaction record (i.e. the values of the Invoice, Receipt or Payment and its corresponding cash transaction record must be the same), and it will also prevent you from deleting the cash transaction after you have saved it for the first time.
- The Cash Collection option also affects the Form that will be used when you print cash transactions. Please refer to the Printing Cash Transactions page for details.
- Payment Mode Control
- This option has no effect unless you are also using the Cash Collection option (described above). In addition to the restrictions imposed by the Cash Collection option, switching on the Payment Mode Control option will prevent you from using Payment Terms of the "Cash" Type and "GenTrans" Payment Modes in Invoices and Purchase Invoices. Similarly, you will not be able to use "GenTrans" Payment Modes in Receipts and Payments. This option should only be used in specialised situations.
- Force Chronology for Cash In/Out
- This option prevents you changing the date in Cash In and Cash Out records. All cash transactions will therefore use the current date, thus ensuring they are always recorded in date order.
Confirm the entry by clicking the [Save] button in the Button Bar, or cancel it by closing the window using the close box.
|