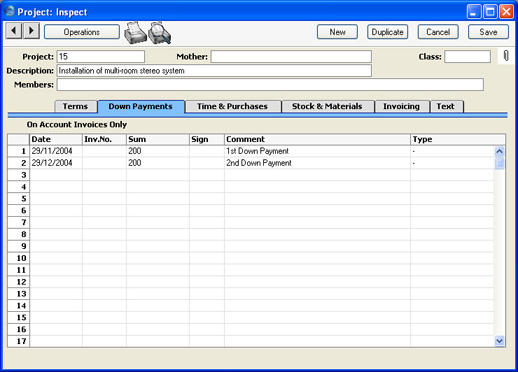
Entering a Project - Down Payments Card
Two schemes are available for the invoicing of Projects. Invoices can be raised which strictly reflect
time spent and
materials used, or a Project can be given an overall fixed price that is then invoiced. This card is used to raise Invoices in cases where the second method is being used.
You can raise a single Invoice for the full Project amount, or you can do so in instalments. Alternatively, if you are intending to use the first invoicing scheme, you can raise an Invoice for a deposit that will later be deducted from the first time/material Invoice.
To raise a single Invoice for the full Project amount or for a deposit, enter that amount on the first line of the grid, together with the earliest date on which the Invoice can be raised. If the Project will be invoiced in instalments, enter each instalment to the grid with appropriate amounts and dates as shown in the illustration below. Then, use 'Create Down Payment Invoice' on the Operations menu to create an unapproved Invoice in the Invoice register. Alternatively, if you want to create Down Payment Invoices for several Projects at once, use the 'Create Project Invoices' Maintenance function and choose the Create Down Payment Invoices option.
If you are intending to raise a single Invoice for the full Project amount or will be using an instalment scheme, it is recommended that you use the Do Not Invoice option on the 'Terms' card. This will prevent unwanted Invoices being created from Project Transactions. If you are using this screen just to issue an initial deposit Invoice, the Do Not Invoice option should be off, so that future Invoices for time, materials and purchases can be raised when necessary.

- Date
- Paste Special
Choose date
- Specify here the earliest date that the deposit Invoice can be raised.
- If you are invoicing a Project in instalments, use this field to control when the instalment Invoices are created. When you run the 'Create Down Payment Invoice' Operations menu function, the new Invoice will be made up from those previously uninvoiced rows of the grid whose Date is earlier than the current date. For example, referring to the illustration above, if the function is run on 12/5/2003, an Invoice for 200.00 + VAT will be created, but if the function is run for the first time on 12/6/2003, an Invoice for 400.00 will be created. This allows you to plan the instalment amounts in advance.
- The Invoice Date of any Invoices raised will be the date the 'Create Down Payment Invoice' function is run.
- Inv. No
- The Invoice Number is placed here once the Invoice has been created.
- Sum
- Enter the amount to be invoiced (excluding VAT).
- Sign
- Paste Special
Person register, System module
- The initials of the Person issuing the Invoice are placed here when the Invoice is created.
- Comment
- Any comment entered here will be included on the Down Payment Invoice. The default is the Description of the Down Payment Item specified in the Project Settings setting.
- Type
- Paste Special
Choices of possible entries
- You can use this field to prevent the raising of an Invoice for this row. This might be necessary if an Invoice had already been raised in the Sales Ledger for a deposit before the Project was entered. If this is the case, choose "Already Invoiced" from the 'Paste Special' list. To have an Invoice raised by the 'Create Down Payment Invoice' function as described above, leave the field with its default value of "-".
Crediting a Down Payment Invoice
If it is necessary to issue a Credit Note against a Down Payment Invoice, follow these steps:
- Create a new record in the Invoice register in the Sales Ledger. Do not copy the Down Payment Invoice.
- After entering the Customer, change the Payment Term to one that is of the type "Credit Note".
- In the first row of the specification area, a crediting message appears. Enter the number of the Invoice to be credited, using 'Paste Special' if necessary to bring up a list of open (unpaid) Invoices.
- Enter the Invoice text, amount to be credited, Sales Account and VAT Code.
- Enter the Project Number on the 'Identifiers' card, using 'Paste Special' if necessary. If you cannot enter a Project Number, it will be because the Payment Term you selected in step 2 is not of the type "Credit Note".
- Check everything and approve the Invoice.
- Open the Project register, find the Project, and go to the 'Down Payments' card. Add a new row to the grid and specify the Date, Amount (negative figure), Signature and Comment (e.g. reason for the Credit Note). Change the Type to "Already Invoiced".
Invalidating a Down Payment Invoice
If it is necessary to invalidate a Down Payment Invoice, this can be done in the usual way (by selecting 'Invalidate' from the Record menu). In the Project, the Invoice Number will automatically be removed from the relevant row of the grid on the 'Down Payments' card. This means you can change the row if necessary and then issue another Down Payment Invoice.
