Entering a Time Sheet
In the Job Costing module, select 'Time Sheets' from the Registers menu, or click the [Time Sheets] button in the Master Control panel.
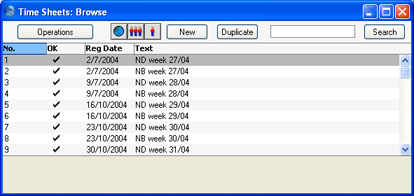
The 'Time Sheets: Browse' window is opened, showing Time Sheets already entered. As is usual in Hansa, you can change the sort order by clicking on a column heading. You can also enter a search value in the box in the top right-hand corner of the window, and search for a single record.

To enter a new Time Sheet, click [New] in the Button Bar or use the Ctrl-N (Windows and Linux) or ⌘-N (Macintosh) keyboard shortcut. Alternatively, highlight a Time Sheet similar to the one you want to enter and click [Duplicate] on the Button Bar.
The 'Time Sheet: New' window is opened, empty if you clicked [New] or containing a duplicate of the highlighted Time Sheet. In the case of the duplicate, the Registration Date of the new record will be the current date, not the date of the original Time Sheet.

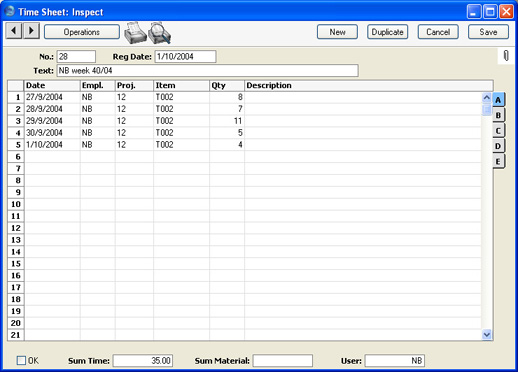
Time Sheets can be entered in the manner that most suits your requirements. In the illustration above, a Time Sheet record has been entered which represents a week's work of a single employee. As it happens, that employee worked on a single Project throughout that week. There is no need to restrict a Time Sheet record to a single Person, Project or even time period unless you are using the
Force Time Entry feature to monitor the entering of Time Sheets. In this case, it is recommended that each Person enter their own Time Sheets, and that they do so regularly enough to satisfy your monitoring regime.
- No.
- Paste Special
Select from another Number Series
- The number of the Time Sheet: Hansa will enter the next unused number from the first number sequence entered in the Number Series - Time Sheets setting. You may change this number, but not to one that has already been used. In multi-user systems, the next unused number will not be allocated until the Time Sheet is saved.
- Reg. Date
- Paste Special
Choose date
- The registration date for this Time Sheet. Hansa enters the current date as a default.
- Text
- A description of the contents of the Time Sheet.
As you enter information in the table, indicate on each row the Date, Person, Project, Item and Quantity. To make data entry faster, Hansa will copy the data from the row above if you leave a field blank and press the Enter or Return key. Use the Tab key if you wish to leave the field blank.
The Time Sheet matrix is divided into five horizontal flips. When you click a flip tab (marked A-E), the two or three right-hand columns of the grid are replaced.

Flip A
- Date
- Paste Special
Choose date
- The date when the work was carried out or the material supplied.
- Empl.
- Paste Special
Person register, System module
- Enter the initials of the employee that carried out the work.
- If any Objects have been assigned to the employee (on the 'Bonus' card of their Person record), they will be brought in to the Objects field on flip B of the Time Sheet automatically.
- The employee's name will be shown on flip D.
- Proj.
- Paste Special
Project register, Job Costing module
- The Code of the Project to which the time or material is to be charged.
- If an employee works on particular Projects at any one time, you can ensure that no other Projects can be entered here. To do this, list the allowed Projects in the grid on the 'Job Costing' card of the appropriate Person record (in the System module) and switch on the Allow Short Codes Only check box. This also has the effect that you can now enter either a Project Code or its short code to this field.
- If any Objects have been assigned to the Project (on the 'Terms' card of the Project screen), they will be brought in to the Objects field on flip B of the Time Sheet automatically.
- The Project Name will be shown on flip D.
- Item
- Paste Special
Item register
- The Item Code for the time. Usually only Service Items (time) can be used here. If you want to be able to use Plain Items (materials and purchases) as well, make this choice in the Project Item Handling or Specified Project Item Handling settings.
- When Project Transactions are created from this Time Sheet, the price of each Item will be calculated using the pricing scheme described on the Pricing and Costs - Time, Purchases and Materials from Time Sheets and Activities page.
- Stocked items are not allowed here: these should be entered to an Order that is linked to the Project using the field on the 'Del Terms' card of the Order screen. Purchased items should be entered through the Purchase Ledger, and Expense items should be entered through the Expenses module.
- If you have several different types of time that are chargeable at different rates, such as consultancy, programming services or installation, these should be set up as separate records in the Item register. If an employee can only provide certain kinds of work, you can ensure that only the appropriate Items can be entered here. To do this, assign each employee to a Job Group using the field on the 'Job Costing' card of the appropriate Person record. In each Job Group record, list the allowed Items in the grid and switch on the Only Short Codes Allowed check box. This also has the effect that you can now enter either an Item Code or its short code to this field. This applies to both time and materials.
- If any Objects have been assigned to the Item (on the 'Pricing' card of the Item screen), they will be brought in to the Objects field on flip B of the Time Sheet automatically.
- The Item Name will be shown on flip D.
- Qty
- The number of hours worked or the quantity of materials supplied.
- Description
- Any comment entered here will be transferred to the Comment field of the Project Transaction.
Flip B
- Objects
- Paste Special
Object register, Nominal Ledger/System module
- Default taken from Project, Item and Person
- Used as default in Project Transactions
- You can assign up to 20 Objects, separated by commas, to this Time Sheet row and all transactions generated from it. You might define separate Objects to represent different Projects, departments, cost centres or product types. This provides a flexible method of analysis that can be used in Nominal Ledger reports.
- Any Objects specified for the Project and Item will be copied here as a default, as will any Objects specified in the Person record for the employee entered on flip A. All Objects will be transferred to the Project Transaction.
- Objects are shown here for information only. Any changes should not be made here but in the Project, Item or Person records as appropriate before entering the Time Sheet. For details about the Objects that will be included in Invoices for a Project, please refer to the page describing the 'Service' card of the Project Settings setting.
Flip C
- Time Class
- Paste Special
Time Classes setting, Job Costing module
- Use this field if you have different charge out rates for various kinds of work and are managing them using Time Classes. Enter the Time Class (e.g. standard rate, evening rate, etc.) used on this occasion. This will determine the price in the resulting Project Transaction and therefore the rate to be charged to the Customer.
- Please refer to the Pricing and Costs - Time, Purchases and Materials from Time Sheets and Activities page for more information on Time Classes.
Flip D
- Project Name
- The Project Name will appear here once you have entered a Project Number on flip A.
- Employee Name
- The Employee Name will appear here once you have entered their initials on flip A.
- Item Name
- The Item Name will appear here once you have entered an Item Number on flip A.
Flip E
- Extra Comment 1, Extra Comment 2
- Use these fields to record any further comments about the work carried out. These comments will be transferred to the second and third Comment fields of the Project Transaction.
Footer
- OK
- Checking this box approves the Time Sheet. When the Time Sheet is next saved, Project Transaction records will be created (one for each Time Sheet row). These will be used by the 'Create Project Invoices' Maintenance function to create Invoices for the time spent and materials used.
- An approved Time Sheet record cannot be changed or deleted, except through the use of the 'Correction Mark' function on the Operations menu. However, the Project Transaction records can be altered before the Invoice has been created.
- References in these web pages to approved Time Sheets are to Time Sheets whose OK check box has been switched on.
- Sum Time
- This shows the total hours for the Time Sheet, calculated by adding the Quantities of all Service Items.
- Sum Material
- This shows the total purchases and materials for the Time Sheet, calculated by adding the Quantities of all Plain Items.
- User
- Paste Special
Person register, System module
- Default taken from Person on first Time Sheet row
- The employee's initials from the first row of the Time Sheet are copied here automatically. You can change to another Person's initials if necessary. If the Limited Access module is present, this field can be used to prevent a user from seeing all Time Sheets in the 'Time Sheets: Browse' window by restricting their view to their own Time Sheets or to those of their Sales Group.
- Please click here for full details of the Limited Access module.
