Stock Settings
This setting contains some miscellaneous options controlling the behaviour of various aspects of the Stock module. 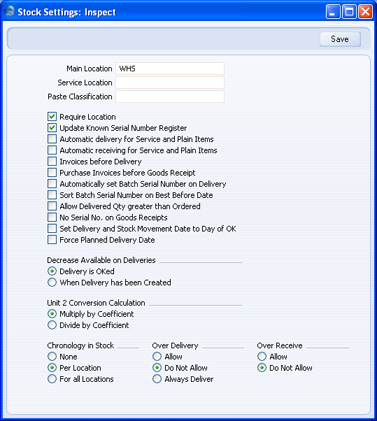
- Main Location
- Paste Special
Locations setting, Stock module - If you specify a Location here, it will be used by default wherever a Location is required and left blank. For example, Items in a Goods Receipt record without a Location will be treated as being stored in the Main Location.
If you have at least one Location, you must specify a Main Location here. This will prevent you having stock that is not in any Location. This will be useful if you only have one Location. If you have more than one, you may also want to use the Require Location option below: this will ensure you have to specify a Location in every stock transaction. - If you are not using the Require Location box (below) and you change the Main Location, you must create a back-up file and import it into a new database before entering any further stock transactions. This will have the effect of moving all stock from the old Main Location to the new one, because all stock transactions with a blank Location will then be treated as referring to the new Main Location. If in reality the stock in the old Main Location remains there, you should then move it back to that Location using Stock Movements.
- A special case of this is the specifying of a Main Location for the first time. In this case, stock that has already been entered without a Location will be treated as being in the Main Location once you have completed the updating procedure described above.
- If you do not follow this updating procedure when you change the Main Location, and instead move stock from the old Main Location to the new one using a Stock Movement, stock levels will be rendered inaccurate the next time you create a back-up file and import it into a new database (e.g. when updating to a new version of HansaWorld Enterprise). You will be able to correct this inaccuracy by reversing the Stock Movement. Do not put off following the updating procedure because you do not want all stock to be moved from the old Main Location to the new one, as this will happen anyway the next time you import a back-up file into a new database (e.g. when updating).
! | If you are not using the Require Location option and you change the Main Location, create a back-up file and import it into a new database straight away. | |
- Service Location
- Paste Special
Locations setting, Stock module - This field is used if you have the Service Orders module. When receiving into service stock Items belonging to Customers that you are to repair, they will be stored by default in the Location specified here.
- Paste Classification
- Paste Special
Item Classifications setting, Stock module - Please click here for full details of this field.
- Require Location
- If you are using this option, you will have to specify a Location in every stock transaction (such as Deliveries and Goods Receipts) and Invoice. If you are not using this option and you do not specify a Location in a transaction, that transaction will be treated as affecting the Location entered in the Main Location field above.
- If you have more than one Location, it is recommended that you use this option. It removes the risk of forgetting to specify a Location in a transaction and therefore adding stock to or removing stock from the Main Location by mistake.
- Update Known Serial Number Register
- You should use this option if you have the Service Orders module and you would like a list of Serial Numbers for Items sold by your company to be made available to the Service Orders module. When such an Item is subsequently brought in for repair, this list will allow HansaWorld Enterprise to determine whether it is still under warranty using the Invoice Date and the Warranty Months field on the 'Recipe' card of the Item screen.
- Automatic delivery for Service and Plain Items
- When you raise Invoices from Sales Orders, usually only those Items on approved Deliveries will be included. This means that you must issue an approved Delivery from a Sales Order before you can raise an Invoice. This might not be appropriate if the Sales Order does not include any Stocked or Structured Items (i.e. it has no stock level implications). If you would like to be able to raise an Invoice without previously issuing a Delivery from such Orders, check this box.
- If you are using this option, when you include a Plain or Service Item in a Sales Order, the Del 1 and Del 2 Quantities will be changed to the Order Quantity when you save the Order. Therefore Plain and Service Items will not be included on Deliveries created from the Order. This also means that you will not be able to reduce the Order Quantity for such Items once you have saved the Order.
- If you are using this option, take care not to create premature Invoices accidentally for services such as delivery and labour from Orders that also include Stocked Items.
- You should not use this option if you have Sales Orders that are connected to Projects. You cannot create Invoices from such Sales Orders: instead you will raise them from Project Transactions that will have been created from Deliveries. If you are using this option, Service and Plain Items (e.g. labour) will not be transferred from Orders to Project Transactions via Deliveries because the Deliveries will not exist.
- Automatic receiving of Service and Plain Items
- When you create Purchase Invoices from Purchase Orders, usually only those Items on approved Goods Receipts will be included. This means that you must have created an approved Goods Receipt from a Purchase Order before you can create an Invoice. This might not be appropriate if the Purchase Order does not include any Stocked or Structured Items (i.e. it has no stock level implications). If you would like to be able to create Invoices without previously entering Goods Receipts from such Purchase Orders, check this box.
- If you are using this option, when you include a Plain or Service Item in a Purchase Order, the Received Quantity will be changed to the Order Quantity when you save the Purchase Order. Therefore Plain and Service Items will not be included on Goods Receipts created from the Purchase Order. This also means that you will not be able to reduce the Order Quantity for such Items once you have saved the Purchase Order.
- Invoices before Delivery
- When you raise Invoices from Sales Orders, usually only those Items on approved Deliveries will be included. This means that you must have issued an approved Delivery from a Sales Order before you can raise an Invoice. If you would like to raise Invoices from Orders (for the complete value of the Order) before issuing Deliveries, check this box. If you have determined that cost accounting transactions are to be created at the point of delivery, stock transactions in the Nominal Ledger will still be raised when you approve and save the Delivery (i.e. using the Invoices Before Delivery option does not affect cost accounting in any way). However, if you have determined that cost accounting transactions are to be created from Invoices, stock transactions in the Nominal Ledger will not be raised. When you raise the Invoice, the value of the delivered Item will not be known because the Delivery does not yet exist. In this case you will need to record this transaction manually in the Nominal Ledger.
- If you are not using this option, you can switch it on for an individual Order by checking the Invoice Before Delivery box ('Del Terms' card).
- Purchase Invoices before Goods Receipt
- When you create Purchase Invoices from Purchase Orders, usually only those Items on approved Goods Receipts will be included. This means that you must have created an approved Goods Receipt from a Purchase Order before you can create an Invoice. If you would like to create Purchase Invoices from Purchase Orders (for the complete value of the Purchase Order) before creating Goods Receipts, check this box.
- If you are not using this option, you can switch it on for an individual Purchase Order by checking the Invoice Before Goods Receipt box ('Terms' card).
- The Always use Full Qty from Purch. Ord. option in the Purchase Invoice Settings setting also allows you to create Purchase Invoices from Purchase Orders before creating Goods Receipts. The Always use Full Qty from Purch. Ord. option will also create a Purchase Invoice for the full order value if there is a partial Goods Receipt, while the Purchase Invoices before Goods Receipt option will create a Purchase Invoice for the value of the partial Goods Receipt.
- Automatically set Batch Serial Number on Delivery, Sort Batch Serial Number on Best Before Date
- When you create Deliveries for Serial Numbered Items, usually you must enter the Serial Numbers yourself, because there is no automatic FIFO or LIFO allocation of Serial Numbers. However, in the case of Items that have Serial Numbers at the batch level only, Serial Numbers and Best Before Dates will appear in Deliveries automatically if you are using this option.
- If the Order Quantity is greater than the size of a batch, the Delivery will contain an appropriate number of separate rows with different Serial Numbers. For example, you have a batch of ten Items with Serial Number 1 and a batch of ten with Serial Number 2, and you receive an Order for eleven. This option will create a Delivery with two rows: the first with a Delivery Quantity of ten and Serial Number 1; and the second with a Delivery Quantity of one and Serial Number 2.
- The lowest batch Serial Numbers will be used first (Serial Number 1 will be offered before Serial Number 2, Serial Number A before Serial Number B, and so on). However, if you are using the Sort Batch Serial Number on Best Before Date option, the batch Serial Numbers with the earliest Best Before Dates will be used first. Any Serial Numbers without Best Before Dates will be used before those with dates.
- If you do not approve a Delivery immediately, you can update its batch Serial Numbers using the 'Refill Batch No. Items' function on the Operations menu.
- Allow Delivered Qty greater than Ordered
- When you create Deliveries from Orders, you are usually prevented from delivering a quantity that is greater than that ordered. Use this option if you would like to be able to do this. This applies to all Item Types, including Plain and Service Items.
- No Serial No. on Goods Receipts
- By default, when you receive an Item that uses Serial Numbers into stock, you will not be able to save the Goods Receipt without entering a Serial Number. Similarly, when you sell an Item, you must quote a valid Serial Number (i.e. one currently in stock) in the Delivery or Invoice.
- If you find these rules to be too strict, use this option. It will allow you to save Goods Receipts without specifying Serial Numbers. You will still have to specify Serial Numbers in goods out transactions (e.g. Deliveries, Invoices, Stock Depreciation records), but no check will be made that they are valid (i.e. that they are currently in stock). Since it is not compulsory to enter Serial Numbers in Goods Receipts, it cannot be known if a particular Serial Number is valid. For the same reason, there will be no 'Paste Special' list available from the Serial Number field in goods out transactions.
- Set Delivery and Stock Movement Date to Day of OK
- If you are using the Queued Cost Model, you must make certain that you enter all stock transactions in strict chronological order. Failure to do this may cause your FIFO/LIFO queue to become incorrect. Do not, for example, enter a Delivery with yesterday's date if you have already entered an outgoing stock transaction of any kind (e.g. Delivery, Stock Depreciation) with today's. It is also recommended that you always approve stock transactions when you save them for the first time. Do not go back to an earlier unapproved stock transaction and approve it if there are later approved ones, unless you change the date as well. To help ensure FIFO/LIFO accuracy, if you are using the Queued Cost Model, it is recommended that you use this option. This will change the Delivery Date in a Delivery to the current date automatically when you approve it. It will also change the Sent Date in a Stock Movement to the current date when you mark it as Sent and save it, and the Received Date to the current date when you mark it as Received and save it.
- Force Planned Delivery Date
- Check this box if you need a Planned Delivery Date to be entered in every Sales and Purchase Order.
- Decrease Available on Deliveries
- Use these options to determine exactly when delivered Items are to be removed from stock (i.e. to determine the moment when stock levels will be reduced). This can be when you create Deliveries or when you approve them.
- You can quickly look up the available stock level of an Item in a particular Location using the 'Item Status' and 'Item Status Report' functions on the Operations menu, available in several areas of HansaWorld Enterprise. The available stock level will also be shown in the Available field in a Delivery when it is created. In effect, these options allow you to choose whether these available stock level figures will include quantities on previous unapproved Deliveries.
- Please click for full details of the 'Item Status' and 'Item Status Report' functions.
- Unit 2 Conversion Calculation
- Several reports in the Stock module offer the option to include Quantity 2. This option allows you to express stock quantities using two different units of measurement. This is only appropriate for Items that have a Unit 2 and a Unit Coefficient specified on the 'Stock' card.
- You can specify that the Quantity 2 figure is to be calculated by multiplying or dividing the standard quantity by the Unit Coefficient. Make this choice using these options. If you change your choice, you should create a Company Text Backup and import it into a new database in order to update the reports.
- Chronology in Stock
- You can use the chronology feature to help improve the accuracy of the FIFO/LIFO queue as it will ensure that you enter stock transactions in date sequence. If you are using this feature, you will not be able to approve a stock transaction (i.e. Goods Receipt, Delivery, Stock Movement, Returned Goods record or Stock Depreciation) if there are unapproved stock transactions (in any of those registers) with an earlier Transaction Date, or approved stock transactions with a later Transaction Date. It is strongly recommended that you use this feature if you are using the Queued Cost Model.
- Use the For all Locations option if all stock transactions are to be considered by the chronology check, or the Per Location option to restrict the feature to stock transactions affecting the Location of the new record.
- You can turn off the chronology check for a particular Location using the Ignore Chronology check box on the Location screen.
! | If you are using this feature, take care never to enter a stock transaction with a future date. If you do this, you will no longer be able to enter any transactions with the current date. | |
- Over Delivery
- Use these options to control what happens when you create Deliveries from Orders when there is insufficient stock to satisfy those Orders in full. Plain and Service Items are not affected by these options, even if you are using the Cost Accounting for Plain Items option in the Cost Accounting setting.
- If you are using the Queued Cost Model (FIFO or LIFO) to calculate cost accounting values, you must use the Do Not Allow option. If you are using the Allow or Always Deliver options and you try to deliver an Item that is not in stock, negative stock will be created, but the FIFO/LIFO value of the Item will not be known and so the value of the cost accounting transaction will not be correct.
- Allow
- This option will allow the delivery of more units of a Stocked Item than are in stock. However, when you create Deliveries from Sales Orders, the default quantity will be the quantity in stock if the order quantity is greater.
- Do Not Allow
- Use this option to prevent the delivery of more units of a Stocked Item than are actually in stock.
- Always Deliver
- This option will allow the delivery of more units of a Stocked Item than are in stock. It differs from the Allow option in that when you create Deliveries from Sales Orders, the default quantity will always be the order quantity, even if there is insufficient stock.
- Over Receive
- Use these options to specify whether you will be able to increase the Quantity in a Goods Receipt to a figure greater than that on the originating Purchase Order.
|