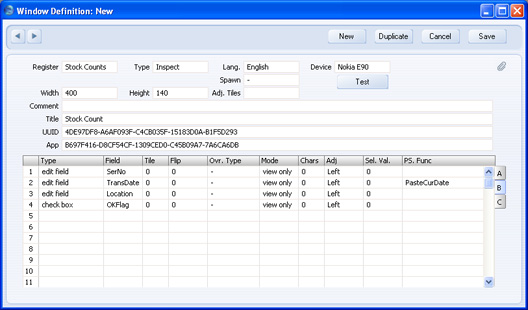
Adding a Field to a Record Window
To add a field to a record window, follow these steps:
- In the first empty row in the grid, set the Type to "edit field".
- Enter the name of the field in the Field column. This should be the internal name of the field, as specified in the Register Definition. You can use the 'Paste Special' function to choose the correct field and to ensure the spelling and capitalisation is correct (it is case sensitive). If the ‘Paste Special’ list is empty, the probable reason is that you are designing a Window for a Register that is not Enabled.
- If the record window will have several cards, use the Tile column to specify the card on which the field will appear. This is described in more detail on the Adding Cards to a Record Window page.
- Use the H and V columns to specify where you want the field to be placed in the record window. Enter the number of pixels to the top left-hand corner of the field (not the label) as follows:
- H (horizontal)
- from the left-hand edge of the record window.
- V (vertical)
- from the top edge of the record window. A vertical spacing of 20 pixels between fields is recommended.
- -H
- from the right-hand edge of the record window.
- -V
- from the bottom edge of the record window.
The maximum values of H and V depend on the Device: please refer to the Window Sizes for each Platform page for details.
If you are using negative figures, remember to leave room for the width of the field (in the case of H) or the depth of the field (in the case of V). If you don't leave enough room, the field may not be drawn in the way you expect.
When placing an object in the top right-hand corner of a window, remember to make room for the [Attachments] button (with the paper clip icon). This button will be included automatically in every record window.
- Use the Width column to specify in pixels how wide the field should be when it is placed in the record window. Ideally, the width should reflect the number of characters that should be entered in the field. There is no need to specify a Height.
- Enter a Label for the field: this is the name that will appear beside the field in the record window, as shown in the diagram below.
The diagram below illustrates the difference between a field and its Label, and also illustrates how the H and V figures refer to the top left-hand corner of the field:

You can also use negative H and V figures:

- On flip B, use the 'Paste Special' function from the Mode column to specify whether the field will be editable, as follows:
- normal
- The field will always be editable.
- edit on insert
- The field will only be editable in records that have not yet been saved.
- view only
- The field will not be editable.
- On flip B, use the Adj. column to specify whether the contents of the field will be left-aligned, centred or right-aligned.
- Add more fields as required:

The order in which you list the fields is important: when you press Tab or Return in the record window, the cursor will move to the next field in the list.
- You can attach the 'Paste Special' feature to the Date field (TransDate), to help the user choose the correct date. On flip B, enter "PasteCurDate" in the PS. Func field:

Please click the links below for more details about:
---
Go back to:
See also:
