Adding a Matrix to a Record Window
To add a matrix or grid to a record window, follow these steps:
- The first step is to place the matrix itself in the window. In the first empty row in the grid, set the Type to "matrix". Do not specify a Field or a Label, but specify the position of the matrix using H and V, and its size using Width and Height. Note that for a matrix, V is the measurement from the top of the window to the top of the first row of the matrix, not to the top of the matrix itself. So, when specifying V, remember to leave room for the column headings (if you don't leave enough room, the matrix may not be drawn in the position you expect, relative to the other objects around it):

- The next step is to add the matrix columns to the matrix. In the first empty row in the grid, set the Type to "matrix column", and specify the name of the field. You cannot choose matrix fields using 'Paste Special', so make sure that you use the correct spelling and capitalisation.
- Use the H column to specify where you want the matrix column to be placed in the matrix. Enter the number of pixels to the left-hand edge of the column as follows:
- H
- from the left-hand edge of the matrix.
- -H
- from the right-hand edge of the matrix.
It is recommended that you set H to 20 for the left-hand column. This will make room for the row numbers, which should appear to the left of that column.
There is no need to set a Width for matrix columns, and doing so will have no effect. The width of a matrix column will be determined by the H measurement of the next column (the one to its right).
- Use the Label column to specify the headings for each column.

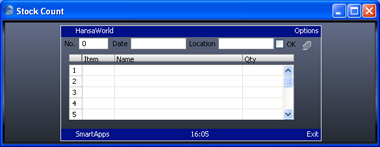
This is how the matrix will appear in the window:

- On flip B, use the 'Paste Special' function from the Mode column to specify whether the matrix columns will be editable, as follows:
- normal
- The matrix columns will always be editable.
- edit on insert
- The matrix columns will only be editable in records that have not yet been saved.
- view only
- The matrix column will not be editable.
- On flip B, use the Adj. column to specify whether the contents of each matrix column will be left-aligned, centred or right-aligned.
- You may have too many matrix columns to be displayed at once. In this situation, you can add flips to the matrix.
In a matrix with flips, the usual practice is for the left-hand columns to be permanently visible, while the right-hand columns will change, depending on which flip you are looking at. In the example, there are five matrix columns: ItemNo, ItemName, StockQty, ItemSerialNo and Position. ItemNo and ItemName will always be visible, and so are said to be on flip 0. StockQty will be visible when the window opens: this column is said to be on flip 1 and will be replaced by ItemSerialNo or Position when the user clicks one of the flips. ItemSerialNo will be on flip 2, and Position will be on flip 3.
First, insert a row in the Window Definition and set the Type to "flip". You should insert this row after the "matrix" row, but before the first "matrix column" row. The "matrix" row specifies that the window contains a matrix, and this must be done before the flip is added, because the flip is part of the matrix. The "flip" row specifies that the matrix contains a flip 0, and this must be done before the matrix columns are added to that flip. All other columns in the "flip" row can be left blank or zero:

- Next, insert a second "flip" row in the Window Definition. This will specify that the matrix contains a flip 1, so you should insert it above the rows containing the matrix columns that will appear on flip 1 (StockQty in the example). You can group all the "flip" rows together, or you can add a "flip" row, then its matrix columns, then the next "flip" row, and so on.
Enter 1 in the Flip column, to specify that the "flip" row refers to flip 1.
Use the H, V, Width and Height columns to specify the position and size of the button that the user will click to go to flip 1. It is recommended that the H value should be the H of the matrix + the Width of the matrix + 14. The 14 makes room for the matrix scroll bar. The V value should be the same as the V of the matrix, so that the top of the flip button is level with the top of the first row.
Use the Label column to specify the text that will appear in that button. By convention, the button for flip 1 is named "A".
Finally in this step, set the Flip of the StockQty matrix column to 1, to signify that this column belongs to flip 1:

- Repeat step 8 to add the other flips and the column(s) that they contain. The V value of each flip should be the V of the previous flip + the Height of the previous flip:

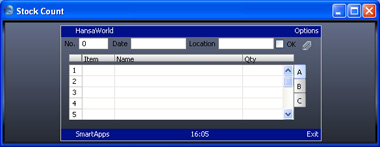
This is how the matrix will appear:

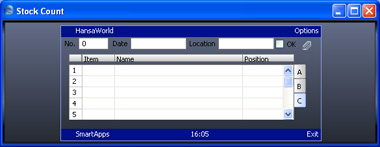
When the user clicks flip C, the StockQty column with the "Qty" heading will be replaced by the Position column:

Please click the links below for more details about:
---
Go back to:
See also:
|
