Reports in the General Ledger - Balance Sheet
The Balance Sheet shows the assets, liabilities and capital of the company at a given point in time. You can use the Balance Sheet model supplied with Books by HansaWorld, or you can define your own, possibly editing the standard definition to suit your needs.
Defining the Balance Sheet
You can define the structure of the Balance Sheet to suit your requirements. The following example illustrates the set-up process.
To change the report definition of the Balance Sheet, first click the [Settings] button in the Master Control panel, then double-click 'Report Settings' in the subsequent list. Then, highlight 'Balance Sheet' in the list on the left-hand side of the 'Report Settings' window and click the [Definition] button. The 'Balance Sheet Report Definition: Browse' window is opened.
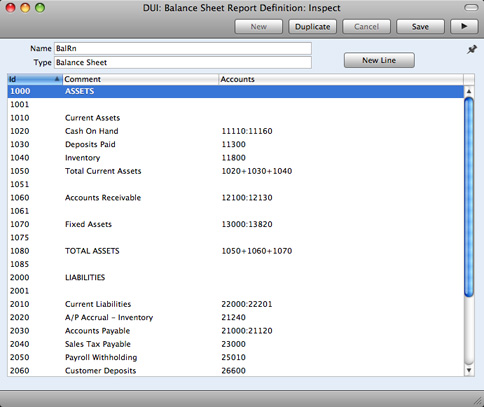
The window shows the Balance Sheet row by row, as it has been presented up to now. Each row is sometimes known as a "Line Definition". To insert new Line Definitions, click the [New Line] button, or double-click a row to edit it. In both cases, the following window opens, entitled 'Line Definition: New' if you clicked [New Line] or 'Line Definition: Inspect' if you are editing an existing Line Definition:
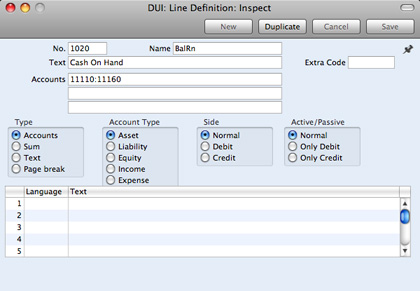
The example Line Definition illustrated above will cause the Account Number, Name and balance of a range of Accounts to be printed in the Balance Sheet, as follows:
- No.
- As well as acting as the unique identifying code for each row in the Balance Sheet, the No. determines the order in which the rows will be printed in the report. When entering rows, it is recommended that you leave gaps in the numbering sequence, so there is room to insert new rows later.
- Text
- This Text will be printed in the report as a heading.
- Accounts
- Paste Special
Account register, General Ledger/System module
- Enter an Account or a range of Account numbers separated by a colon (:). The Account Number, Name and balance of every Account in this range will be printed in the Balance Sheet, under the heading specified in the Text field.
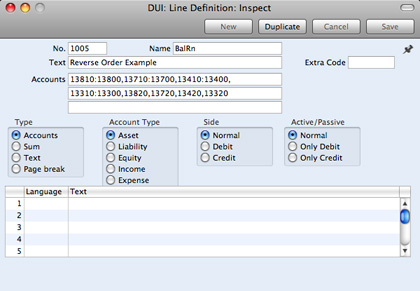
- The Accounts field consists of three rows, with room for a definition 300 characters long. As well as specifying a single Account or a range of Accounts, you can also specify a number of individual Accounts, or ranges of Accounts, separated by commas. If you enter a range of Accounts with the highest number first, the Accounts in that range will be presented in reverse order. An example sequence is illustrated below:
This sequence will appear as follows in the printed report:
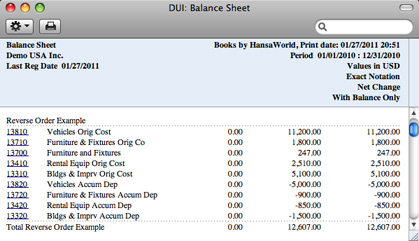
In this example, the "Reverse Order Example" heading was taken from the Text field in the Line Definition.
- Type
- Choose the "Accounts" option to signify that each of the Accounts in the range will be printed individually in the report. After the last Account in the range, a total for the group will be printed.
- Account Type
- Choose the Account Type. This controls the presentation of the Account balances in the report. Assets and Expenses will be printed as positive values, while liabilities, equity and incomes will be negative.
- Side, Active/Passive
- These options are described in the 'Special Features of the Balance Sheet' section towards the bottom of this page.
- Extra Code
- This field is used in countries (e.g. Russia) where the Balance Sheet is printed using a standard report design that includes line numbers: use this field to specify the correct line number for this row of the report. The Extra Code only appears in the report when you produce it using the No Comparison option.
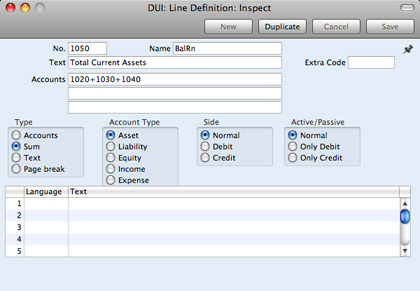
The next example Line Definition will add the results of previous Line Definitions together and print the result:
- Type
- Choose the "Sum" option to signify that the line in the report will add the total values from previous lines in the report together and print the result on a separate line. In this case, the result will be printed under the heading "Total Current Assets" (from the Text field).
- Accounts
- Since the Type is "Sum", use the Accounts field to specify the line numbers (1020+1030+1040) whose total values are to be added together. Do not enter Account Numbers in the three Accounts fields if the Type is "Sum".
- Account Type
- Again these options control the presentation of the total figure when printed in the report (positive or negative).
The Text field in the example Line Definition illustrated below is empty. As the Type is "Accounts", this means that the line will not be printed in the report. If this line had some Text, it would cause the balances of every Account between 41000 and 99999 to be listed in the report, followed by the total balance for that range of Accounts. As there is no Text, the processing will still take place (i.e. the total balance for that range of Accounts will still be calculated), but this processing will effectively be hidden as nothing will be printed.
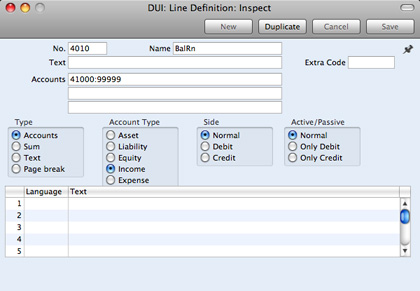
The total balance could then used in line 4020:
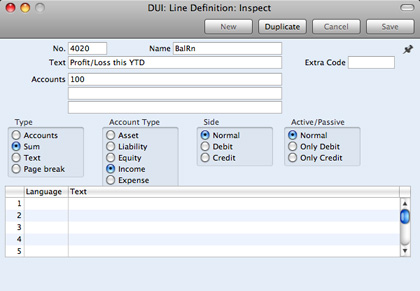
Taken together, rows 4010 and 4020 will print the total balance for Accounts 41000:99999 without listing those Accounts individually. Since these are the Income and Expense Accounts, this is appropriate for the Balance Sheet.
If the Type in a Line is "Text", then you can leave the Text field empty. This will cause a blank line to be printed in the report. This can be useful if you want to insert spaces between sections in the report.
When you have finished with the last row, if you want to save your changes, click [Save], or else close the window with the close box. Then, close the list of definitions using the close box once again.
The new Balance Sheet report is now ready to print.
! | Books by HansaWorld is supplied with a standard Chart of Accounts and a set of Report Definitions. This is a well-structured Chart, with systematic groupings of Accounts. It is suitable without any changes for most small or medium companies, but it is also easily modified by you or your financial adviser. |
|
If you stay within the structure of the Chart (e.g. avoid putting Liability Accounts among the Assets!), there is no need to alter the definitions. But remember, it is a good idea to print a test Balance Sheet to see if your definitions produce exactly what you expect.
To delete a line from the Balance Sheet, follow these steps:
- Click the [Settings] button in the Master Control panel and double-click 'Report Settings' in the subsequent list. Then, highlight 'Balance Sheet' in the list on the left-hand side of the 'Report Settings' window and click the [Definition] button.
The 'Balance Sheet Report Definition: Browse' window is opened.
- Double-click the row you want to remove, to open its definition window.
- Select 'Delete' from the Record menu.
The line will be deleted from the Balance Sheet and you will be returned to the 'Balance Sheet Report Definition: Browse' window.
! | You cannot undo the deletion of a row in the Balance Sheet. |
|
Multiple Balance Sheet Definitions
In some companies there is a requirement for multiple Balance Sheet definitions. To cater for this requirement, Books by HansaWorld allows you to add as many Balance Sheet reports as you need to the General Ledger. Each of these reports can have its own definition. To add a new Balance Sheet, follow these steps:
- Click the [Settings] button in the Master Control panel and double-click 'Report Settings' in the subsequent list.
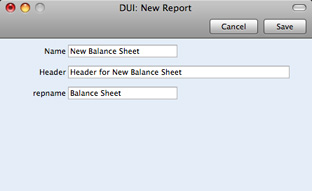
- When the 'Report Settings' window opens, click the [New] button to create a new report. Alternatively, to copy an existing report and its definition (either one you have added yourself or the standard Balance Sheet), highlight it in the list and click the [Duplicate] button. The 'New Report' window opens, empty if you clicked [New] or containing the details of the duplicated report:
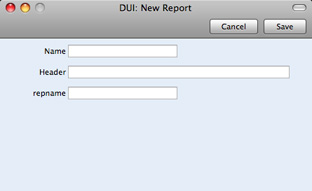
- Name
- Enter a name for the report. This name will appear in the 'Reports' list. You cannot use the same name for more than one report.
- Header
- Enter a second name for the report. This name will be printed in the report header, and will also appear in the title bar of the report window if you print the report to screen.
- repname
- Paste Special
Choices of possible entries
- Use this field to specify the report type (i.e. Balance Sheet or Profit & Loss report).
- Click the [Save] button to save the new report. The 'New Report' window closes, and the new report is added to the bottom of the list in the Report Settings window, using the Name specified in the 'New Report' window:
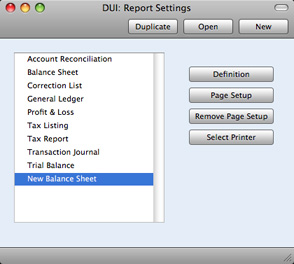
If you need to modify the report (perhaps you made a spelling mistake or you chose a temporary name), highlight it in the list in the 'Report Settings' window and click the [Open] button. The report is opened in the 'New Report' window illustrated in step 2.
- Having created the new report, you should now enter a definition for the new report. Highlight it in the list in the 'Report Settings' window and click the [Definition] button. This process is the same as for the 'standard' Balance Sheet, and is as described in the 'Defining the Balance Sheet' section earlier on this page. If you created the new report by duplicating an existing one, the definition will be duplicated as well.
You can also drag rows from an existing report definition to the new one. Highlight each report in turn in the list in the 'Report Settings' window and click the [Definition] button. You will then have two report definition windows open. You can now drag rows individually from one window to the other, or you can highlight several rows at a time by shift-clicking and drag them all at once.
- To print the new report, open the 'Reports' list as normal. The new report will appear at the bottom of the list, using the Name specified in the 'New Report' window:
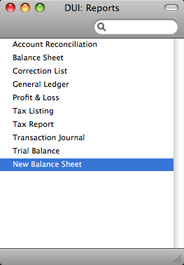
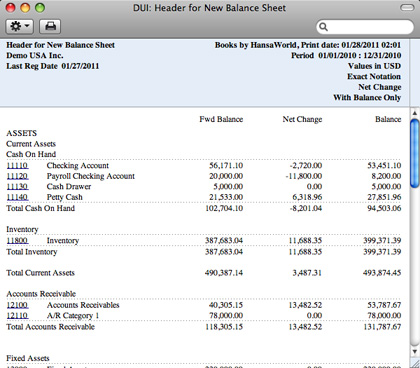
Double-click the report name and print the report in the usual way. The specification window for the report is the same as that for the 'standard' Balance Sheet, and is described in the 'Printing a Balance Sheet' section immediately below. The text in the title bar of the report window, and the report title on the first line of the report header ("Header for New Balance Sheet") will be taken from the Header field in the 'New Report' window illustrated in step 2 above.
- If you need to remove the new report, open the 'Reports' list as shown in step 5 and click on the report name. Then, select 'Clear' from the Edit menu.
Printing a Balance Sheet
After ensuring you are in the General Ledger, click the [Reports] button in the Master Control panel and then double-click 'Balance Sheet' in the 'Reports' list. The 'Specify Balance Sheet' window is opened.
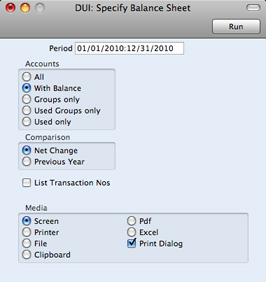
- Period
- Paste Special
Reporting Periods setting, System module
- Enter the period for the Balance Sheet you want to print. The first period in the Reporting Periods setting will be offered as a default.
- Accounts
- Use these options to choose how you want the Accounts to be printed in the report.
- All
- This option will list all the Accounts that have been included in the Balance Sheet definition.
- With Balance
- This option will only list Accounts that have an opening balance and/or a closing balance.
- An Account with no opening balance that has been used in the period in such a way that it also has no closing balance will not be shown in the report. If you want such an Account to be included in the report, use the Used Only option below.
- Groups only
- This option does not print balances for individual Accounts. Instead, it simply prints an overall balance for each line in the Balance Sheet definition.
- Used Groups only
- This option only prints balances for lines as entered in the Balance Sheet definition that have been used.
- Used only
- This option will only list Accounts that have been used. This includes Accounts that have balances brought forward from a previous period that have not been used during the report period.
- This option is similar to With Balance above, with the exception that it also includes Accounts with no opening balances that have been used during the period in such a way that they also have no closing balances.
- Comparison
- Choose to compare with Net Change or the same period the previous Year.
- List Transaction Nos
- With this box checked, the Transaction Numbers of all Transactions that fall within the reporting period, together with debit and credit totals, will be listed at the bottom of the report.
When you click [Run], the Balance Sheet will be printed as you have specified.
When printed to screen, the Balance Sheet has the Books by HansaWorld Drill-down feature. Click on the Account Number of any Account in the report to open the General Ledger Report for the same Account and period. From the General Ledger report, you can click on any Transaction Number to open an individual Transaction record.
Special Features of the Balance Sheet
This section describes the Side and Active/Passive options in the Balance Sheet definition.

You can use these options to satisfy certain accounting and reporting requirements in various countries. The easiest way to explain the usefulness of these facilities is with the help of an example. In most companies, there are a number of reconciliation or suspense accounts, either assets or liabilities, which can hold either debit or credit balances. The accounting conventions of some countries only allow "pure" debit or credit accounts, and when a balance sheet is produced, it becomes necessary to move individual accounts back and forth between the active or the passive groups, depending on the current positive or negative balance.
To complicate things even further, in some countries it is customary to distinguish between four different "states" of a book entry: Debit+, Debit-, Credit+ and Credit-. In modern western accounting systems, a book entry is either debit or credit, regardless of the class of the account, i.e. there is a simple arithmetic definition of balances.
In those environments where all these special rules are used, the preparation of balance reports tends to become complicated and labor consuming. These special functions in Books by HansaWorld allow the far-reaching automation of many of these routine tasks. This is how it works.
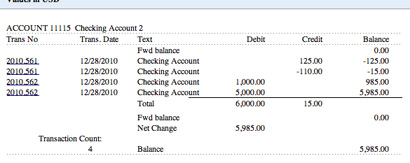
Let us start with the following General Ledger report, showing the actual debit and credit balances for two Accounts.
Account 11115 - Checking Account 2:
Account 11116 - Checking Account 3:
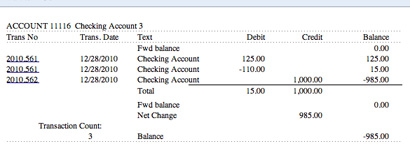
Account 11116 is defined as an asset, and currently has a balance in credit. Total Debits during the period is 15, and total Credits 1000. Account 11115 has a normal debit balance, but on this Account one negative value has been entered on the credit side. If the Accounts are used in a report definition in the normal way, with the buttons Side:Normal and Active/Passive:Normal selected, the balance of Account 11116 will be shown as a negative asset value.
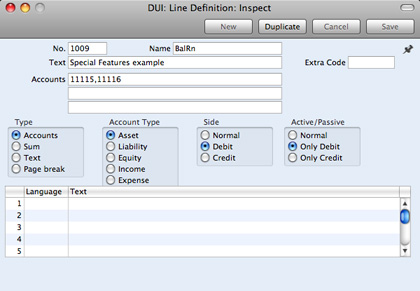
With the buttons Side:Debit and Active/Passive:Only Debit options selected, the debit column total for Account 11115 will be shown, because the Account balance is in debit:

With Side:Credit and Active/Passive:Only Credit selected, the balances from both the Accounts' credit columns will be shown:

With Side:Credit and Active/Passive:Only Debit selected, nothing will be shown, because the credit column of Account 11115 has a positive value, and 11116 has an overall debit balance.
With Side:Debit and Active/Passive:Only Credit selected, once again nothing will be shown.
The combination Side:Credit and Active/Passive:Normal shows the credit column balances for both Accounts:

---
In this chapter:
Go back to:
