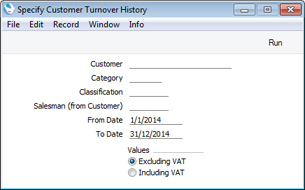
Customer Turnover History
This function in the Sales Ledger is similar to the
'Customer Statistics' function described immediately above in that it exports monthly sales totals for each specified Customer, compiled from Invoices, POS Invoices and Bar Tabs. Compared to the 'Customer Statistics' function, this function offers a much greater range of selection criteria, and will also export more Customer information (Customer Number, Name, Customer Category, Classification(s) and Salesman).

- Customer
- Paste Special
Customers in Contact register
- Range Reporting Alpha
- If necessary, enter here the Customer Number of the Customer (or range of Customers) you wish to have included in the export file.
- Category
- Paste Special
Customer Categories setting, Sales Ledger
- If you only want to include Customers belonging to a particular Customer Category in the export file, specify that Category here.
- Classification
- Paste Special
Contact Classifications setting, CRM module (if installed)
- Enter a Classification Code in this field if you want Customers with a certain Classification to be included in the export file. If the field is empty, all Customers, with and without Classification, will be exported. If you enter a number of Classifications separated by commas, only those Customers featuring all the Classifications listed will be exported. If you enter a number of Classifications separated by plus signs (+), all Customers featuring at least one of the Classifications listed will be exported. If you enter a Classification preceded by an exclamation mark (!), all Customers featuring any Classification except the one listed will be exported.
- For example:
- 1,2
- Exports Customers with Classifications 1 and 2 (including Customers with Classifications 1, 2 and 3).
- 1+2
- Exports Customers with Classifications 1 or 2.
- !2
- Exports all Customers except those with Classification 2.
- 1,!2
- Exports Customers with Classification 1 but excludes those with Classification 2 (i.e. Customers with Classifications 1 and 2 are not exported). Note the comma before the exclamation mark in this example.
- !1,!2
- Exports all Customers except those with Classification 1 or 2 or both. Again, note the comma.
- !(1,2)
- Exports all Customers except those with Classifications 1 and 2 (Customers with Classifications 1, 2 and 3 will not be exported).
- !1+2
- Exports Customers without Classification 1 and those with Classification 2 (Customers with Classifications 1 and 2 will be exported).
- (1,2)+(3,4)
- Exports Customers with Classifications 1 and 2, and those with Classifications 3 and 4.
- 1*
- Exports Customers with Classifications beginning with 1 (e.g. 1, 10, 100).
- 1*,!1
- Exports Customers with Classifications beginning with 1 but not 1 itself.
- *1
- Exports Customers with Classifications ending with 1 (e.g. 1, 01, 001).
- 1*,*1
- Exports Customers with Classifications beginning and ending with 1.
- Salesman (from Customer)
- Paste Special
Person register, System module
- If you only need Customers with a particular Salesman to be included in the export file, enter that Salesman's Signature here.
- From Date, To Date
- Paste Special
Choose date
- Use these fields to specify the start and end dates for the export. The defaults will be taken from the first row of the Reporting Periods setting.
- The export file will contain a separate column for each month in the period specified here, containing monthly sales totals for each Customer. So, only the month and year in the start and end dates will be used when determining the period: the day will be ignored. For example, if you enter a period of 31 August:1 September, the export file will contain figures for the whole of August and the whole of September.
- Values
- Use these options to specify whether the monthly sales figures in the export file should include or exclude VAT.
Click the [Run] button in the Button Bar to proceed. A dialogue box will open, allowing you to name the export file and specify where it is to be saved. Enter a name for the file, and click [Save] or press the Enter key. The export file will be created and saved. When the export finishes, you can close the 'Export' window using the close box.
---
Export functions in the Sales Ledger and Integration modules:
Go back to:
