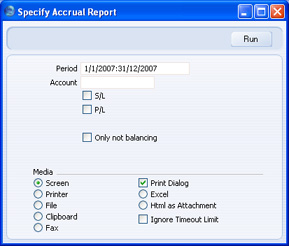
Language:


Introduction to the Account Register

The Account register is where you should enter your Chart of Accounts in Standard ERP. This register is located in the System module and the Nominal Ledger.

Standard ERP does not use hard-coded Accounts. You must therefore enter your Chart of Accounts yourself or import one before you can begin posting transactions. The simplest method is to use the sample Chart of Accounts supplied with Standard ERP. Please refer to the Importing Set-up Data page for details of how to do this. After importing the sample Chart of Accounts, you can modify it so that it is a better fit for your requirements and your business.

When starting to use Standard ERP, one of your first tasks will be to enter your Chart of Accounts. After doing so, you should go on to configure some of the basic settings, such as VAT Codes, Payment Modes (payment methods), Account Usage S/L, Account Usage P/L and Account Usage Stock (which set defaults for the Accounts and VAT Codes that will be used in the Sales Ledger, the Purchase Ledger and the Stock module, respectively). You should also enter definitions for the Balance Sheet, Profit & Loss and VAT reports.

Depending on your location, the file containing the sample Chart of Accounts will also contain configured versions of the settings and report definitions mentioned in the previous paragraph. For example, in the UK, importing the Chart of Accounts will also configure these settings and report definitions.

If you import the sample Chart of Accounts and then alter it, you must check these settings to make sure they are still correct. For example, if you decide to use a different Account as your VAT Outputs Payable Account, you will need to alter all the VAT Code records and the definition of the VAT Report.

You can also import your own Chart of Accounts from a text file with the correct format. For details about the correct format, please produce the Export/Import format report in the Technics module specifying AccVc as the View Code or refer your local HansaWorld representative. Importing your own Chart of Accounts will mean that you will be able to use a Chart of Accounts with which you are already familiar, but you will need to configure the settings and report definitions yourself.

!

If you use your own Chart of Accounts, or modify the one supplied with Standard ERP, you must ensure that every Account that you have used in the settings and report definitions in each module is a valid Account that exists in your Chart of Accounts.


You can always access the Chart of Accounts through the 'Paste Special' feature (subject to Access Rights). You can use this feature when you enter a transaction of any kind and cannot remember an Account Number.

Opening the Account Register

To open the Account register, ensure you are in the Nominal Ledger or the System module. Then, if you are using Windows or Mac OS X, click the [Registers] button in the Navigation Centre and double-click 'Accounts' in the resulting list. If you are using iOS or Android, tap the [Registers] button in the Navigation Centre and then tap 'Accounts' in the 'Registers' list. The 'Accounts: Browse' window will be opened, showing the Accounts that you have already entered.

The list contains two columns: Account Number and Account Name.

By default, the Accounts will be listed in Number order. If you are using Windows or Mac OS X, you can change the sort order by clicking on a column heading. To reverse any sort, simply click once again on the column heading. The current sort order is marked by the column heading being coloured blue. To preserve the sort order so that it will be used the next time you open the window, choose 'Save Position' from the Window menu. If you are using iOS or Android, tap on any column heading and choose the sort order you need. Repeat the procedure to reverse the sort. To preserve the sort order, tap on any column heading again and choose 'Save sort order'.

Searching for an Account

After opening the 'Accounts: Browse' window, you can search in the list for a particular Account. Searching for a particular Account depends on whether you are using the Browse Filtering option in the Optional Features setting in the System module, as follows:
  • If you are not using the Browse Filtering option, first sort the list by the column that you want to use for the search. Then, enter the text that you want to find in the Search field in the top of the window (in the top right-hand corner if you are using Windows/Mac OS X) and press the Return key (Mac OS X) or Search (iOS/Android). The first record containing a match for your search string will be highlighted (if you are using Windows, a match will be highlighted as you type each character). For example, to search for a particular Account Name, sort by Name before entering an Account Name (or the first few characters) in the Search field.

  • If you are using the Browse Filtering option, all you need to do is to start typing a letter, word or number in the Search field (there is no need to click in the field before typing). As you type each character, non-matching records will be removed from the list. There is no need to sort the list first.

The Account register in Standard ERP:
Go back to: