|
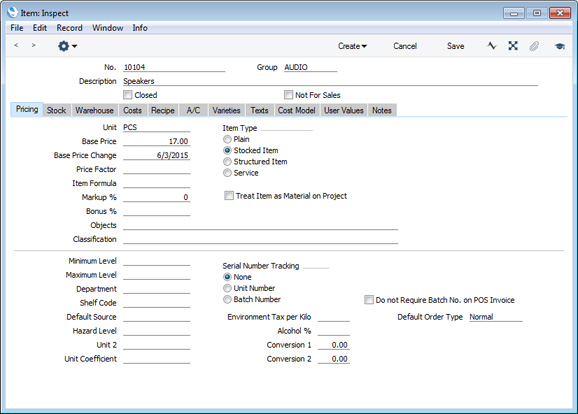
Search HansaManuals.com HansaManuals Home >> Standard ERP >> Starting Work >> Entering the First Item Previous Next Entire Chapter in Printable Form Search This text refers to program version 8.0 Entering the first Items The Item register contains information about the products and services that you sell. This register is available in the Sales Orders, Purchase Orders and Sales Ledger modules, and in the Contracts, Production, Quotations, Service Orders and Job Costing modules if installed.You can group Items of a similar type together using Item Groups. You can give every Item belonging to the same Group the same default Sales and Cost Accounts, Credit Account and VAT Codes, saving you the work of having to specify these for each Item individually. Defining and assigning Item Groups also makes modification easier: if you need to change the Cost Account, for example, you only need make one change (to the Item Group), rather than many (to each of the Items). Before entering Items, therefore, it is recommended that you enter some Item Groups, using the register in the Sales Ledger. To enter your first Item, first select one of the modules mentioned in the first paragraph using the [Switch Module] button in the Navigation Centre or the Ctrl-0 (zero) (Windows and Linux) or ⌘-0 (Mac OS X) keyboard shortcut. Then, click the [Registers] button in the Navigation Centre and double-click 'Items' in the resulting list. The 'Items: Browse' window is opened, showing a list of Items already entered. To create a new Item, select 'New' from the Create menu above the list or use the Ctrl-N/⌘-N keyboard shortcut. Alternatively, highlight an Item similar to the one you want to enter and select 'Duplicate' from the same menu (or use Ctrl-K/⌘-Y). If you don't need to open the 'Items: Browse' window, a shortcut is to open the + drop-down menu from the Navigation Centre (in the top right-hand corner if you are using Windows or Linux, towards the top left if you are using Mac OS X) and select 'Items'. Use the 'Item: New' window shown below to enter information about an Item. Notes about the more important fields can be found beneath the illustration: for full details about every field, please refer to the Items page. When an Item record is complete, click the [Save] button in the top right-hand corner of the window. The Item will be saved in the Item register. The window title will change to 'Item: Inspect', giving you a chance to check you have not made any mistakes in entering the record. Close the record by clicking the close box or using the Ctrl-F4 (Windows and Linux) or ⌘-W (Mac OS X) keyboard shortcut. If you have a number of Items to enter, select 'New' from the Create menu (or use the Ctrl-N/⌘-N keyboard shortcut) instead of clicking the [Save] button as described above. The Item will be saved and closed, and a blank window will be opened, allowing you to enter another Item straight away. If you wish to import Items from your old accounts system, please follow the import instructions on the Importing Set-up Data page to import a text file created by that system. For details of the composition of this text file, please refer to your HansaWorld representative.
In this chapter:
Go back to:
Previous Next Top Entire Chapter in Printable Form |