Single Functions
There are two methods that you can use to control the access that your employees have to your Standard ERP database:
Access Groups and Single Functions. An employee with an Access Group can be given access to any part of the system, while one belonging to a Single Function (a "Single Function" User) can only be given access to a limited number of Standard ERP functions (up to a maximum of three). "Single Function" Users are therefore much more restricted in what they can do, so they are treated differently for licensing purposes.
If you have any Single Function Users, you should use this setting to define the various combinations of functions available to them. For example, you might have some Single Function Users that can only enter Orders, and some that can enter Orders and Quotations. In this case you would enter two records in this setting, one granting access to the Order register only and the other to the Order and Quotation registers. You should then enter the Single Function Users themselves in the Person register as Named Users, specifying the appropriate Single Function for each one using the field on the 'Access' card.
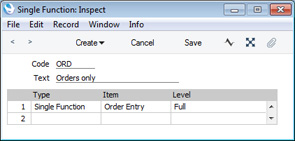
To work with the Single Functions setting, ensure you are in the System module and then open the ‘Settings’ list by clicking the [Settings] button in the Navigation Centre or using the Ctrl-S/⌘-S keyboard shortcut. Double-click 'Single Functions' in the resulting 'Settings' list to open the 'Single Functions: Browse' window. This lists the Single Function records that have already been entered: to enter a new record, select ‘New’ from the Create menu in the Button Bar. The 'Single Function: New' window appears: enter the details as appropriate and click [Save] to save the new record.
- Code
- Enter the unique Code by which the Single Function record is to be identified from elsewhere in Standard ERP. The Code may consist of up to five characters, and you can use both numbers and letters.
- Text
- Assign a descriptive name to the Single Function record. This will be shown in the 'Single Functions: Browse' window and the 'Paste Special' list.
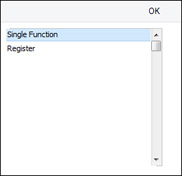
Use the grid to list the functions to which the Single Function record will give access. You can give access to up to three functions or tasks. First, specify the component in the Type field, using the 'Paste Special' function to show the two components available:
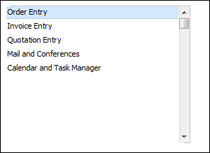
Next, use the second field in the grid to specify the individual item. For example, if you enter "Single Function" in the Type field, the 'Paste Special' list from the Item field will contain a list of functions:
If you enter "Register" in the Type field, the 'Paste Special' list from the Item field will contain a list of registers to which you can grant access if necessary.
Finally, use the last column to determine the access level of the Group. A further 'Paste Special' list displays the available options:
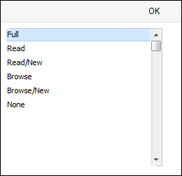
If you entered "Single Function" in the Type field, you will need to choose "Full" here. If you entered "Register" in the Type field, you can also choose 'Read', 'Read/New', 'Browse' or 'Browse/New' here, as follows:
- Browse
- Allows access to the browse and 'Paste Special' windows only. Searches can be performed. Records cannot be entered or modified.
- Browse/New
- Allows access to the browse and 'Paste Special' windows and the creation of new records. Existing records cannot be viewed, changed or copied.
- Read
- Allows access to the browse window and the double-clicking of items so that they can be viewed in an inspect window. Records cannot be entered or modified.
- Read/New
- Allows access to the browse window and the double-clicking of items so that they can be viewed in an inspect window. New records can be created. Existing records cannot be modified, but they can be copied.
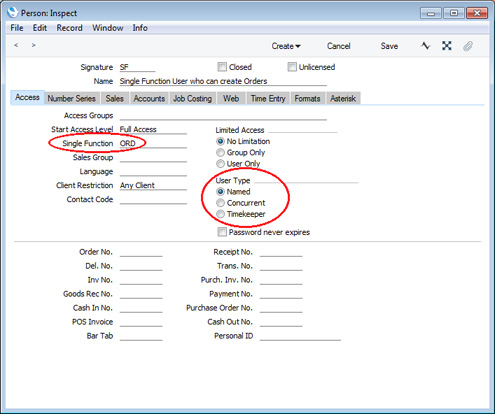
When the record is complete, click the [Save] button to save it. When you then enter a Person who is a Single Function User, specify the Single Function record in the field on the 'Access' card. The User Type must be Named:
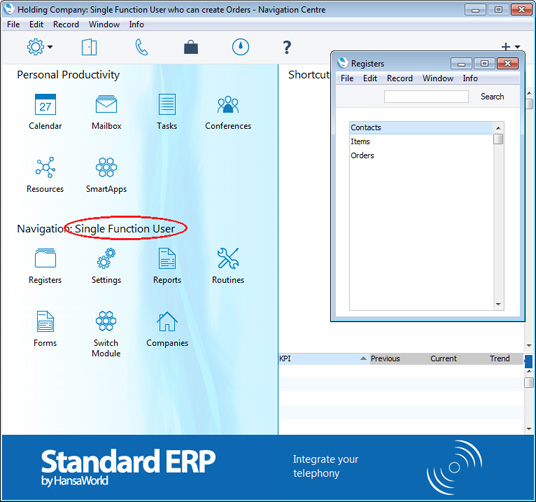
When this Person logs in to your Standard ERP system, their Navigation Centre will state that they are a Single Function User, while their ‘Registers’ list will contain only the registers that are necessary for them to carry out their allotted tasks:
---
Settings in the System module:
- Access Groups
- Active Users
- Auto Actions
- Base Currency
- Base Currency Rates
- Company Date and Numeric Format
- Company Info
- Configuration
- Conversions - Master, Conversions - Accounts and VAT Code
- Conversions - Master, Conversions - Activity Types
- Conversions - Master, Conversions - Contact Classifications
- Conversions - Master, Conversions - Contacts
- Conversions - Master, Conversions - Currency Codes
- Conversions - Master, Conversions - Items
- Conversions - Master, Conversions - Locations
- Conversions - Master
- Conversions - Master, Conversions - Suppliers
- Conversions - Master, Conversions - Objects
- Conversions - Master, Conversions - Users
- Countries
- Countries Regions
- Currency Round Off
- Days and Months
- Departments
- Discount Options
- Display Groups
- Exchange Rates Settings
- Form Settings
- Global Warnings on UnOKed Records
- Internet Enablers
- Journaling
- KPIs
- Languages
- Locking
- Locking Exceptions
- Number Series Defaults
- Opened Windows History
- Optional Features
- Password Security
- Printers
- Reporting Periods
- Round Off
- Sales Groups
- Single Functions
- Styles
- Sub-Ledger Control Accounts
- Task Manager Access
- User Warnings on UnOKed Records
- Values in Text
- VAT Number Masks
- Weeks
Go back to: