Entering an Invoice - Identifiers Card
This page describes the fields on the 'Identifiers' card of the Invoice record. Please follow the links below for descriptions of the other cards:
---
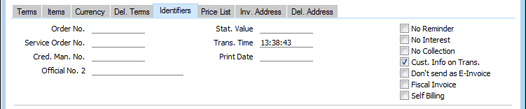
- Order No.
- When you create an Invoice from a Sales Order or a Delivery, the Order Number of the related Sales Order will be placed in this field and cannot be changed.
- Serv. Ord. No.
- When you create an Invoice from a Service Order, the Number of the Service Order will be placed in this field and cannot be changed.
- Note that you should create Invoices associated with Service Orders from the Service Orders module, using the 'Invoice' function on the Create menu (Windows/Mac OS X) or + menu (iOS/Android) of the 'Service Orders: Browse' and 'Service Order: Inspect' windows).
- Official No. 2
- In some countries and in some circumstances, an Invoice should have a second Official Serial Number. These circumstances are as follows:
- Poland
- When an Invoice is Fiscal (i.e. when the Fiscal Invoice box has been ticked), it will be sent to, printed by and recorded in the fiscal printer when you mark it as OK and save.
- The receipt printed by the fiscal printer will usually be sufficient for the Customer's records. However, they can request a printed copy any time up to three months later. The copy must be printed with the current date as the issue date and a new Invoice number because its original number will be out of sequence for the new date.
- To cater for this situation, you should set up a number sequence in the Legal Record Numbers 2 setting. This setting is only available if the VAT Law in the Company Info setting is "Polish", but its operation is similar to the Legal Record Numbers setting. For this purpose, enter a number sequence in which the Register is "All Invoices" and the Selection is "At Printout".
- When you print the Fiscal Invoice, an Official No. 2 will be assigned to the Invoice. This will be the first unused number in the number sequence you have defined in the Legal Record Numbers 2 setting, and it will be printed in the document provided you have included the "Official Serial Number 2" field in your Form Template design. The current date will be placed in the Print Date field, and will be printed in the document provided you have included the "Print Date" field in your Form Template design.
- Portugal
- You must enter an Official No. 2 in an Invoice in which the Status (below) is "Manual" or "Recovered from Damaged Database". Please refer to the description of the Status field below for details.
- Sweden
- In Sweden, it is a legal requirement that all cash or credit card payments in shops should be made through a certified POS solution that contains a fiscal control unit (CleanCash).
- After the correct configuration, each time you mark as OK and save a Cash Note, it will be sent to and recorded in the CleanCash device. The device will send back a control code that will be stored in the Official No. field. The Cash Note will then be printed automatically.
- The law allows you to print a single copy of a Cash Note. To print this copy, open the Cash Note and choose 'Send to Fiscal Device' from the Operations menu. The Cash Note will again be sent to the CleanCash device (this time with type "kopia"). The device will send back a second control code, which will be saved in the Official No. 2 field. The copy of the Cash Note will then be printed, with the second control code being printed in the "Official Serial Number" field. No further printing of the Cash Note will be possible.
- Stat. Value
- This field is used for Intrastat reporting. The figure that you should enter here may depend on the type of goods sold and your country of operation, but typically you should enter the value of goods sold plus the cost of freight and insurance to the border of your country of operation. The figure should be in the Invoice Currency and should exclude VAT. It will be used when calculating the "FOB Value, Local" and "FOB Value, foreign Currency" values in the Intrastat S/L form. It will also be used in similar calculations by the following export functions in the Sales Ledger: Intrastat S/L (Estonia); Intrastat S/L (Finland); Intrastat S/L (Germany); Intrastat S/L (Lithuania) and Ist@at - Items Export.
- Trans. Time
- This field will be updated with the current time when you mark an Invoice as OK and save it. It therefore displays the time when you committed the Invoice to the Sales and Nominal Ledgers.
- Print Date
- Please refer to the description of the Official No. 2 field in Poland above for details about this field.
- Status
- Paste Special
Choice of possible entries
- This field is used in Bolivia and Portugal.
- In Bolivia, this field controls the value that will be exported as the Invoice Status in files created by the S/L VAT Invoices (Bolivia) export function in the Sales Ledger. Choose one of the following values:
- -
- This is the default Status signifying a normal Invoice. The Invoice Status in files created by the S/L VAT Invoices (Bolivia) export function will be "V".
- Invalidated
- The Invoice Status in files created by the S/L VAT Invoices (Bolivia) export function will be "A".
- Lost
- The Invoice Status in files created by the S/L VAT Invoices (Bolivia) export function will be "E". You should use this Status in an Invoice where you needed to send a copy to the Customer because the original was lost.
- Not Used
- The Invoice Status in files created by the S/L VAT Invoices (Bolivia) export function will be "N". You should use this Status in an Invoice that will not be used, to signify that there will be a break in the Official Number sequence.
You can change the Status in an Invoice after you have marked it as OK and saved it.
- The S/L VAT Invoices (Bolivia) export will only be available if the VAT Law in the Company Info setting in the System module is set to "Bolivian".
- In Portugal, you can choose the following values as the Status:
- -
- This is the default Status signifying a normal Invoice.
- Manual
- Choose "Manual" as the Status in an Invoice if it is one that you have already issued to the Customer on paper or from another system (e.g. a back-up system).
- If the Status of an Invoice is "Manual", you must enter the Official No. of the original Invoice (e.g. the paper Invoice) in the Official No. 2 field to the left. The format of the Official No. 2 must include the Serie followed by "/" followed by the number (e.g. ABC/001). You must also specify a new Official No. in the header, using 'Paste Special' to choose from a number sequence in the Legal Record Numbers setting in which the Register is "Normal Invoices Manual", "Cash Notes Manual", "Credit Notes Manual" or "Interest Invoices Manual" (depending on the type of Invoice you are entering) and the Selection is "Manual". The Invoice Date should be the date from the original Invoice. So, if you need to enter more than one Invoice, be careful to enter them in date order, starting with the earliest. Forced Chronology in the Legal Record Numbers setting will prevent you entering them in any other order.
- Recovered from Damaged Database
- Choose "Recovered from Damaged Database" as the Status in an Invoice if it is one that that you have already entered in the Invoice register, but was lost, perhaps due to a system crash or similar.
- If the Status of an Invoice is "Recovered from Damaged Database", proceed as described for "Manual" immediately above, with the exception that you must choose the Official No. in the header from a number sequence in the setting in which the Register is "Normal Invoices Recovered from Damaged Database", "Cash Notes Recovered from Damaged Database", "Credit Notes Recovered from Damaged Database" or "Interest Invoices Recovered from Damaged Database" (depending on the type of Invoice you are entering).
- No Reminder
- If you have ticked the Reminders box on the 'Terms' card of the Contact record for a particular Customer, you will be able to print and send Reminders to that Customer for any outstanding Invoices. You can then tick this box in an individual Invoice if you do not want Reminders to be printed for that Invoice. Please refer here for details about printing Reminders.
- You can exclude Invoices that you have marked as No Reminder from some forms and reports such as the Open Invoice Customer Statement and the Sales Ledger report.
- When you create Invoices from Contracts, you can have them marked as No Reminder automatically. This is controlled using the Reminders field in the Contract Classes setting.
- No Interest
- If you have ticked the Interest box on the 'Terms' card of the Contact record for a particular Customer, you will be able to charge that Customer interest on any outstanding Invoices. You can then tick this box in an individual Invoice if you do not want Interest to be charged on that Invoice. Please refer to the page describing the Interest setting for details about how Interest for late payment will be calculated, and to the description of the 'Create Interest Invoices' Maintenance function for details about creating Invoices for Interest.
- No Collection
- Check this box if you have passed the responsibility for collecting payment for the Invoice to another company (e.g. a debt collection agency). You can exclude Invoices marked as No Collection from some reports and forms such as the Open Invoice Customer Statement and the Sales Ledger report.
- Cust. Info. on Trans.
- Default taken from
Account Usage S/L setting, Sales Ledger (Invoice Info on N/L Transaction check box)
- When a Nominal Ledger Transaction is generated automatically from an Invoice, this option will cause the Invoice Number, Due Date and Customer to be copied to flip E of the Transaction row posting to the Debtor Account.
- You should use this option if you want to use the Debtors Account report in the Nominal Ledger. This report lists debit and credit postings to the Debtor Account, organised by Customer. In order to provide this analysis, the report needs the Customer Number to be copied to flip E of each posting to the Debtor Account.
- Don't send as E-Invoice
- If you are using E-Invoicing and you do not want a particular Invoice to be sent as an E-Invoice, select this option.
- When you create Invoices from Contracts, this box will be ticked automatically if you select the Do not send as E-Invoices option when you run the 'Create Contract Invoices' Maintenance function in the Contracts module.
- Please refer to your HansaWorld representative for more details about E-Invoicing.
- Fiscal Invoice
- A fiscal printer is a device that prints receipts from point-of-sale and cash transactions, as well as recording those transactions in an internal memory. This information can later be read by tax authorities to ensure that a shop's sales have been registered and reported correctly. In countries where fiscal printers are used, they should be attached to every cash machine and till in a point-of-sale environment.
- Tick this box if the Invoice is one that should be printed on a Fiscal Printer. This will usually be the case if the Type of the Payment Term is "Cash". This box will be ticked by default if you have ticked the Fiscal Invoices Only box on the 'Terms' card of the Contact record for the Customer.
- When you mark as OK and save an Invoice in which you have ticked the Fiscal Invoice box, it will be sent to, printed by and recorded in the fiscal printer. If for some reason this process fails, you can repeat it by selecting 'Send to Fiscal Device' from the Operations menu.
- Please refer to your HansaWorld representative for details about which fiscal printers are supported and about configuring Standard ERP so that it will communicate with fiscal printers.
- Self Billing
- Default taken from
Contact record for the Customer (Self Billing Customer)
- A self-billing Invoice is an Invoice that a company issues to itself. For example, a company may have received goods from a Supplier on the agreement that invoicing will occur as it sells or consumes them. That company will create self-billing Purchase Invoices when necessary, notifying the Supplier as it does so. That Supplier should then create corresponding Sales Invoices. If you are a Supplier in a self-billing agreement, you can mark your Sales Invoices as self-billing using this check box. Self-billing Invoices are separately flagged when included in SAF-T exports in Portugal.
---
The Invoice register in Standard ERP:
Go back to:
|