Operations Menu - Payments - Create Payments Suggestion
This page describes the 'Create Payments Suggestion' function on the Operations menu in the 'Payments: Browse' window. If you are using iOS or Android, the 'Create Payments Suggestion' function is on the Tools menu (with 'wrench' icon).
---
The 'Create Payments Suggestion' function finds Purchase Invoices that are due for payment and initiates the payment process by creating Payment records for them.
When you select the function from the Operations menu (Windows/Mac OS X) or Tools menu (iOS/Android), the 'Create Payments Suggestion' window illustrated below will open. Use this window to specify the Purchase Invoices that you want to pay, and then click (Windows/Mac OS X) or tap (iOS/Android) the [Run] button to create the Payment records.
The function will create a separate Payment record for each Payment Date in the specified period. By default, every Purchase Invoice due for payment on a particular date (except those that have been marked as On Hold will be added to the Payment record for that date, irrespective of Supplier (you can override this default using the One Supplier Per Payment option). If you then print payment forms (such as remittance advices or cheques), a separate page will be printed for each Supplier.
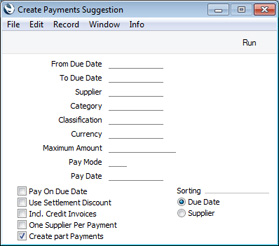
- From Due Date, To Due Date
- Paste Special
Choose date
- Use these fields to specify a period as follows:
- If you select the Use Settlement Discount option below, Payments will be created for Purchase Invoices that have Discount Dates falling in this period. For Purchase Invoices without Discount Dates (i.e. without settlement discounts), Payments will be created for those whose Due Dates fall in this period.
- If you do not select the Use Settlement Discount option below, Payments will be created for Purchase Invoices that have Due Dates falling in this period (i.e. the Discount Date will not be a determining factor).
If you leave both fields empty, Payments will be created for every Purchase Invoice, including those that are not yet due for payment (i.e. those with Discount Dates or Due Dates in the future).
- You can specify an open-ended period by specifying a date in only one of these fields. For example, you can leave the From field empty and specify a To date if you want to pay every Purchase Invoice with a Discount or Due Date that is on or before a particular date. Similarly, you can leave the To field empty and specify a From date to pay every Purchase Invoice with a Discount or Due Date that is on or after a particular date (this will include Purchase Invoices with Discount or Due Dates in the future).
- Supplier
- Paste Special
Suppliers in Contact register
- Range Reporting Alpha
- Specify here the Supplier whose Invoices you wish to pay. You can also specify a range of Suppliers, separated by a colon (:). Leave the field empty to pay Invoices from every Supplier.
- Category
- Paste Special
Supplier Categories setting, Purchase Ledger
- If you want to pay Invoices issued by Suppliers belonging to a particular Supplier Category, specify that Category here.
- Classification
- Paste Special
Contact Classifications setting, CRM module
- Enter a Classification Code in this field if you want to pay Invoices received from Suppliers with a certain Classification. If the field is empty, Invoices issued by all Suppliers, with and without Classifications, will be paid. If you enter a number of Classifications separated by commas, only Invoices issued by those Suppliers featuring all the Classifications listed will be paid. If you enter a number of Classifications separated by plus signs (+), Invoices issued by Suppliers featuring at least one of the Classifications listed will be paid. If you enter a Classification preceded by an exclamation mark (!), Invoices issued by Suppliers featuring any Classification except the one listed will be paid.
- For example:
- 1,2
- Pays Invoices issued by Suppliers with Classifications 1 and 2 (including Suppliers with Classifications 1, 2 and 3).
- 1+2
- Pays Invoices issued by Suppliers with Classifications 1 or 2.
- !2
- Pays Invoices issued by all Suppliers except those with Classification 2.
- 1,!2
- Pays Invoices issued by Suppliers with Classification 1 but not to those with Classification 2 (i.e. Invoices issued by Suppliers with Classifications 1 and 2 will not be paid). Note the comma before the exclamation mark in this example.
- !1,!2
- Pays Invoices issued by all Suppliers except those with Classification 1 or 2 or both. Again, note the comma.
- !(1,2)
- Pays Invoices issued by all Suppliers except those with Classifications 1 and 2 (Invoices issued by Suppliers with Classifications 1, 2 and 3 will not be paid).
- !1+2
- Pays Invoices issued by Suppliers without Classification 1 and those with Classification 2 (Invoices issued by Suppliers with Classifications 1 and 2 will not be paid).
- (1,2)+(3,4)
- Pays Invoices issued by Suppliers with Classifications 1 and 2, and those with Classifications 3 and 4.
- 1*
- Pays Invoices issued by Suppliers with Classifications beginning with 1 (e.g. 1, 10, 100).
- 1*,!1
- Pays Invoices issued by Suppliers with Classifications beginning with 1 but not 1 itself.
- *1
- Pays Invoices issued by Suppliers with Classifications ending with 1 (e.g. 1, 01, 001).
- 1*,*1
- Pays Invoices issued by Suppliers with Classifications beginning and ending with 1.
- Currency
- Paste Special
Currency register, System module
- If you need to pay Purchase Invoices that were issued in a particular Currency, specify that Currency here. If you leave this field blank, only Purchase Invoices in Base Currency 1 (as defined in the Base Currency setting in the System Module) or those with no Currency (if you have not specified a Base Currency 1 in the Base Currency setting) will be paid.
- Maximum Amount
- Specify here the maximum amount to be paid, in the Currency specified above.
- For example, if you have three Purchase Invoices with outstanding amounts 28.00, 29.00 and 30.00 and you specify a maximum amount of 60.00, the first two Invoices (total 57.00) will be paid if you are not using the Create part Payments option below (i.e. the full Maximum Amount might not be used). If you are using the Create part Payments option, then the first two Invoices and 3.00 from the third Invoice (total 60.00) will be paid (i.e. the Maximum Amount will be used in full, assuming it is less than the total amount that is outstanding).
- The order in which the Invoices will be paid will depend on the One Supplier Per Payment and Sorting options below. If you use the One Supplier Per Payment option, Invoices will be paid in Supplier Number order. Otherwise, they will be paid in Due Date order (Discount Date order if you use the Use Settlement Discount option) or Supplier Number order, depending on the Sorting option..
- Pay Mode
- Paste Special
Payment Modes setting, Sales/Purchase Ledger
- Specify the Payment Mode that you want to be used in the Payments created by the function. If you leave this field empty, the first Payment Mode in the Payment Modes setting will be used.
- Pay Date
- Paste Special
Choose date
- If you need the Payments created by this function to have a particular Payment Date, specify that date here. You must specify a Pay Date if you choose not to use the Pay On Due Date or the Use Settlement Discount options below, otherwise no Payments will be created.
- Pay On Due Date
- Select this option if you want to pay each Purchase Invoice on its Due Date. The function will create separate Payment records for each Due Date as required, with the Due Dates as Payment Dates. If you select this option and specify a date in the field above, the function will still create separate Payment records for each Due Date, but the Payment Date in each Payment will be the date specified above.
- If you select this option but not the Use Settlement Discount option below, Purchase Invoices with settlement discounts will be paid on their Due Dates, not on their Discount Dates. Therefore settlement discounts may not be included. If you need to pay Purchase Invoices with settlement discounts, select both options to take advantage of the discounts.
- Use Settlement Discount
- Use this option if you want to take advantage of any settlement discounts offered for early payment. Each Purchase Invoice being paid will be included in a Payment record with its settlement discount in a separate discount row.
- Selecting this option will have the following consequences:
- By default, a single Payment will be created (or one for each Supplier if you are using the One Supplier Per Payment option). The Payment Date will be the earliest Discount Date of the Purchase Invoices being paid. Purchase Invoices without Discount Dates (i.e. without settlement discounts) will be included in the Payment, so these may be paid before their Due Dates.
- If you specify a Pay Date in the field above, again a single Payment will be created (or one for each Supplier if you are using the One Supplier Per Payment option). This time, the Payment Date will be the date specified in the field above, and settlement discounts will only be calculated when eligible (i.e. for Purchase Invoices with Discount Dates that are later than the date specified).
- If you also select the Pay On Due Date option above, separate Payment records will be created for each Discount Date, with the Discount Dates as Payment Dates. If you have Purchase Invoices without Discount Dates (i.e. without settlement discounts), additional Payments will be created if necessary for each Due Date.
If you do not select this option, Purchase Invoices will be paid in full, and any settlement discounts will be ignored.
- Incl. Credit Invoices
- The function will try to pay the full outstanding amount on each Purchase Invoice (subject to any Maximum Amount). If a Purchase Invoice has been partially credited, this means that only the remaining uncredited amount will be paid. However, Credit Notes that have not been set against specific Purchase Invoices (i.e. Credit Notes in which the Credit of Invoice field is empty) will only be taken into account if you select this option. They will be included in Payments in separate rows with negative Sent Values.
- One Supplier Per Payment
- Use this option if you would like separate Payment records to be created for each Supplier. Otherwise, a single Payment record will be created with the specified Pay Date (or one for each Due Date or Discount Date), containing every Purchase Invoice being paid, irrespective of Supplier.
- Create part Payments
- Please refer to the description of the Maximum Amount field above for details about this option.
- Sorting
- If you are not using the One Supplier per Payment option above and you specify a Pay. Date, a single Payment record will be created, containing all Purchase Invoices being paid. Use these options to choose the order in which the Purchase Invoices are to be listed in the Payment record.
The new Payments will not be marked as Ordered or OK, so the Purchase Invoices will remain open (i.e. unpaid). After running the function, locate the new Payments in the Payment register and check them. You can marked them as Ordered (thus ensuring the Invoice(s) being paid will no longer be treated as open) and then OK individually or using the 'Order' and 'OK' functions on the Operations/Tools menu in the 'Payments: Browse' window.
---
The Payment register in Standard ERP:
Go back to:
|