Item Classifications and the Item 'Paste Special' List
Whenever you need to enter an Item in a record such as an Order, Invoice or Goods Receipt, you can use the 'Paste Special' feature to help you choose the correct Item.
When you open the 'Paste Special' list from any Item field, the resulting 'Paste Item' window will usually be simple list in which you can choose the Item you need by double-clicking (Windows/Mac OS X) or tapping (iOS/Android):

You can sort the list so that you can find the Item you want, and you can save the sort order so that it's used by default.
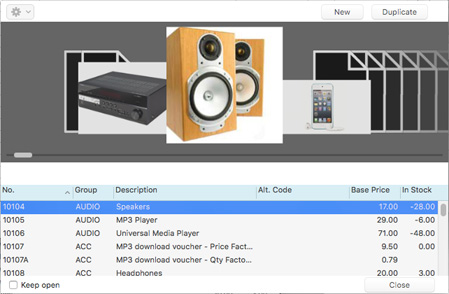
If you are using Mac OS X, the 'Paste Item' window will by default include a section that incorporates Apple's "Cover Flow" technology. Again, you can choose the Item you need by double-clicking:

If you have many Items in your database, you can use Item Classifications to build a 'Paste Special' list that provides a greater level of help with Item selection. Follow these steps:
- Spend some time planning your Item Classifications with the aim of helping users to choose Items quickly and easily.
Planning your Item Classifications will result in a hierarchical structure similar to the example illustrated below:

This structure will result in the following Item Classifications:

- Each Item Classification record contains a Classification field. As you enter your Item Classifications, use this field to construct the Item Classification hierarchy. In each record on a lower level, this field should contain the Classification on the level immediately above.
In the example, the "MAIN" Classification is on the top level, so the Classification field in the "MAIN" record is blank:

The "MAIN" Classification has four sub-Classifications "Streaming", "Digital Playback", "Vinyl" and "Speakers". In these Classifications, the Classification field should contain "MAIN", the superior Classification to which they belong:

Within Classification 1 ("Streaming"), there are two sub-Classifications, "Music Servers" and "Streaming Devices". In these Classifications, the Classification field should contain "1", the immediately superior Classification:

This structure is continued down through the hierarchy.
- Having planned your Item Classifications and entered them in the Item Classifications setting, you should now assign them to your Items (using the Classification field on the 'Pricing' card). You can assign as many Classifications as you like to each Item, separated by commas: in the example illustrated below, the Item has been classified as a streaming device and a digital radio. The Classifications that you assign can be from any level in the hierarchy.

Every Item should have at least one Classification: Items without a Classification will not appear in the new 'Paste Special' list.
- Decide which Classification is to be your default Classification. This is the Classification whose Items will be listed when the Item 'Paste Special' list first appears. Enter this Classification in the Classification field in the Stock Settings setting in the Stock module:

Entering a Classification in the Stock Settings setting will cause the standard 'Paste Special' window to be replaced with the following window when you open the 'Paste Special' list from any Item field (in this case, from the Item field in an Invoice):

In this example, we have specified that our "MAIN" Classification (i.e. the top level Classification) is the Paste Classification. As a result, the list on the left-hand side is headed "MAIN", and the four second-level Classifications that belong to the "MAIN" Classification are listed there. The list of Items on the right is empty because no Items belong directly to the "MAIN" Classification.
If the Item that we want is a type of Speaker, we can double-click or tap on "4 Speakers" in the left-hand list, with the following result:

The title of the left-hand list changes to "4", the Classification Code for Speakers. This list is now empty, because this Classification has no sub-Classifications. The right-hand list now shows the four Items that belong to this Classification. You can sort and search in this right-hand list in the usual fashion and, as in the standard 'Paste Special' window, you can create a new Item by clicking [New] or [Duplicate] buttons (Windows/Mac OS X) or + (iOS/Android). If the Item we want is in the list, we can double-click or tap it to add it to the Invoice.
The advantage of specifying that our "MAIN" Classification (i.e. the top level Classification) in the Classification field in the Stock Settings setting in this example is that when the 'Paste Special' list opens, the major Classifications are all shown in the left-hand list, helping us to find the Item that we want quickly and easily.
However, in some circumstances we might want to specify a lower level Classification in the Stock Settings setting. For example, our best-selling Item might belong to the "SD Streaming Devices" Classification, so we can enter "SD" in the Classification field in the Stock Settings setting. "SD" is a Classification on the third level. In this situation, when the 'Paste Special' list opens, the title of the left-hand list will be "SD", as specified in the Stock Settings setting. This list is empty, because "SD" has no sub-Classifications. The right-hand list contains the Items that belong to this Classification:

If the Item that we want does not belong to the "SD" Classification, we can click the [Back] button to go up one level in the hierarchy (to Classification "1 Streaming"), or we can click the [Top] button to go to the top level (to the "MAIN" Classification).
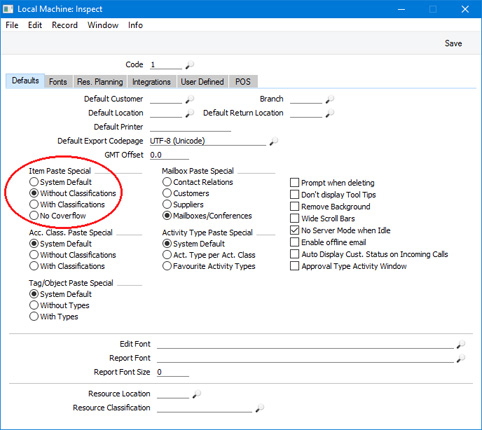
- After you have specified a Classification in the Stock Settings setting, the 'Paste Item' window with Classifications will be used on every machine in the network. If you only need the standard 'Paste Item' window to be used on a particular machine, change to the User Settings module on that machine and open the Local Machine setting. Choose "Without Classifications" as the Item Paste Special option (if you are using Mac OS X you can also choose "No Coverflow"):

---
Item Classifications in Standard ERP:
Go back to:
