POS Button Types in POS Invoices - Item and Pricing Functions
This page describes the following POS Button Types in POS Invoices:
- Dynamic Barcode
- Item
- Item Search
- Item Status
- Modifier
- Open Item Record
- Previous Sales Prices
- Price Lookup
- Serial No. Lookup
- Split Item
Please refer here for an index of all POS Button Types.
---
Dynamic Barcode - Function
- Adds an Item that is priced by size or weight to a POS Invoice.
- Requirements
- You must have specified a barcode structure for Items priced by size or weight in the Dynamic Barcode setting.
- Workflow
- Click or touch the "Dynamic Barcode" button.
- The 'Dynamic Barcode Scan' window appears.
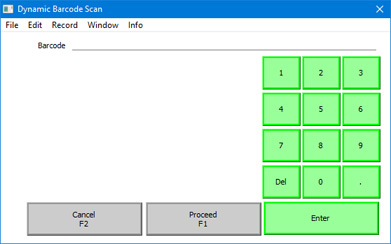
- Scan the barcode on the Item or enter it using the keypad.
- Click or touch the [Proceed] button.
- The Item will be added to the POS Invoice.
- Equivalent POS Command
- Scan Dynamic Barcode
Item- Function
- Adds a specific Item to a POS Invoice.
- Requirements
- In the row in the POS Button record that adds the "Item" button to the POS Invoice window, you must enter an Item Number in the Code field, using 'Paste Special' if necessary. This is the Item that will be added to the POS Invoice when the cashier clicks or touches the button.
- Workflow
- Click or touch the "Item" button.
- The relevant Item will be added to the POS Invoice.
- Note
- The "Item" button can be useful for commonly used Items, especially those without barcodes (for example, fruit and vegetables).
Item Search- Function
- Allows a cashier to add an Item to a POS Invoice by searching for it by name.
- Requirements
- Can only be used on tills and cash machines that have keyboards.
- Workflow
- Click or touch the "Item Search" button.
- The 'Search for Item' window appears:
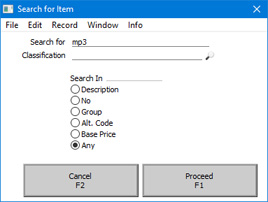
- Enter part of the Item's name or other piece of information (information that fits one of the radio button options e.g. Item Group or Base Price) in the Search for field.
Entering more than one word as the search string will be treated as a "Find All Words" search, not "Find Exact Phrase".
- Press the Enter key twice or click or touch the [Proceed] button.
- The 'Paste Item' window will appear, listing the results of the search:
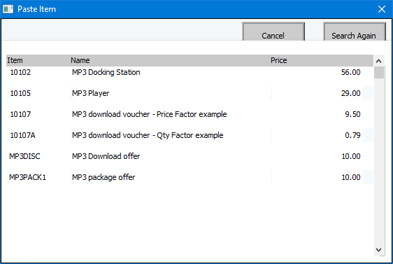
- Click or touch the Item that you need, or highlight it and press the Enter key. The Item will be added to the POS Invoice. If the Item that you need isn't listed, click or touch the [Search Again] button or close the window using the [Cancel] button, the close box or the Esc key.
Item Status- Function
- Produces an Item Status report for a particular Item.
- Workflow
- Highlight the Item in the POS Invoice you are interested in. The last Item added to the Invoice will be highlighted by default.
- Click or touch the "Item Status" button.
- An Item Status report for the Item will be printed to screen.
- Notes
- The Item Status report shows the stock levels of the Item in every Location, the sales price of the Item in every Price List, and various other details. A fuller description can be found here.
- If you use the "Item Status" button on a till with a live-sync connection to the server, the stock levels and outstanding order quantities shown in the report will not be correct. These figures are not stored in the local databases on live-sync tills.
Modifier- Function
- Adds a specific Item together with selected accessories or options to a POS Invoice.
- Requirements
- The relationship between an Item and its accessories or options must be established in the Modifiers setting.
- In the row in the POS Button record that adds the "Modifier" button to the POS Invoice window, you must specify a Modifier record in the Code field, using 'Paste Special' if necessary. This means you should add a separate POS Button for each Item that is sold together with accessories or options.
- Workflow
- Click or touch the "Modifiers" button.
- A 'Modifiers' window will appear, containing one button for each option or accessory:
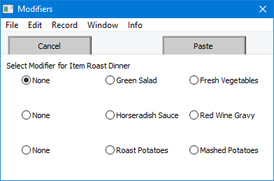
- Click or touch the button representing the option or accessory that the Customer requires. If the window contains more than one row of buttons, click or touch one option in each row.
- Click or touch the [Paste] button to add the Item together with the selected options to the POS Invoice, or click or touch [Cancel] to return to the POS Invoice without adding any Items.
- Note
- Please refer here for details about Modifiers.
Open Item Record- Function
- Opens the Item record for any Item in a POS Invoice
- Workflow
- Highlight the line in the POS Invoice containing the Item in which you are interested. The last Item added to the Invoice will be highlighted by default.
- Click or touch the "Open Item Record" button.
- The relevant Item record opens.
- If your till has a keyboard, you will be able to make changes to the record.
- Close the Item record using the close box.
- Note
- If a till has a live-sync connection to the server, any changes that a cashier makes to a Item record on that till will not be sent to the server. If another user with a live connection to the server changes the same record, these changes will be sent to the live-sync till and the changes made on that till will be lost. For this reason, it is recommended that you use Access Groups to give live-sync users Read access to the Item register so that they cannot change Item records. You may not want cashiers to be able to change Item records in any case.
Previous Sales Prices- Function
- Produces a report listing the prices previously paid by the Customer for a particular Item.
- Workflow
- Highlight the Item in the POS Invoice you are interested in. The last Item added to the Invoice will be highlighted by default.
- Click or touch the "Previous Sales Prices" button.
- A Previous Sales Prices report for the Item will be printed to screen. The report will list each price paid by the Customer for the Item, together with the Invoice or POS Invoice Number of the most recent Invoice or POS Invoice in which they were charged each different price.
Price Lookup- Function
- Displays the price of an Item without adding it to a POS Invoice.
- Workflow
- Click or touch the "Price Lookup" button.
- The 'Price Lookup' window appears:
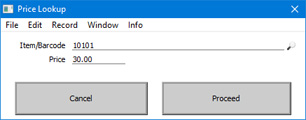
- Scan the Item's barcode, or enter its Item Number or Barcode and click or touch the [Proceed] button.
- The Item's price will be displayed in the Price field.
- Click or touch the [Cancel] button to return to the POS Invoice.
Serial No. Lookup- Function
- Allows the cashier to specify the Serial Number of an Item.
- Requirements
- The Item must be one that requires Serial Numbers at Unit or Batch level.
- Workflow
- Highlight a Serial Numbered Item in the POS Invoice. The last line added to the Invoice will be highlighted by default.
- Click or touch the "Serial No. Lookup" button.
- If the highlighted Item is Serial Numbered, the 'Scan Serial No.' window will appear:
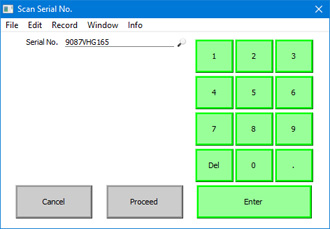
- Enter or scan the Serial Number.
- Click or touch [Proceed] to add the Serial Number to the POS Invoice or [Cancel] to retain the previous one.
- Notes
- When a cashier adds a Serial Numbered Item to a POS Invoice, the 'Scan Serial No.' window will usually be opened automatically. It will not be opened if the Item is Serial Numbered at the Batch level and the Do not Require Batch No. on POS Invoice option in the Item record ('Stock' card) is selected. The "Serial No. Lookup" button will therefore be useful when a cashier needs to change the Serial Number of an Item and when the cashier did not specify a Serial Number when originally prompted (i.e. if they cancelled the 'Scan Serial No.' window without specifying a Serial Number).
- As you can use this button to change the Serial Number in any row in the POS Invoice, it is not recommended that you use it if you are also using the Incremental Receipt Printing option on a particular till. If so, the original Serial Number will already have been printed so the new Serial Number will not be printed. If you are using incremental printing, use the ”Serial No.” POS Command, which only allows you to change the Serial Number of the last Item (i.e. before it is printed).
- If an Item is Serial Numbered at the Batch level and the Do not Require Batch No. on POS Invoice option in the Item record is selected, it will not be necessary for cashiers to specify Serial Numbers for that Item. If a cashier does not specify a Serial Number for an Item, a Serial Number will be selected automatically when you run the 'Update Stock' Maintenance function to remove the Items sold on POS Invoices from stock.
- Equivalent POS Command
- Serial No. (will only change the Serial Number of the last Item in a POS Invoice).
Split Item- Function
- Allows the cashier to break a box or package into its constituent units (e.g. into individual units: for simplicity, this description uses the phrase "constituent unit" to mean "individual or other constituent unit").
- Requirements
- Requires a supervisor to log in: can only be used by a cashier or supervisor whose Access Group gives access to the 'Split Item on Touch Screen Invoice' Action.
- The relationship between the box or package and its constituent unit must be established in the Split Items setting. A box or package cannot be split if there is no record in this setting specifying how it should be split.
- Workflow
- Enter the Item Number or scan the barcode of the box or package.
- Ensure the box or package is highlighted in the POS Invoice (it will be highlighted if it is the last line to be added to the POS Invoice) and click or touch the "Split Item" button.
- If the cashier does not have the necessary access right, the 'Login' window will appear, allowing a supervisor to log in.
- The price in the row in the POS Invoice showing the box or package will be removed, and the quantity of constituent units will be placed in the Sum column. This converts the row into a signifier that the box or package has been split into its constituent units.
- Control of the till will be passed back to the cashier.
- Enter the Item Number or scan the barcode of the individual unit.
- Notes
- When you use the 'Update Stock' Maintenance function to update stock levels from the POS Invoice, the row that signifies that the box or package has been split will cause the box or package to be removed from stock and the constituent units to be added to stock. The second row where the cashier scanned the barcode of the individual unit will cause that Item to be removed from stock.
- You can use this button if you want to record in a POS Invoice that it caused a box or package to be split. However, if a cashier does not use this button and simply scans the constituent unit as if it were a normal Item, stock levels will still be updated correctly by the 'Update Stock' Maintenance function (i.e. if there are no constituent units in stock, the stock updating process will split a box or package automatically using the information in the Split Items setting). Because of this, you will usually not need to offer a "Split Item" button to your cashiers, and it is not recommended that you do. If you do not offer a "Split Item" button, cashiers will only need to scan the constituent unit (they should be aware that they should not also scan the box or package).
---
Configuring the POS Invoice Window:
Go back to:
|