Access Groups
Access Groups allow you to control the access that different users have to your Standard ERP system. For example, you may want to grant a particular user access to the Sales and Purchase Ledgers while preventing them from entering the Nominal Ledger. After configuring your Access Groups, whenever you enter a record to the
Person register for a new user, you should assign that Person to the relevant Access Group.
You can use Access Groups to control access to your Standard ERP database in one of two ways:
- You can exclude a Person from everywhere in your Standard ERP database except those areas that you list in that Person's Access Groupi.e. you specify what the Person can do. This is known as "Starting from No Access".
- You can allow a Person to go everywhere in your Standard ERP database except to those areas that you list in that Person's Access Group i.e. you specify what the Person cannot do. This is known as "Starting from Full Access".
Bear this choice in mind while configuring your Access Groups as described below.
Note that you can only control a Person's access by assigning them to an Access Group. Persons that do not belong to an Access Group will have full access to your Standard ERP database.
To work with Access Groups, first use the [Switch Module] button in the Master Control panel to enter the System module and then click the [Settings] button, also in the Master Control panel. Double-click 'Access Groups' in the resulting list to open the 'Access Groups: Browse' window. This window will display a list of the Access Groups that are already in the system:
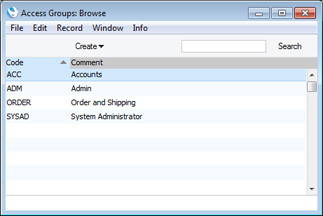
To create a new Access Group, select 'New' from the Create menu in the Button Bar. To edit an existing record, double-click one of the items in the list. When the record is complete, click the [Save] button in the Button Bar to save changes and close it using the close box, or click the close box if you don't want to save changes.
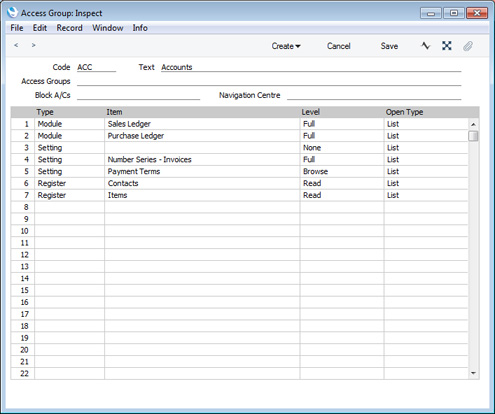
The example illustration above shows an Access Group that will be assigned to Persons who "Start from No Access".
Members of this Access Group will only have access to two modules - the Sales Ledger and the Purchase Ledger. The first row of the grid gives access to the Sales Ledger, so this will be the active module when members log in to your Standard ERP database.
If the Access Group only contained the first two rows, its members would be allowed access to every area of those modules (i.e. every register, setting, report, form, Maintenance function, etc). However in this case, the third row with its blank Item denies access to all settings in both modules. The fourth row gives access back to one particular setting, the Number Series - Invoices setting, while row 5 gives Browse access to a second setting, Payment Terms. This allows members of the Access Group to open the 'Payment Terms: Browse' window but not to open individual records or to create new ones. You need to give some level of access to Payment Terms if you want members of the Access Group to be able to choose a Payment Term using 'Paste Special' when entering Invoices.
Rows 6 and 7 give Read access to the Contact and Item registers. This allows members of the Access Group to be able to open individual Contact and Item records, but not to be able to create new ones. Again, some level of access is needed to allow members to be able to choose Customers and Items using 'Paste Special' when entering Invoices.
The Access Group record contains the following fields:
- Code
- Use this field to assign a unique identifier to each Access Group. You can use up to five alpha-numeric characters.
- Text
- Enter a description of the Access Group, to be shown in the 'Access Groups: Browse' and 'Paste Special' windows.
- Access Groups
- Paste Special
Access Groups setting, System module
- You can use this field if you are creating an Access Group that will include access rights that you have already defined in another Access Group. Specify that Access Group here. You can enter several Access Groups, separated by commas.
- For example, you might already have one Access Group giving access to the Sales Ledger and one giving access to the Purchase Ledger. If you now need to create a third Access Group giving access to both Ledgers, you can enter the two previous Access Groups here, saving you the need of listing the registers, settings and so on in the matrix once again. It also reduces the maintenance burden: if you make a change in the Access Group giving access to the Sales Ledger, you won't need to make the same change in the Access Group giving access to both Ledgers.
- The access rights in the Access Group that you specify in this field will have priority over those that you specify in the matrix below. For example, if you deny access to the Number Series - Invoices setting in the grid below, and you enter an Access Group in this field in which you have given full access to the same setting, then users will have full access to the setting. If you list several Access Groups in this field with varying levels of access to that setting, then access will be given as specified in the last-named Access Group. For example, if you enter Access Groups A, B and C, then C will have priority over A and B and over the matrix below.
- Block A/Cs
- Please refer to the Block Accounts page for details about this field.
Use the grid area to determine the areas of your Standard ERP database to which members of the Access Group will be given access, and the level of that access. You can allow or disallow access to any module or any component of a module (such as a particular register or setting).
The access right that you specify in the row with the highest number will be given priority. For example, if you deny access to all settings on row 1 and then give access to the Payment Terms setting on row 2, then members of the Access Group will have access to Payment Terms. However, if you give access to the Payment Terms setting on row 1 and deny access to all settings on row 2, then members of the Access Group will not have access to Payment Terms. You can use this order of priority to set a general rule (e.g. a rule for settings as a whole) and then to make exceptions (e.g. for Payment Terms).
- Type
- Paste Special
Choices of possible entries
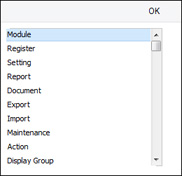
- The first step is use the Type field to specify the area of your database to which you are controlling access (for example, module, register, setting, report, document, etc.). Use 'Paste Special' to open a list of the Types available:
- Item
- Paste Special
Choices of possible entries
- Having specified the Type, use the Item field to name the specific component whose access you are controlling. Again, use 'Paste Special' to open a list of the components available. The 'Paste Special' list will vary, depending on the Type.
- For example, if you entered "Module" in the Type field, the 'Paste Special' list from the Item field will contain a list of modules:
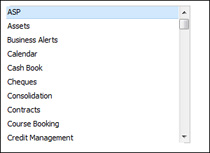
The list will show every module in Standard ERP, including those that you may not have installed. Make sure you only select modules that are included in your particular installation of Standard ERP.
- If you enter "Action" in the Type field, the 'Paste Special' list from the Item field will contain a list of functions to which you can restrict access if necessary. These include the checking of the OK box in transactions of all kinds, the Operations menu functions and some miscellaneous features such as deleting records.
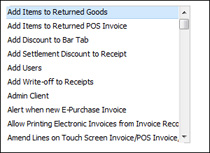
Note that, as indicated by their names, some of these Actions will Allow access, while others will Disallow access. Make sure you make an appropriate entry in the Level field to the right.
- If you enter "Reports" in the Type field, 'Paste Special' from the Item field will list all reports, and so on.
- You can leave the Item field empty if you want to apply the Level to all sub-components of the specified Type. For example, if the Type is "Reports", the Item is empty and the Level is "None", members of the Access Group will have no access to any report. You can then list individual reports on subsequent rows with a Level of "Full" to give access only to those reports listed.
- Level
- Paste Special
Choices of possible entries
- Use the Level field to specify the level of access that you are allowing to the Item. A further 'Paste Special' list displays the available options:
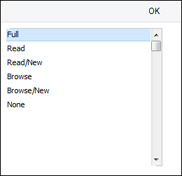
You can use the following two options with any Type:
- Full
- Allows full access to the Item.
- None
- Denies all access to the Item.
- If the Type is "Document", this Level will allow users to print forms from browse and record windows, but not from elsewhere. For example, a user with no access to the Invoice document will be able to print an Invoice record by opening it and clicking the Printer icon, and by highlighting it in the 'Invoices: Browse' window and selecting 'Print' from the File menu. They will not be able to choose the 'Invoices' option in the 'Forms' list , so they won't be able to print a range of Invoices, and they won't have access to the 'Form Definition' window (i.e. they will not be able to change the Form Template used when Invoices are printed).
You can only use the remaining options when the Type is "Register" or "Setting", with one exception noted in the text :
- Browse
- Allows users to open the register or setting and to see the records it contains in a list. Users will be able to search the list. Users will not be able to open, modify or create individual records.
- Browse/New
- Allows users to open the register or setting and to see the records it contains in a list. Users will be able to search the list. Users will not be able to open or modify individual records, but they will be able to create new ones (although not by duplicating existing ones).
- Read
- Allows users to open the register or setting and to see the records it contains in a list. Users will be able to search the list. Users will be able to open individual records but not to modify them or to create new ones.
You can also use this Level when the Type is "Report", in which case users will be able to print the report to screen but not to a printer or to a text file (i.e. users will not be able to print the report using any of the Media options in the report specification window except Screen).
- Read/New
- Allows users to open the register or setting and to see the records it contains in a list. Users will be able to search the list. Users will be able to open individual records but not to modify them. They will be able to create new records (including by duplicating existing ones).
If you want to allow 'Paste Special' access to a register or setting to which access is otherwise denied, you should grant Browse or Read access to that register or setting. For example, if a user only has access to the Invoice register, you should grant them Browse or Read access to the Contact and Item registers if you want them to be able to choose Customers and Items using 'Paste Special' when they enter new Invoices.
Be careful when granting access to Items and Locations. Items is a setting in the Stock module but a register in many other modules. You may need separate rows for Items as a setting and for Items as a register. Similarly, Locations is a setting in the Stock module but a register in the Warehouse Management module. If you need to grant Browse or Read access to Locations so that they can be chosen using 'Paste Special', you should do so as a register.
- Open Type
- Paste Special
Choices of possible entries
- You can only use the Open Type if the Type is "Register". This field controls what will happen when a member of the Access Group opens a register, as follows:
- List
- The register's browse window will open, listing the records in the register.
- New Record
- An empty record window will open, allowing the user to create a new record in the register immediately. To open the register's browse window from this record window, the user should use the F3 (Windows and Linux) or ⌘-Shift-G (Mac OS X) key combination.
Be sure to choose an Open Type that is compatible with the Level.
Please click the following links for more information about Access Groups:
Settings in the System module:
- Access Groups
- Active Users
- Auto Actions
- Bank Holidays
- Base Currency
- Base Currency Rates
- Company Date and Numeric Format
- Company Info
- Configuration
- Conversions - Master, Conversions - Accounts and VAT Code
- Conversions - Master, Conversions - Activity Types
- Conversions - Master, Conversions - Contact Classifications
- Conversions - Master, Conversions - Contacts
- Conversions - Master, Conversions - Currency Codes
- Conversions - Master, Conversions - Items
- Conversions - Master, Conversions - Locations
- Conversions - Master
- Conversions - Master, Conversions - Suppliers
- Conversions - Master, Conversions - Objects
- Conversions - Master, Conversions - Users
- Countries
- Countries Regions
- Currency Round Off
- Days and Months
- Departments
- Discount Options
- Display Groups
- Exchange Rates Settings
- Form Settings
- Global Warnings on UnOKed Records
- Internet Enablers
- Journaling
- KPIs
- Languages
- Locking
- Locking Exceptions
- Number Series Defaults
- Opened Windows History
- Optional Features
- Password Security
- Printers
- Reporting Periods
- Round Off
- Sales Groups
- Single Functions
- Special Days
- Styles
- Sub-Ledger Control Accounts
- Task Manager Access
- User Warnings on UnOKed Records
- Values in Text
- VAT Number Masks
- Weeks
Go back to: