Point of Sales - Live-Sync Details
This page describes various details of the synchronisation process, used by tills and cash machines that have live-sync connections with the server. Please refer
here for a list of the steps that should be followed in order to connect a live-sync till to the server for the first time.
---
When you connect a live-sync till to the server for the first time, everything needed for the till to act as a sales terminal when the server is offline will be sent from the server to the till. The 'Synchronising' window will appear, indicating the progress of the synchronisation process:

While the server is online, all work carried out on the till will be saved first in the database on the till and then in that on the server. If the server goes offline, work will continue to be saved on the till, and will be sent to the server when it next becomes available. If the till is offline, relevant information saved on the server (e.g. Items, Prices, etc) will be sent to the till the next time it logs in.
The following registers and settings will be subject to the synchronisation process:
Direction of Synchronisation: from client to server
Direction of Synchronisation: from server to client
These registers and settings will be read-only on live-sync clients: it will not be possible to change them (i.e. to modify existing records or to add new ones).
Direction of Synchronisation: both directions
Unique Identifiers
Each record in a register or setting that is synchronised from the client to the server will contain the usual visible unique identifier (for example, the Invoice Number in a POS Invoice). There will also be a second hidden unique identifier, the UUID (Universally Unique ID). Each new record will be given its own UUID. This UUID will never be duplicated, on any client.
Each record to be synchronised will also be given a sequence number automatically. A record's sequence number will be updated every time the record is changed. A separate series of sequence numbers will be maintained in each database (i.e. the main database and the till databases), starting at zero. The server and all clients will keep track of these sequence numbers and record the last sequence numbers to be synchronised. The next time synchronisation occurs, the process will begin with the record whose sequence number is one higher than the last one previously synchronised. As with the UUID, the sequence number is not shown in the interface.
Activating Synchronisation
To activate synchronisation, configure the following two settings before connected any tills. In both cases workion a desktop client:
- The Synchronisation Options setting in the Technics module.
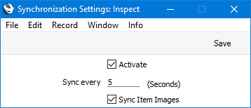
- Activate
- Ticking this box has the following effects:
- The synchronisation process will be activated.
- A UUID History register will be maintained. This register records the deletion of records in the main database in the registers and settings that are subject to the synchronisation process. If live-sync tills are connected when a record is deleted, that record will also be deleted in those till databases. If any live-sync tills are not connected when a record is deleted, the synchronisation process will use the UUID History to find that record in those till databases the next time they log in and to delete it.
If the Activate box is not ticked, the UUID History register will not be maintained. The UUID History is only needed in a system with live-sync clients. Maintaining it in other systems will cause the database to be larger than necessary.
The UUID History is visible in a setting in the Database Maintenance module. You can empty the UUID History periodically, providing you are sure that the deletions have been carried out on every live-sync till. To do this, run the 'Delete Synchronization History' Maintenance function in the Technics module.
- Sync every
- Specify here in seconds how often the server should check for new, updated and deleted records in the main database for sending to the connected tills. Depending on the server workload, a value between 30 and 900 seconds is recommended.
- Sync Item Images
- Select this option if you would like images attached to Item records to be included in the synchronisation process. You will need to use this option if you are using the Item Pictures in POS Invoices option on live-sync tills. Depending on the size of the images and the frequency of changing them, selecting this option will increase the server workload.
- The Optional Features setting in the System module.
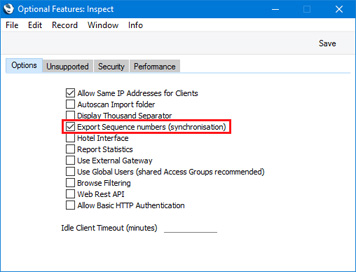
- Export Sequence numbers (synchronisation)
- You must select this option in a system with live-sync clients.
- As described above, the synchronisation process uses sequence numbers to determine the records that it should update.
- This option ensures that sequence numbers are included in database text backup files created from the main database. If you need to create a new database by importing a text backup file (e.g. when updating to a new version of Standard ERP, or when your database becomes damaged), the new database will contain the correct sequence numbers. If you are not using this option, sequence numbers in the new database will be set back to zero. This will prevent synchronisation from the server to the clients, because the synchronisation process will attempt to begin from a sequence number higher than zero.
- The first time you connect a live-sync till to the server, the synchronisation process will check to see if you are using this option. If you are, the till and main databases will be synchronised. If you are not, the 'Synchronising' window illustrated at the beginning of this section will remain on the till's screen permanently. The log file on the server will record that synchronisation has failed. In this event, click the [Quit] button in the 'Synchronising' window on the till, turn this option on in the main database and re-connect the till.
Identifying the Type of Connection
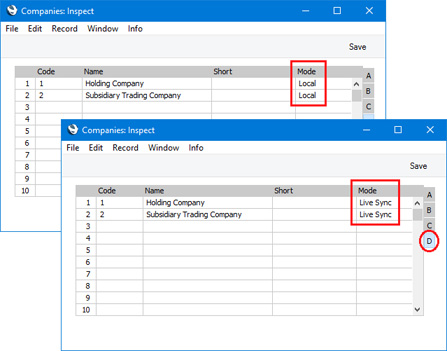
To identify whether a client connects to the server using the standard live connection or a live-sync connection, open the Company register on the client and refer to flip D. The Mode field will contain "Local" in the case of a live connection, and "Live Sync" in the case of a live-sync connection:
Quitting Sync Clients
Use the 'Quit' command as normal when you need to quit Standard ERP on a sync client. The 'Synchronising' window will appear, to indicate the progress of the transfer If the server is not online, the 'Synchronising' window will remain on screen, showing no progress. Click or touch the [Quit] button to close the client.
Monitoring Synchronisation
You may need to check periodically that every POS Invoice and other transaction created on a sync client has reached the server. You can do this by running the Sync Check report in the System module, which you should do from the sync client when it is connected to the server. The report will compare the records in the sync client database with the records in the server database. When you run the report, the following window will appear:
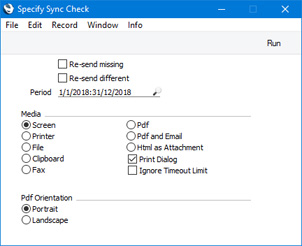
- Re-send missing
- If the sync client database contains any records that are not in the server database, these records will be shown in the report as "Not On Server". Select this option if you would like these records to be sent to the server when you produce the report.
- Re-send different
- If a record exists in both the sync client database and the server database, it will be shown in the report as "Different". The record may have been modified in one or both databases after the last synchronisation. Select this option if you would like the record to be sent to the server again (i.e. for the record to be sent from the sync client database, to overwrite the one that is in the server database).
- Period
- Paste Special
Reporting Periods setting, System module
- Specify the period to be covered by the report.
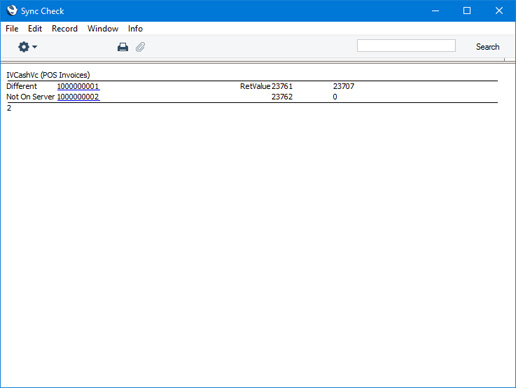
One way to use the report is to produce it without using the Re-send missing and Re-send different options. If the report is empty, all records have been sent from the sync client database. If the report is not empty, inspect the records that are listed in the report if necessary, and then produce the report again using the Re-send missing and/or Re-send different options as needed. The records will again be listed in the report, and will be sent to the server at the same time. On recalculating the report, it should now be empty.
If a record is not sent to the server by the Re-send missing and/or Re-send different options, the probable reason is that a record already exists on the server with the same visible unique identifier but a different UUID. For example, if the record is a POS Invoice, a POS Invoice with the same Invoice Number but a different UUID already exists on the server. The record that is already on the server could have been created from another sync client or from a live client. Because the two records conflict, they cannot be synchronised. The probable causes of this conflict are that you have not filled out the Synchronised Number Series setting for the register in question and/or the relevant Number Series setting is empty. Both settings should be filled out for successful synchronisation.
Backing Up Sync Clients
If a sync client is not able to connect to the server for a while, its database will contain POS Invoices that have not been sent to the server and so are not stored anywhere else. If that database becomes damaged or is lost, those POS Invoices will also be lost. You may therefore need to consider establishing back-up routines for sync client databases, especially if it is likely that the sync clients will not be able to connect to the server for long periods of time.
It is recommended that you back up your sync client databases using journaling. Once configured, journaling will operate in the background and won't need any intervention from cashiers. Please refer to the description of journaling here for full details. When configuring journaling on sync clients, bear the following points in mind:
- The settings that are used to control journaling (the Journaling and Backup Settings setting in the System module and the Timed Operations setting in the Technics module are not synchronised, so you will need to configure) them individually on each sync client.
- Most settings on a sync client cannot be changed as they are read-only. However, the settings that are used to control journaling are not read-only. After initial synchronisation, log in to each sync client as a user with access to the Technics module, enable the journaling feature (using the Journaling setting) and activate database duplication (using the Timed Operations setting). If necessary, use the Backup Settings setting if you need new journal files to be created regularly.
- If you need to revert to an old database and to apply the journal, you can do so on the till in question providing it has a keyboard and a text editor that allows you to create and edit a parameters.txt file. Otherwise you may need to copy the relevant files to a more convenient machine. Follow the instructions here, use the client version of the Standard ERP application and use the parameters.txt method of instructing the application to start up using the --apply-journal and then the --stop-journaling --i-know-this-is-dangerous parameters. It is recommended that you work on a machine that is unable to connect to the server, so that the database does not attempt to connect to and synchronise with the server while the journal is being applied.
- Remember to retain an untouched "HANSA.HDB.COPY" file and journal file at all times. Remember as well that if you need to start an old database to check that it is undamaged, a new "HANSA.HDB.COPY" file will be created because database duplication will be activated in the old database. Do not confuse this "HANSA.HDB.COPY" file with the one that you will use for the reversion.
Preparing for Point of Sales:
---
Go back to:
