Tag/Object Types
This page describes the Tag/Object Types setting in the Nominal Ledger. For clarity, the term "Object" has been used in this description.
---
If you are using Objects, you can also use Object Types to group Objects of a similar nature together.
Using Object Types will have the following benefits:
- The analysis in many reports will be enhanced. In many reports in the Nominal Ledger, you can specify an Object Type as a search criterion, and the resulting report will contain separate figures for each Object that belongs to the specified Object Type. For example, if you have an Object Type for Objects representing salespersons, you can produce a Profit & Loss report for that Object Type, to compare the profitability of each salesperson.
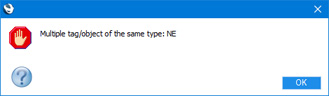
- When you are using Object Types, you can only use one Object belonging to a particular Object Type in a transaction of any kind. This can be a useful check. For example, if you are using Objects to represent branches or offices, these Objects should belong to the same Object Type. This will prevent you making postings with more than one branch signifier. If you try to use more than one Object belonging to the same Object Type in a transaction, the following warning will appear when you try to save the record:
- If you are using Object Types, you can also use the Tag/Object Type Control setting to specify that you must use an Object belonging to a certain Object Type whenever you post to a particular Account. For example, you can use Object Type Control to specify that you must assign an Object representing the salesperson and an Object representing the product type to every posting to a Sales Account.
Please refer to the
Objects in Standard ERP page for more details about using Objects and Object Types including illustrated examples.
If you need to print a list of the Object Types that you have entered in the Tag/Object Types setting, produce a System Documentation report (from the System module) with the Tag/Object Types option selected.
Creating an Object Type
To open the Object Types setting, first ensure you are in the Nominal Ledger module. Then, if you are using Windows or Mac OS X, click the [Settings] button in the Navigation Centre or use the Ctrl-S/⌘-S keyboard shortcuts and then double-click 'Tag/Object Types' in the 'Settings' list. If you are using iOS or Android, select 'Settings' from the Tools menu (with 'wrench' icon) and tap 'Tag/Object Types' in the 'Settings' list. A list of existing Object Types will be opened.
To enter a new Object Type, select 'New' from the Create menu (Windows/Mac OS X) or the + menu (iOS/Android). The 'Tag/Object Type: New' window will appear:
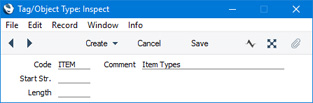
- Code
- Enter the unique Code by which the Object Type record is to be identified from elsewhere in Standard ERP. The Code can consist of up to five characters, and you can use both numbers and letters.
- Comment
- Enter the name for the Object Type. This name will be shown in the 'Tag/Object Types: Browse' window and the 'Paste Special' list so should be clear enough to make the selection of the correct Object Type easy for all users
- Start Str.
- If you need the Object Codes of every Object belonging to an Object Type to begin with the same characters, enter those characters here. Specifying a Start String can be an aid for users selecting Objects in transactions, and it will also be useful if you will produce the Tag/Object/Quantity Results report in the Nominal Ledger using the Show Group Sub Accounts option.
- Length
- If you need the Object Codes of every Object belonging to an Object Type to consist of a specific number of characters, enter that number here. Any Start String that you specify in the field above will be included in the count. Remember that when you assign Objects to a transaction, you are limited to 60 characters, so you should not use long Object Codes because this will restrict the number of Objects you can use at any one time.
Confirm the entry by clicking the [Save] button (Windows/Mac OS X) or by tapping √ (iOS/Android). If you are modifying an existing record, restore the old data by clicking [Cancel] (Windows/Mac OS X)] or by tapping < (iOS/Android). Close the window using the close box or by tapping <.
Deleting an Object Type
To delete an Object Type, follow these steps:
- Open the Tag/Object Types setting as described above.
The 'Object Types: Browse' window opens.
- Find the Object Type that you need to remove, using the Search field if necessary.
- Open the Object Type record by double-clicking (Windows/Mac OS X) or tapping (iOS/Android).
The Object Type will be shown in a window with the title 'Tag/Object Type: Inspect'.
- Select 'Delete' from the Record menu (which has a 'cog' icon if you are using iOS or Android). The Object Type will be removed permanently. The window will now show the previous Object Type in the list.
- Close the window using the close box (Windows/Mac OS X) or by tapping < (iOS/Android). The list of Object Types will be shown again.
! | You cannot undo a deletion of an Object Type. |
|
Settings in the Nominal Ledger:
Go back to: