Company Info
Use the Company Info setting to record your company's name and address, and other particulars such as phone and fax numbers, and the bank and bank account number. This will be printed as appropriate on all documents. If you have more than one
Company, you should record this information separately in the Company Info setting in each Company.
To open the Company Info setting, first ensure you are in the System module. Then, if you are using Windows or macOS, click the [Settings] button in the Navigation Centre and then double-click 'Company Info' in the resulting list. If you are using iOS or Android, select 'Settings' from the Tools menu (with 'wrench' icon) and tap 'Company Info' in the 'Settings' list. The 'Company Info: Inspect' window will be opened. When the window is complete, confirm the entry by clicking [Save] (Windows/macOS) or tapping √ (iOS/Android). To close the window without saving changes, click the close box or tap <.
When you
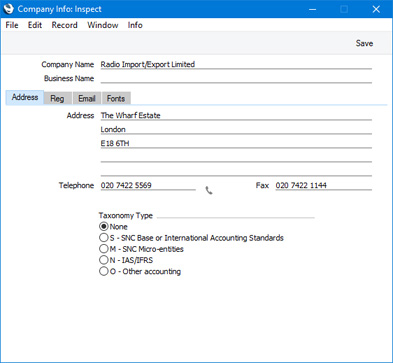
create a new database, the first Company will be created automatically for you. As part of this process, you will be asked to provide a Name for this Company in the 'Enter Company Name' window. This Company Name will be copied to the Company Info setting as shown above. If you add more Companies, you should give each one a Name in the Company Info setting. If you change this Company Name in the Company Info setting in any Company, this will cause Standard ERP to go into demonstration mode. To regain full use of Standard ERP, you will need to apply for a new
Enabler Key.
If your company has a registered name and a different commercial or trading name, enter the registered name in the Company Name field and the commercial or trading name in the Business Name field. If you need the Company Name to be printed on documentation, add the "Own Name" field to your Form Template designs. If you need the Business Name to be printed on documentation, add the "Own Business Name" field to your Form Template designs.
The Company Info setting is spread over four cards. To view specific cards, click or tap one of the four named tabs. Please follow the links below for details about each card:
---
Settings in the System module:
- Access Groups
- Active Users
- Auto Actions
- Bank Holidays
- Base Currency
- Base Currency Rates
- Cloud Security
- Company Date and Numeric Format
- Company Info
- Configuration
- Conversions - Master, Conversions - Accounts and VAT Code
- Conversions - Master, Conversions - Activity Types
- Conversions - Master, Conversions - Contact Classifications
- Conversions - Master, Conversions - Contacts
- Conversions - Master, Conversions - Currency Codes
- Conversions - Master, Conversions - Items
- Conversions - Master, Conversions - Locations
- Conversions - Master
- Conversions - Master, Conversions - Suppliers
- Conversions - Master, Conversions - Tags/Objects
- Conversions - Master, Conversions - Users
- Countries
- Countries Regions
- Currency Round Off
- Days and Months
- Departments
- Discount Options
- Display Groups
- Exchange Rates Settings
- Form Settings
- Global Warnings on UnOKed Records
- Internet Enablers
- Journaling
- KPIs
- Languages
- Locking
- Locking Exceptions
- Nature of Business
- Number Series Defaults
- Opened Windows History
- Optional Features
- Password Security
- Printers
- Reporting Periods
- Round Off
- Sales Groups
- Single Functions
- Special Days
- Styles
- Sub-Ledger Control Accounts
- Task Manager Access
- User Warnings on UnOKed Records
- Values in Text
- VAT Number Masks
- Weeks
Go back to: