Countries
This page describes the Countries setting in the System module.
---
The Countries setting should contain separate records for each Country with whom you trade. You can set various defaults in a Country record, and these defaults will be copied to each Contact residing in that Country. You can also enter various translations of the Country Name, to be printed on documentation as appropriate.
To work with the Countries setting, first ensure you are in the System module. Then, if you are using Windows or macOS, click the [Settings] button in the Navigation Centre and then double-click 'Countries' in the 'Settings' list. If you are using iOS or Android, select 'Settings' from the Tools menu (with 'wrench' icon) and tap 'Countries' in the 'Settings' list. The 'Countries: Browse' window will open. This contains a list of the records already entered to this setting.
Double-click (Windows/macOS) or tap (iOS/Android) on a line to open the edit window, or add a new record by selecting 'New' from the Create menu (Windows/macOS) or the + menu (iOS/Android). When the record is complete, click the [Save] button (Windows/macOS) or tap √ (iOS/Android) to save it, or use the close box (Windows/macOS) or < (iOS/Android) to close it without saving changes.
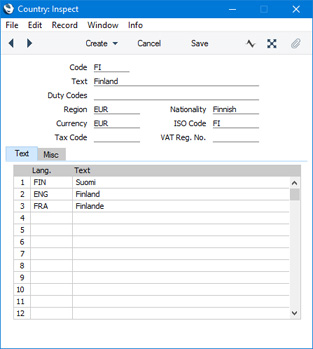
Header- Code
- Enter the unique Code by which the Country record is to be identified from elsewhere in Standard ERP. The Code can consist of up to five characters, and you can use both numbers and letters.
- Although you can use arbitrary codes, it is usually recommended that you use the two-character ISO 3166 codes for each Country. This can be a requirement for official reporting. For example, if you are in the UK and will be submitting Intrastat reports, you should use ISO 3166 codes to represent the Countries where your Customers are located. A list of ISO 3166 codes can be found in the HMRC's Notice 60 document, available from https://www.uktradeinfo.com/Intrastat/IntrastatServices/Pages/Notice60.aspx. Similarly, if you will be paying international Purchase Invoices using 'Banking File' export files using one of the SEPA formats, you will usually need to use ISO 3166 codes to represent the destination Countries (as well as your own Country).
- Text
- Enter the name of the Country, to be shown in the 'Countries: Browse' window and the 'Paste Special' list.
- Duty Code
- Paste Special
Duties and Charges setting, Customs module
- This field is used in the Customs module: please refer to your local HansaWorld representative for details.
- Region
- Paste Special
Countries Regions setting, System module
- This field will be useful if you are using the Hotel module. You can use it to assign each Country to a Region. This could be the continent where the Country is located, or any other regional description that you need.
- This information will be used by the Nationality Statistics report in the Hotel module. This report can display the number of Guests from each Country, the number of Guests from each Region or both.
- Nationality
- Enter the word for the nationality of the Country in this field. For example, in the Country record for Finland, enter "Finnish" or "Finn".
- When entering a record in the Contact register, you can specify a Nationality (on the 'Personal' card of the standard Contact window, or on the 'Guest' card when entering Hotel Guests). Use 'Paste Special' from the Nationality field in the new record in the usual way to choose a Country. The Nationality from the Country record will then be brought in to the new Contact.
- You will not be able to assign a Nationality to a Contact if you have not used that Nationality in a record in the Countries setting. For example, if you specify that a Contact is Finnish, you must also have specified that Finnish is a Nationality in at least one Country record.
- If you need to ensure that a Nationality is specified for every Contact that has been marked as a Guest (using the Guest box in the header of the Contact window), select the Force Nationality on Guest Record option in the Hotel Settings setting. You will not need to specify a Nationality for a Contact that is not a Guest.
- Currency
- Paste Special
Currency register, System module
- Enter the Currency used in the Country here. This information will be used in the P/L VAT Report in the Purchase Ledger.
- ISO Code
- Enter the two-character ISO 3166 code for the Country here.
- The ISO 3166 codes of the Countries in which your Customers and Suppliers reside will be included in files created by various export functions, such as the 'Periodic VAT Declaration' export function in Italy and the 'EU VAT Purchases' and 'EU VAT Sales' export functions in Croatia. If you will be using these export functions, you should enter the ISO 3166 code of each Country in this field even if you have also entered the ISO 3166 code in the Code field above.
- If you need ISO 3166 codes to be printed on documentation, add the fields listed below to your Form Template designs. The "Country Code (Customer)", "Country Code (Supplier)" and "Own Country Code" fields will print the ISO Code from the relevant Country record. If that Country record does not have an ISO Code, it will print the Country Code. So, an ISO 3166 code will be printed from this field or from the Code field above.
- Country Code (Customer)
- Use this field in the Form Templates for Invoices, Orders, POS Invoices, Quotations and Returned Goods. You can also use this field in the Form Template for Stock Movements: in a Stock Movement that was created from a Sales Order, it will print the ISO Code or the Country Code of the Customer in the Order.
- Country Code (Supplier)
- Use this field in the Form Template for Returned Goods to Supplier records.
- Own Country Code
- This field will print the ISO Code or Code from the record in the Countries setting for your own Country as specified in the Company Info setting. This is a standard field that you can use when printing almost any form.
- Country ISO Code
- This field will print the ISO Code from the record in the Countries setting for the Customer's Country, but it will not print the Code if there is no ISO Code. You can use this field when printing Invoices and, in Croatia and Slovenia, Purchase Book forms.
Text CardUse the table on the 'Text' card if you need to enter various translations of the Country Text. Specify a Language in the first column using 'Paste Special' if necessary, and the appropriate translation in the second column. There is no need to enter a row for your home Language.
These translations will be printed on Invoices if you have included the "Country Name" field in your Invoice Form Template. The Language of the Invoice (shown on the 'Price List' card) will determine which translation will be printed. If an Invoice does not have a Language or has a Language with no translation listed in this table, the Country Text itself will be printed.
Misc Card 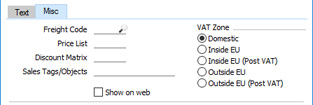
- Freight Code, Price List, Discount Matrix, Sales Tags/Objects, VAT Zone
- When you specify a Country in a Contact record, a default Freight Code, Price List, Discount Matrix, Sales Tags/Objects and/or VAT Zone can be brought into the Contact from the Country record. Use these fields to specify the values that are to be brought in to each Contact. You can use 'Paste Special' from the Freight Code, Price List, Discount Matrix and Sales Tags/Objects fields.
- Show on web
- If you are using the Standard ERP Web Shop, you can specify that Customers should specify a Country as part of their Invoice Address and/or as part of their Delivery Address. To do this, add a record in which the Field Type is "Country" in the Customer Registration Fields setting and/or the Delivery Address Fields setting respectively (both settings are in the Web Shop and CMS module). Customers will be able to choose their Country from a drop-down menu. Tick this box for each Country that is to be included in the drop-down menu.
---
Settings in the System module:
- Introduction
- Access Groups
- Active Users
- Auto Actions
- Bank Holidays
- Base Currency
- Base Currency Rates
- Cloud Security
- Company Date and Numeric Format
- Company Info
- Configuration
- Conversions - Master, Conversions - Accounts and VAT Code
- Conversions - Master, Conversions - Activity Types
- Conversions -
Master, Conversions - Contact Classifications
- Conversions - Master, Conversions - Contacts
- Conversions - Master, Conversions - Currency Codes
- Conversions - Master, Conversions - Items
- Conversions - Master, Conversions - Locations
- Conversions - Master
- Conversions - Master, Conversions - Suppliers
- Conversions - Master, Conversions - Tags/Objects
- Conversions - Master, Conversions - Users
- Countries
- Countries Regions
- Currency Round Off
- Days and Months
- Departments
- Discount Options
- Display Groups
- Exchange Rates Settings
- Form Settings
- Global Warnings on UnOKed Records
- Internet Enablers
- Journaling
- KPIs
- Languages
- Locking
- Locking Exceptions
- Nature of Business
- Number Series Defaults
- Opened Windows History
- Optional Features
- Password Security
- Printers
- Reporting Periods
- Round Off
- Sales Groups
- Single Functions
- Special Days
- Styles
- Sub-Ledger Control Accounts
- Task Manager Access
- User Warnings on UnOKed Records
- Values in Text
- VAT Reg. Number Masks
- Weeks
Go back to:
|