|
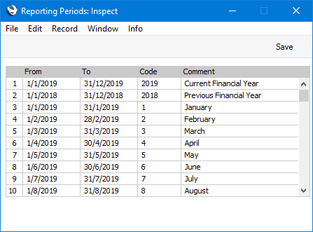
Search HansaManuals.com HansaManuals Home >> Standard ERP >> System >> Settings Previous Next Entire Chapter in Printable Form Search This text refers to program version 8.4 Reporting Periods This page describes the Reporting Periods setting in the System module.--- The Reporting Periods setting allows you to name and define the periods that you will commonly use when producing reports, printing forms and running Maintenance functions. If you open the 'Paste Special' list from the Period field in any specification window, you will be shown a list of the Reporting Periods that you have entered in this setting. For example, if you often produce monthly reports you should list each month separately in this setting. To open the Reporting Periods setting, first ensure you are in the System module. Then, if you are using Windows or macOS, click the [Settings] button in the Navigation Centre and then double-click 'Reporting Periods' in the 'Settings' list. If you are using iOS or Android, select 'Settings' from the Tools menu (with 'wrench' icon) and tap 'Reporting Periods' in the 'Settings' list. The 'Reporting Periods: Inspect' window will open. Add a separate row for each commonly-used Reporting Period (e.g. for each month, quarter or year). Enter the periods in order so that when you come to choose a Reporting Period using the 'Paste Special' function, you will be able to find the one that you need quickly and easily. If you need to insert a row, click on the row number where the insertion is to be made and press the Return key (Windows/Mac OS X) or long tap on the row number and select 'Insert Row' (iOS/Android). If you need to remove a row, click on the row number and press the Backspace key or long tap on the row number and select 'Delete Row'. When the setting is complete, click the [Save] button (Windows/macOS) or tap √ (iOS/Android) to save, or use the close box (Windows/macOS) or < (iOS/Android) to close the window without saving changes.
The Reporting Period in the first row of this setting will be offered as a default wherever a Reporting Period is required. You might therefore like to change the first row from time to time so that a useful Period is always offered as a default. --- Settings in the System module:
|