The Report Generator and SmartApps
The SmartApps Designer module allows you to design your own applications (known as "Apps") that you can then use from inside Standard ERP. You can use the Report Generator to design reports that you can then incorporate in your Apps.
To incorporate a Report in an App, follow these steps:
- The first step in designing any new App should be to create the App itself. Ensure you are in the SmartApps Designer module, and then open the App register by clicking the [Registers] button in the Navigation Centre. In Standard ERP, first change to the SmartApps module, and then click the [Apps] button in the Navigation Centre and selecting 'Apps' from the subsequent list. Select 'New' from the Create menu to create the new App:
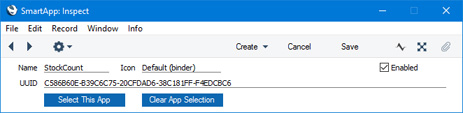
Enter a Name for the App and save. The UUID (Universally Unique Identifier) will be generated automatically when you save.
- Enter the Register Definition and the Browse and Record Window Definitions for the App.
- Change to the Report Generator module and enter the Report Definition for the report. As part of this process, go to the 'Settings' card and copy the UUID from the App (step 1) to the App field:
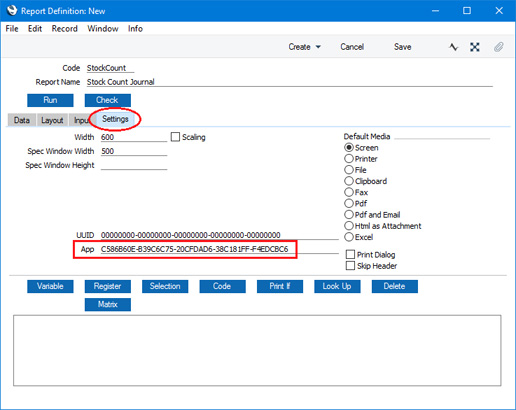
This connects the Report Definition to the App. The Report Definition will have its own UUID that will be generated automatically.
- Design the report as described in this documentation. When you add a Register to a Report Definition on the 'Data' card, the Register Definition that you created in step 2 will be added to the 'Paste Special' list of Registers, allowing you to choose it as though it were one of the registers built in to Standard ERP.
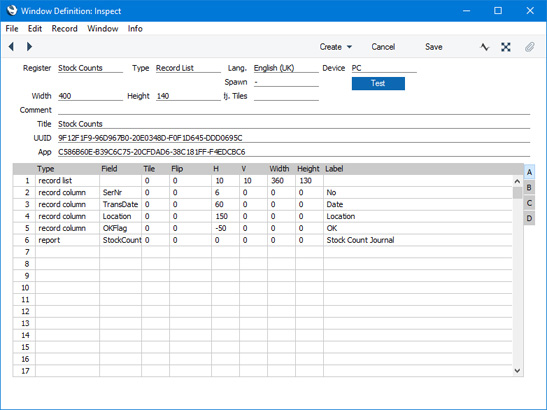
- After designing the Report, you can attach it to one of the App's Window Definitions. Usually, you will attach it to the App's browse window. Open the Window Definition for the browse window and add a row where the Type is "report". In the Field column, specify the Code from the Report Definition record, and in the Label column, specify the name of the command users will select when they want to produce the report. They will find the report on the Operations menu of the specified window.
---
Go back to: