Entering a Budget
This page describes entering records to the Budget register in the Nominal Ledger.
---
You should enter a separate Budget record for each Account for a particular period (e.g. fiscal year). If you will be using Tags/Objects to set Budgets for various departments or cost centres, you should enter separate Budget records for each Account-Tag/Object combination. You should then enter an overall master Budget for the Account, which will be the sum of the various Account-Tag/Object Budgets. This is described in step 5 below.
- To open the Budget register, first ensure you are in the Nominal Ledger module. Then, if you are using Windows or macOS, click the [Registers] button in the Navigation Centre and double-click 'Budgets' in the resulting list. If you are using iOS or Android, tap the [Registers] button in the Navigation Centre and then tap 'Budgets' in the 'Registers' list.
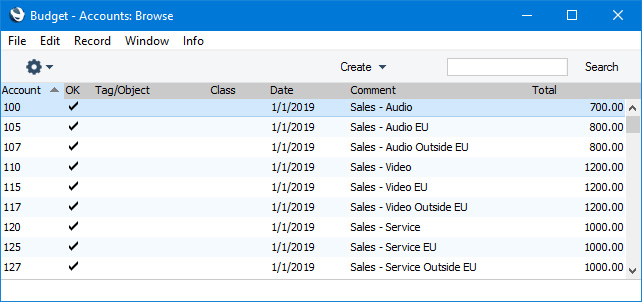
The 'Budget - Accounts: Browse' window is opened, listing the Accounts for which you have already entered Budgets.

- Select 'New' from the Create menu (Windows/macOS) or + menu (iOS/Android) or highlight a Budget record similar to the one you want to enter and select 'Duplicate' from the same menu.
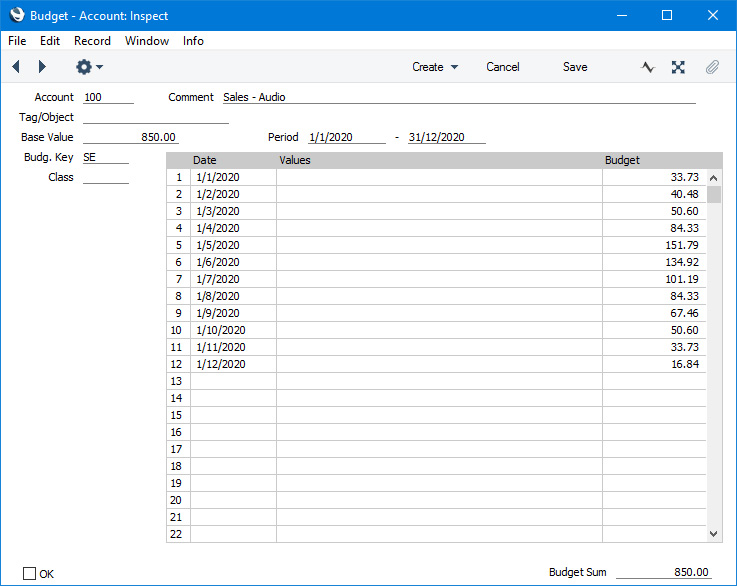
The 'Budget - Account: New' window will be opened, empty if you selected 'New' or containing a duplicate of the highlighted Budget record.

- Account
- Paste Special
Account register, Nominal Ledger/System module
- Specify the Account for which you are entering a Budget. You cannot change the Account after you have saved the Budget for the first time.
- Comment
- The Account Name will be placed in this field when you specify the Account above.
- Tag/Object
- Paste Special
Tag/Object register, Nominal Ledger/System module
- If you are creating a Budget for a particular Tag/Object-Account combination, specify the Tag/Object here. This allows you easily to create Budgets for different departments. You cannot enter or change the Tag/Object after you have saved the Budget for the first time.
- If you are entering Budgets for various Tags/Objects in combination with a particular Account, you should also enter an overall Budget for the Account. This should be the sum of the individual Tag/Object Budgets. If you enter the overall Budget after those for the various Tags/Objects, you can use the 'Calculate Sum from Account-Tag/Object Budget' function on the Operations menu (Windows/macOS) or Tools menu (iOS/Android) to calculate this sum. This is described in step 5 below.
- Base Value
- Enter the total Budget value for the Period as a whole. Remember to enter sales and income values, liabilities and equity as negative (credit) values, and assets and costs as positive (debit) values.
- You can treat this figure as a control total for the period. If the period is a year, for example, you can break the figure down into monthly or quarterly totals in the grid area. You can enter these monthly or quarterly figures yourself (in the Values column), aiming to ensure the Budget Sum underneath the grid matches the Base Value, or you can have them calculated from the Base Value using a Budget Key that you will specify in the field below.
- Period
- Paste Special
Choose date
- Enter the start and end dates of the Budget Period.
- Budg. Key
- Paste Special
Budget Keys setting, Nominal Ledger
- The Budget Key is a useful tool for breaking a total budget figure down to monthly or quarterly totals a formula. For example, experience may show that sales of a particular product always follow a set pattern with a certain percentage of the total in each month. You can enter this pattern in a Budget Key record. Alternatively, and more simply, you can use a Budget Key to break an annual rent figure down into twelve equal divisions.
- Setting up Budget Keys is fully described here.
- To apply a Budget Key to a Budget record, first enter a figure in the Base Value field above. This should be the total Budget figure for the whole period (perhaps a year). Then, specify an appropriate Budget Key and enter the start dates of each month or quarter on separate rows in the grid area. You should have the same number of period divisions (i.e. rows in the grid) as you have entered in the Budget Key record. Then, choose 'Recalculate' from the Operations menu (Windows/macOS) or Tools menu (iOS/Android). Budget figures for each period (e.g. monthly or quarterly figures) will be placed in the Budget column. These will be calculated by apportioning the Base Value using the ratios in the Budget Key. Finally, save the record.
- Class
- Paste Special
Budget Classes setting, Nominal Ledger
- The Budget Class field allows you to enter more than one Budget record for a particular Account-Tag/Object combination for a particular period. This allows you to budget for different market or other scenarios. When you produce a Balance Sheet or Profit & Loss report using the Budget Comparison, you will be able to choose a Budget Class, allowing you to compare the budgets for the different scenarios with actual results.
Use the grid area to divide the Budget Period specified above into sub-periods. You can define a define any number of periods, but, if you are using a Budget Key, you should have the same number as you have entered for the Budget Key. If the Budget and Budget Keys have different numbers of periods, the Base Value and Budget Sum figures will not match after you have used the 'Recalculate' function.
Budget sub-periods will help you monitor actual performance against budget. You should carry out this comparison regularly in order for it to be effective and to identify any discrepancies quickly and as they occur. Some Accounts will require closer monitoring than others: for these Accounts, you should define a greater number of sub-periods, and you should produce regular comparison reports more frequently. For example, you may need to monitor Sales Accounts more closely and more frequently than Office Furniture Accounts.
- Date
- Paste Special
Choose date
- Enter the start date for each Budget sub-period. To save labour and reduce the chance for error, the easiest way to enter Budget records is to use the 'Duplicate' function to copy a Budget record with the dates already entered.
- Values
- Enter absolute values for each period.
- If you have specified a Budget Key and Base Value, these Values will be treated as extra amounts to be added to the calculated figures when you use the 'Recalculate' function. Depending on the Values that you enter, this may result in the Budget Sum differing from the Base Value.
- If you have not specified a Budget Key, these Values will be moved to the right-hand column when you select 'Recalculate' from the Operations menu (Windows/macOS) or Tools menu (iOS/Android). Alternatively, you can enter figures directly in the right-hand column.
- Budget
- The Budget amount for the sub-period. This value will be calculated each time you select the 'Recalculate' command from the Operations or Tools menu.
- If you have not specified a Budget Key, you can enter figures for each sub-period in this column.
- OK
- You can approve a Budget by ticking this check box and saving. Once you have done this, you will no longer be able to change the Budget record. If you do need to change an approved Budget, first remove the tick from the OK box and save.
- You do not have to mark a Budget as OK to activate it (i.e. for it to be included in reports). Nevertheless, once you have finalised a Budget, it is recommended that you mark it as OK. If it becomes necessary to change a Budget, you should not do so in the Budget itself. Instead, you should enter a new record in the Revised Budget register. This ensures you keep a record of your original Budget forecast. Marking Budgets as OK will help ensure you follow this practice.
- You can use Access Groups to control who can mark Budgets as OK and who can reverse the marking of Budgets as OK. To do this, deny access to the 'OK Budget' and 'UnOK Budget' Actions respectively.
- Budget Sum
- This field shows the total budget for the year. Unlike the figure that you entered in the Base Value field, this figure will be calculated automatically: it is the sum of the Budget figures in the grid. Therefore, if you revise the Budget and recalculate it using the 'Recalculate' function on the Operations or Tools menu, the Base Value will remain unchanged, so you can make a comparison between the original budgeted figure and the final one. The Budget Sum will also take into account any extra amounts in the Values column.
- If you cannot explain the difference between the Base Value and the Budget Sum, the probable cause is that the Budget has a different number of periods (rows in the grid) to the Budget Key.
- When you have entered Values in as many rows in the grid as you need, or you have chosen a Budget Key, select 'Recalculate' from the Operations or Tools menu. Then click [Save] (Windows/macOS) or tap √ (iOS/Android) to save, or [Cancel] or < to cancel.
- Repeat steps 1 to 3 to set Budgets for each Account-Tag/Object combination, perhaps with different Classes if you need to budget for different scenarios. Use the 'Duplicate' function to assist with the data entry. You can only save one Budget record for each Account-Tag/Object-Period-Class combination.
! | For a Budget record to be included in Nominal Ledger reports for comparison purposes, you must have added at least one row with a date in the grid area of the Budget window. | |
- After you have entered a Budget for each Account-Tag/Object combination, you should set an overall Budget for each Account for the same period. This overall Budget record should contain the sum of the separate Budgets for each Tag/Object and will be used when you produce a Balance Sheet or Profit & Loss report without specifying a Tag/Object. To do this, create a new Budget record and enter the Account and Period. Leave the Tag/Object field empty. Save the record and then select 'Calculate Sum from Account-Tag/Object Budget' from the Operations or Tools menu. Overall Budget figures will be calculated by adding together the Budgets featuring the Account with the various Tags/Objects that fall in the relevant period.
---
The Budget register in Standard ERP:
Go back to:
|
