Registration and Creating Accounts
This page describes adding an Element to your website that will allow browser users to create accounts (i.e. records in the Contact register), and includes a description of the following Element Type:
- Register New Customer Form
All the settings and registers mentioned on this page are located in the Webshop and CMS module unless otherwise specified.
---
The "Register New Customer Form" Element will allow browser users (usually Customers and potential Customers) to register with your company through your website. Behind the scenes, each new registration will cause a new record to be created in the Contact register. The new Contact will be marked as a Customer (i.e. the Customer check box will be ticked).
When building a website, you will usually be able to test using a single-user version of the Standard ERP application in Single User Server mode. However, to test the "Register New Customer Form" Element you should use the server version of the application and work in a client. This is because the single-user version of the application cannot fully separate your logging in as a normal Standard ERP user from your logging in from a browser. When registering as a new Customer, the Password and Password (confirm) fields will not be displayed in the "Register New Customer Form" Element when the website is powered by the single-user application.
Before using the "Register New Customer Form" Element, carry out the following configuration work:
- Use the My Account Settings setting to specify default values for the new Contact records that will be created by the online registration process:

- Unique Fields
- Use these options to specify the field(s) that should contain unique values in each new Contact record. For example, if you select the Email option it will only be possible to register one Contact record with a particular Email Address. If a browser user attempts to use an Email Address twice, the second record will not be saved and the browser user will be shown the appropriate Web Text (see list towards the end of this page).
- The Email option is universal (i.e. if selected, it will also prevent you using an Email Address more than once when entering Contact records in Standard ERP), while the other options will only be used with Contact records created through the online registration process.
- Default Values
- These fields allow you to specify default values for some of the fields in the Contact records that will be created through the online registration process.
- In more detail, defaults will be set as follows:
- Allow Login, Type
- Taken from this setting.
- Customer Category
- Taken from this setting unless you have asked the registering Customer to specify a Category as part of the registration process (see step 2 below). If so and if the Customer does not choose a Category, the Category will be blank in the new Contact record.
- Region, Credit Limit, Credit Limit Days, No Mass Letters, No Mass Emailing, On Account
- Taken from the Contact Settings setting (in the Sales Ledger and the CRM module). The Automatically Create Sales Tags/Objects on Contacts option in this setting will also be used if selected.
- Sales Payment Term
- No default.
- Require Customer Category, Require VAT Reg. No.
- These options in the Contact Settings setting will not be used in Contact records created through the online registration process. If you need it to be mandatory that online registrations include a Customer Category and VAT Registration Number, specify that they are Required in the Customer Registration Fields setting (step 2 below).
- Show Login after registration
- After a new Customer registers, they will not be logged in automatically. They will be shown their Contact Number and, if you select this option, a [Complete and Login] button that will allow them to log in.
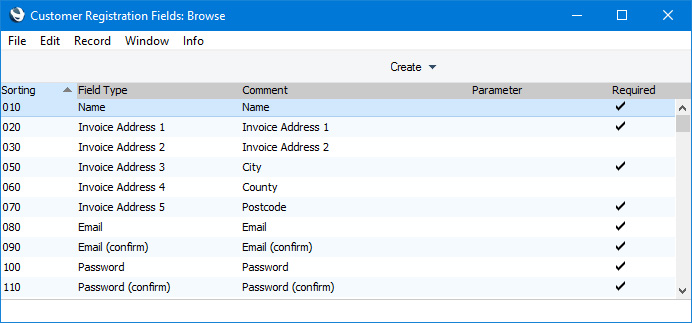
- Create separate records in the Customer Registration Fields setting for each field that you need new Customers to fill in.
The fields that you list in this setting will be used in two places:
- In the "Register New Customer Form" Element that new Customers will use to register with your company.
- In the "My Account" area of the website that existing Customers will use to modify their address and other details. Please refer here for details about the "My Account" feature.

- Field Type
- Paste Special
Choices of possible entries
- Use 'Paste Special' to choose the fields that are to be shown to new Customers.
- Comment
- Enter the name of the field that is to be shown to new Customers. If necessary, enter translations of this name in the matrix below. Asterisks (*) will be added automatically to the names of fields that you mark as Required (below).
- Parameter
- If the Field Type is "Classification (select)" or "Classification (radio)", you must enter a Classification Type in this field (using 'Paste Special' if necessary). New Customers will then be able to choose a Classification with that Type. You can add several Classification fields, each with a different Type (i.e. with different Parameters) if you need Customers to choose Classifications with various Types. For example, you might need new Customers to state how they discovered your website (by choosing a Classification with Type "Source") and to specify their business sector (by choosing a Classification with Type "Business Type").
- "Classification (select)" will allow new Customers to choose a Classification from a drop-down menu, while "Classification (radio)" will allow them to choose using radio buttons.
- Sorting
- Use this field to determine the order in which the fields will be listed in the "Register New Customer Form" Element. You can use any alphanumeric scale. For example, a field with "1" in its Sorting field will be listed above a field whose Sorting is "2".
- Required
- Select this option if you need it to be mandatory that new Customers fill in a particular field.
- Allow Update through My Account
- As mentioned above, the fields in the Customer Registration Fields setting will be shown to Customers when they register and when they need to change address and other details. When a new Customer registers, every field will be editable. When an existing Customer needs to edit their details, you may need to restrict the fields that they can change. Select this option for a field that you do not want to be changeable. The field and its value will still be displayed to the Customer.
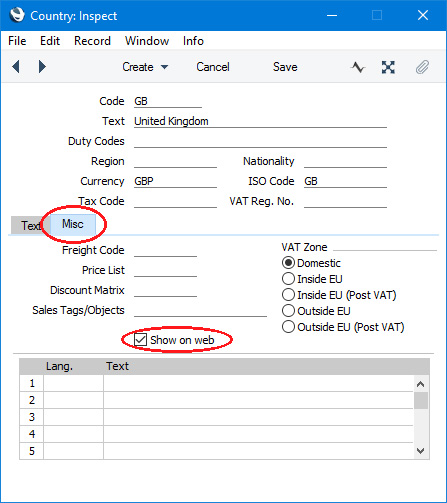
- If you added a record to the Customer Registration Fields setting in which the Field Type is "Country", new Customers will be able to choose a Country from a drop-down menu. This drop-down menu will list the records in the Countries setting in the System module in which you have selected the Show on web option on the 'Web' card. In this step you should therefore select the Show on web option in each Country record as appropriate:
- If you would like to add ReCAPTCHA to the "Register New Customer Form" Element, follow these steps:
- Register your domain (root URL) with the Google ReCAPTCHA service (using the Admin Console at "https://www.google.com/recaptcha/). Do not include www, http:// or https:// in the domain. You will be provided with a site key and a secret key.
- In Standard ERP, open the Google ReCaptcha Settings setting:
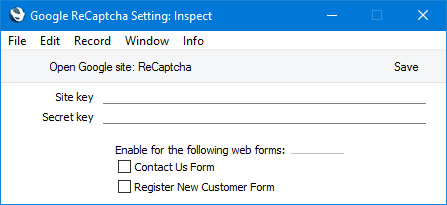
Enter the site key and the secret key and specify that you would like to enable ReCAPTCHA in the "Register New Customer Form" Element (and in the "Contact Us Form - adjustable" Element if necessary: this Element is described here).
ReCAPTCHA will be included in the "Register New Customer Form" Element in its own <div> with Class "g-recaptcha".
- Create a "Register New Customer Form" Element and add it to the appropriate Page or parent Element:
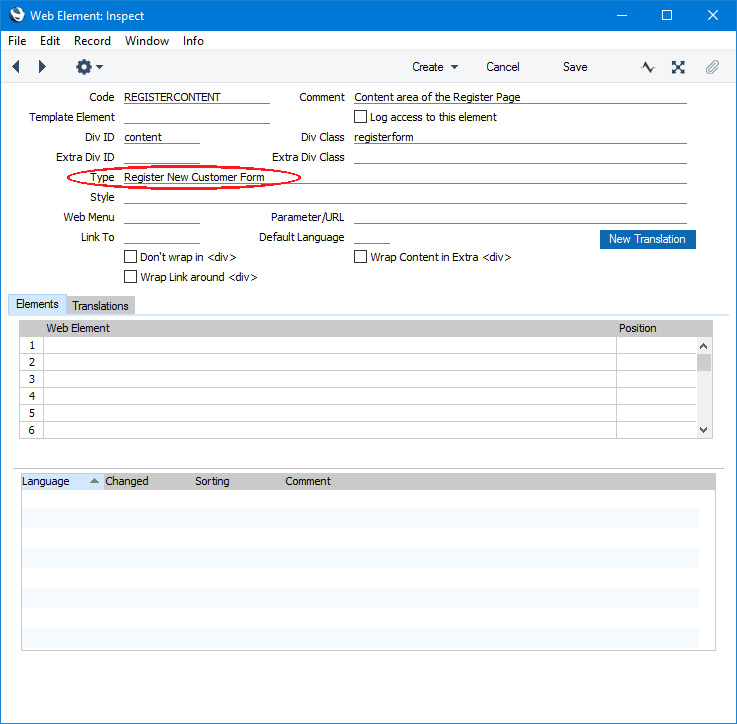
The "Register New Customer Form" Element will list the fields that you entered in the Customer Registration Fields setting automatically. The field labels will be taken from that setting so there is no need to provide a Translation for this Element. If you need to change the button label and the messages (e.g. the message that will be displayed if a browser user does not fill in the form correctly) (and/or enter translations), use the
Web Texts setting as mentioned towards the end of this page.
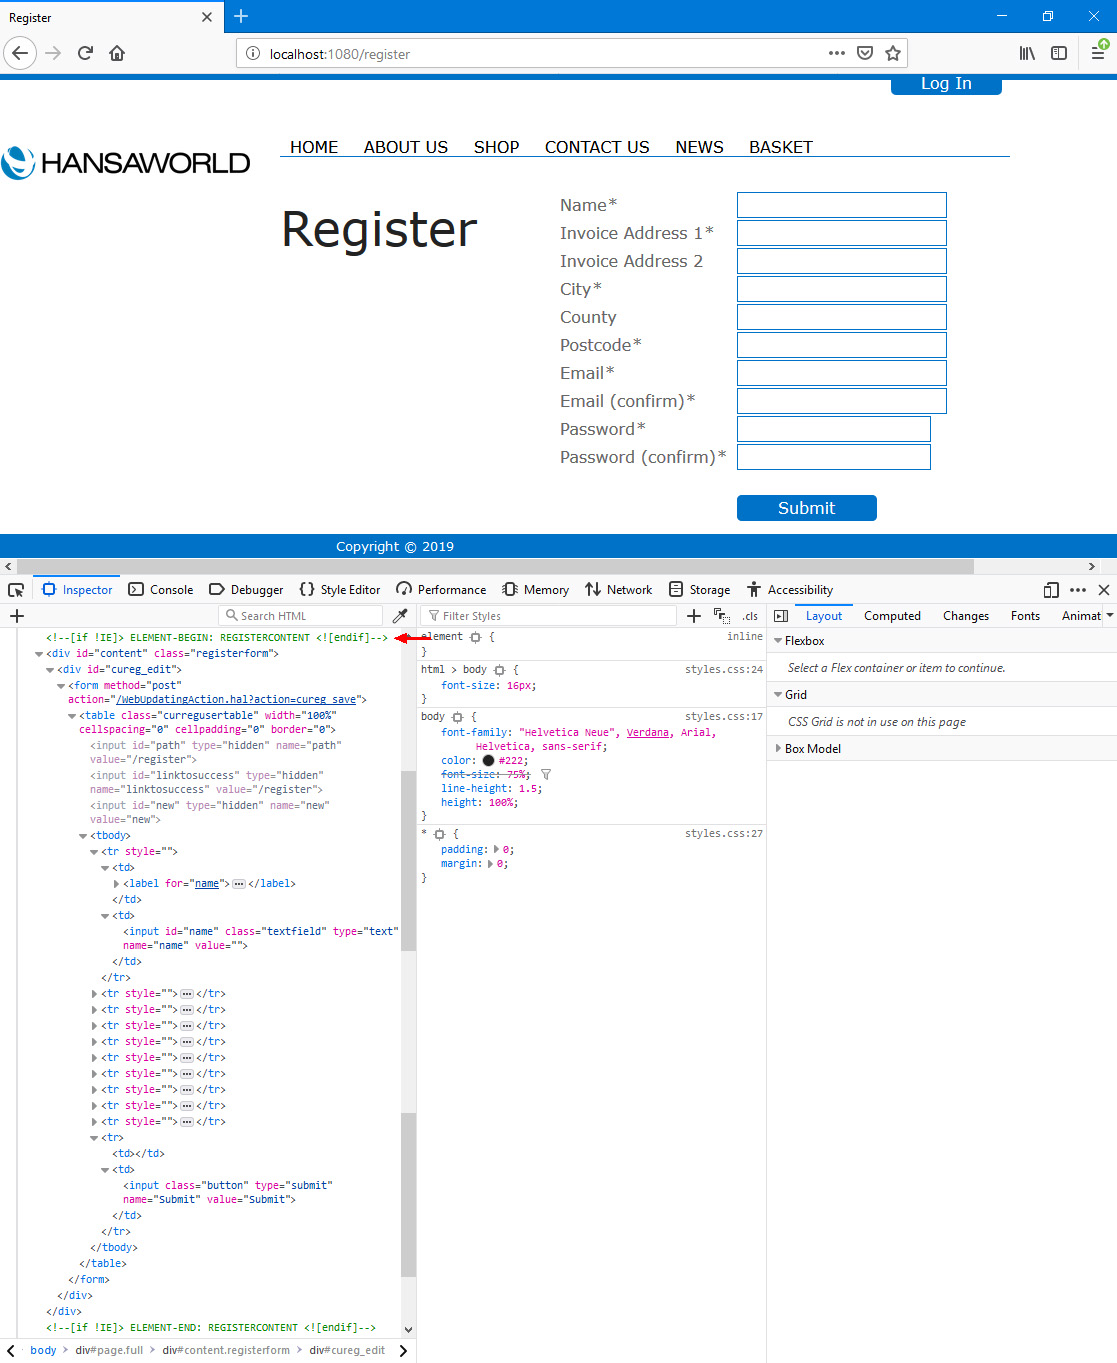
In this illustration, the following
<div> attribute is user-assigned (i.e. you can assign a different attribute or choose not to assign it at all):
- id="content" class="registerform" (specified in the "REGISTERCONTENT" Element)
The following attributes are assigned automatically by Standard ERP (i.e. you will not be able to change these attributes, but you will be able to apply styling to them in your .css file):
- <div id="cureg_edit"> (wraps the table containing the fields and the button)
- <table class="curegusertable"> (contains the fields and the button)
- <input class="button"> (used for the button)
After registering, the Customer will by default be shown a
Web Text (20088) displaying their Customer Number. If you selected the
Show Login after registration option in step 1, a [Complete and Login] button (Web Text 25518) will also be displayed. This will log the Customer in (on this occasion they will not need to enter their Customer Number or password).

In this illustration, the following
<div> attribute is user-assigned (i.e. you can assign a different attribute or choose not to assign it at all):
- <id="content" class="registerform" (specified in the "REGISTERCONTENT" Element)
The following attributes are assigned automatically by Standard ERP (i.e. you will not be able to change these attributes, but you will be able to apply styling to them in your .css file):
- <p class="heading3"> (used for the "Thank you!" text (Web Text 25407))
- <input id="s1" class="button"> (used for the [Complete and Login] button)
If you would prefer to take the new Customer to a page of your own design, create the page (including
Structure,
Page,
Elements and
Translations) and then enter the Code of the Structure record in the Link To field in the "Register New Customer Form" Element. You will not be able to display the new Customer Number on a page of your own design, but the page could remind the Customer that they will be able to log in using their email address.
If the user has not filled in the form correctly when they press the [Submit] button, they will be taken back to the form where they will be shown an appropriate error message. The error message will be in <div id="errorbox"> (inside <div id="cureg_edit">):
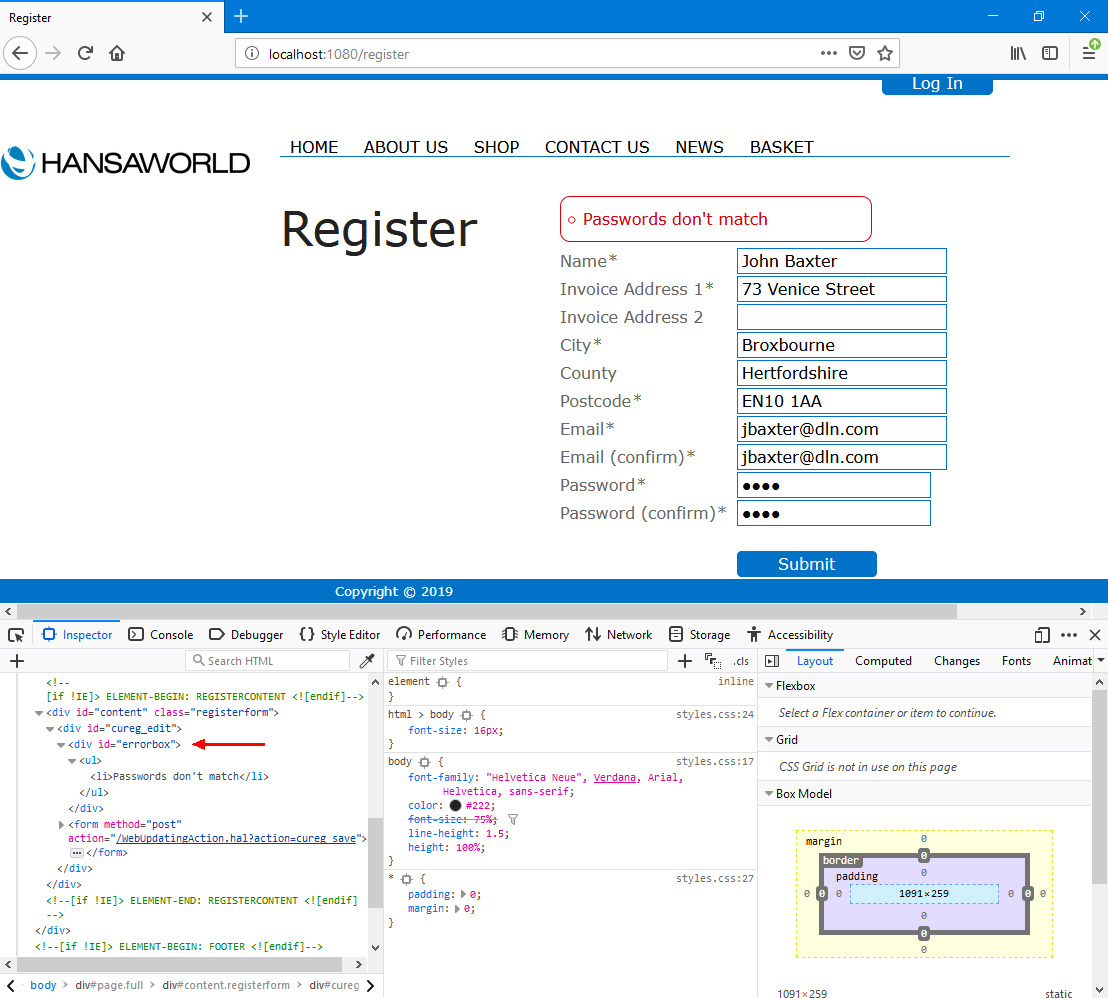
If you need a welcome email to be sent to new Customers to confirm their registration, follow these steps:
- Enter a Customer Letter (in the CRM module) with * in the Customer field (and in the Cust. Class field if you have specified in the CRM Settings setting (also in the CRM module) that a Customer Classification is required in Customer Letters), and with a Name, a Header and the letter text in the Text field. You should also enter an email address in the Reply To (Email) field: this is the address from which the confirmatory emails will be sent:
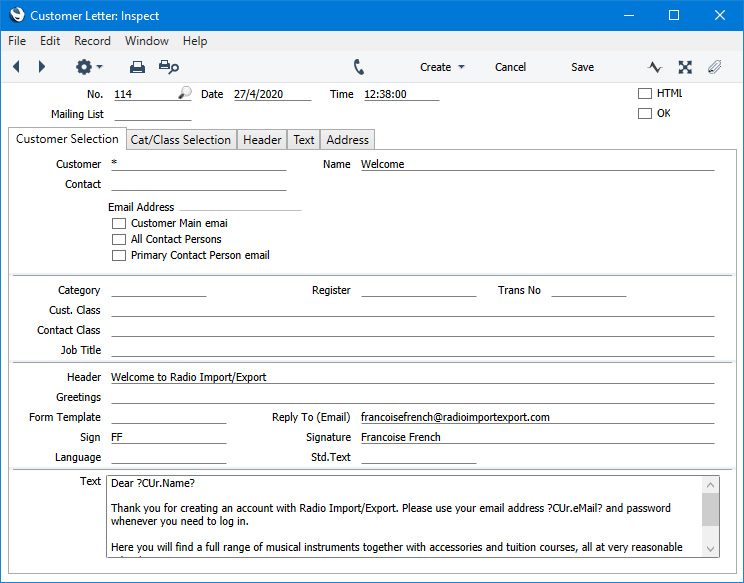
As shown in the illustration, you can include expressions such as ?CUr.Name? and ?CUr.Email? in the letter text if you want the mail text to include information taken from the new Contact record. Please refer here for a list of available expressions.
- In the Webshop Email setting, go to the 'Register' card and enter the Name from the Customer Letter in the Letter Tag field:
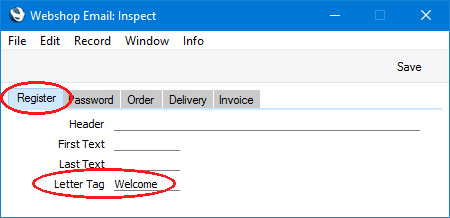
These emails will not appear in anyone's Mailbox in Standard ERP, but they will be visible in the
Email Queue in the Email and Conferences and Technics modules. For mails to be sent, you must subscribe to the Email and Conferences and External Email modules and you must have configured the Email SMTP Server setting. Please refer
here for full details about the mailing facilities in Standard ERP.
You can use the Web Texts setting to change the following texts:
| Element Type | Default Text | Web Text Code |
| | |
| Register New Customer Form | Available Qty [label for Delivery Option radio button] | 32436 |
| Register New Customer Form | Available Qty and Close Order [label for Delivery Option radio button] | 32437 |
| Register New Customer Form | Contact If Missing Items [label for Delivery Option radio button] | 32438 |
| Register New Customer Form | Customer Code [field label] | 20154 |
| Register New Customer Form | Submit [button] | 20067 |
| Register New Customer Form | Select which company you want to register as a customer in [please refer here for details] | 25901 |
| Register New Customer Form | Please verify that you are human [used with ReCAPTCHA] | 30081 |
| Register New Customer Form | Thank you! | 25407 |
| Register New Customer Form | Your Customer Code is [do not include the final space] | 20088 |
| Register New Customer Form | You can use this Customer Code to log in to the shop in the future | 25900 |
| Register New Customer Form | Complete and Login [button] | 25518 |
| Register New Customer Form | is required [will be preceded by a field label and a space] | 25044 |
| Register New Customer Form | E-Mails don't match | 25045 |
| Register New Customer Form | E-mail Address is not Correct | 25057 |
| Register New Customer Form | Passwords don't match | 25046 |
| Register New Customer Form | Customer with this Name already registered | 25049 |
| Register New Customer Form | Customer with this Email address already registered | 25050 |
| Register New Customer Form | Customer with this Reg. No. already registered | 25051 |
| Register New Customer Form | Customer with this VAT Reg. No. already registered | 25052 |
| Register New Customer Form | Invalid Telephone number | 25100 |
| Register New Customer Form | Invalid Mobile number | 25101 |
| Register New Customer Form | Incorrect VAT Number format. | 25102 |
| Register New Customer Form | Incorrect Address format. | 25103 |
| Register New Customer Form | Incorrect Delivery Address format. | 25104 |
---
Allowing Contacts to Use Your Website:
Go back to:
