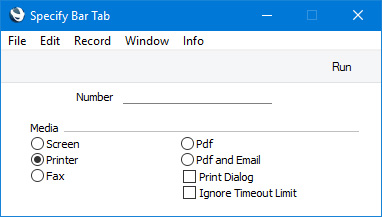
Language:


Restaurant - Connecting Printers - USB/Wifi Receipt Printers with user-definable print-outs

This page describes connecting USB and Wifi printers to tills and devices to print Bar Tabs: for details about serial printers, please refer to the Serial Receipt printer or the Fiscal Printer pages. Among the USB and Wifi printers that can be used are the Epson TM-T88V and Star TSP 113, both of which are supplied with drivers for many operating systems.

To work with USB and Wifi printers, follow these steps:

  1. Connect USB and Wifi printers to each till and install any necessary drivers.

  2. Using the tools provided by each till's operating system, specify that the USB or Wifi printer is the default printer.

  3. Working on a desktop client, change to the System module and use the Form Template register to design the Bar Tab Receipt Form. Use the 'Properties' function on the Operations menu to name the Form Template (in this description, we have used the name "BAR_TAB_RECEIPT") and to turn off the Printer Dialog option. Full instructions for using the Form Template register can be found here, while specific instructions for designing till receipts can be found at the end of this page. A full list of the fields you can include in the Template design can be found here.

  4. Change to the Restaurant module and click or tap the [Forms] button in the Navigation Centre. The 'Forms' list window is opened: highlight 'Bar Tab Receipts'.

  5. Select 'Define Form' from the Operations menu (with 'cog' icon):

  6. In the subsequent 'Form Definition' window, enter "BAR_TAB_RECEIPT" in the Form Template field of the first row (you can use 'Paste Special' to ensure the spelling is correct):

    Click [Save] to save the Bar Tab Receipt Form definition.

  7. In a mixed network with tills that use different operating systems, you may need a separate Form Template for each operating system. If so, you can ensure the appropriate Form Template will be printed from each till using Languages. Assign a Language (for example, Mac or Windows) to each waiter and member of bar staff (in their Person records) and then enter a row for each Language/operating system in the 'Form Definition' window:

  8. Bar Tabs will be printed using different forms, depending on the circumstance. The various forms are the Bar Tab, the Bar Tab Kitchen Order and the Bar Tab Receipt. You must therefore specify which Form Template is to be used by these forms before you can begin printing. It may be that you decide to use the same Form Template for each form, but if so, you must still explicitly connect the Form Template to each form separately.

    To do this, repeat steps 3-7 in turn to specify the Form Templates that will be used when you print Bar Tabs using the various forms. The Form Templates can all use the same fields so when designing each Form Template in step 3 you can refer to the list of fields here. In step 4, highlight 'Bar Tab', 'Bar Tab Kitchen Order' or 'Bar Tab Receipt' as appropriate in the 'Forms' list window.

    The various forms will be used in the following circumstances:

    Bar Tab
    Bar Tabs will be printed automatically using the Bar Tab form if you have specified in the Auto Actions setting in the System module that Bar Tabs will be printed An Insert or At Insert & Update and providing the Bar Tab will not be printed on a fiscal printer (i.e. providing the Customer is not one in which the Fiscal Invoices Only check box has been ticked).

    The "Finish and Print" button will first print a Bar Tab using the Bar Tab Receipt form (providing the Bar Tab will not be printed on a fiscal printer) and then using the Bar Tab form.

    The "Print Tab" button will print a Bar Tab using the Bar Tab form.

    The "Print Preview" button will print a preview of a Bar Tab to screen using the Bar Tab form.

    If you have selected the Print Receipt option in the Restaurant Settings setting, a Bar Tab will be printed automatically using the Bar Tab form after you register a payment using the "Pay" button.

    Bar Tab Kitchen Order
    The "Print Tab to Kitchen" button will print a Bar Tab using the Bar Tab Kitchen Order form.

    Bar Tab Receipt
    The "Finish" button will print a Bar Tab using the Bar Tab Receipt form, providing the Bar Tab will not be printed on a fiscal printer.

    In the various circumstances listed above, if the required form does not have an associated Form Template (steps 3-7 above), Standard ERP will display the message "No form defined. Please check the form definition" when you try to print a Bar Tab. If you are shown this message, check the printing circumstance to see which form is missing its Form Template.

  9. If you will need waiters and bar staff to be able to re-print Bar Tabs, add "All Tabs" and "Print Tab" buttons to the Bar Tab window.

Designing the Bar Tab Form Template

To design the Bar Tab Form Template, follow the steps listed below. You can only follow this process using Windows or macOS, not iOS or Android:
  1. Switch to the System module, click the [Registers] button in the Navigation Centre and double-click 'Form Templates' in the resulting list.

  2. The 'Form Templates: Browse' window will be opened, listing the Form Templates that you have already entered. To enter a new Bar Tab Form Template, select 'New' from the Create menu; to modify an existing template, double-click it in the list.

  3. In the case of a new Form Template, select 'Properties' from the Operations menu.

    Enter an appropriate Code and, using 'Paste Special' from the Form Type field, classify the Form Template as a Bar Tab. This will ensure that you will only be able to include fields appropriate to Bar Tabs in the Form Template.

    As till receipts will be printed from Bar Tabs automatically when waiters and bar staff click or touch or click the "Finish" button, it will probably not be necessary or desirable for the waiters and bar staff to process a printer dialogue every time. So, do not tick the Printer dialog option.

    You should now specify how many items will be printed on each page of each till receipt. As a till receipt is usually a long strip of paper that does not have pages in the usual sense, one recommendation (which will depend on the printers you are using) is that you configure the Form Template as shown in the illustration above. In this illustration, we have specified that one Item will be printed on each page ("1" has been entered in each of the Single Page, Middle Pages, First Page and Last Page fields. This will mean that every till receipt will be printed using the first page, an appropriate number of middle pages, and the last page. To use this model, you must specify that an Item will be printed on the last page. If a Bar Tab only contains a single Item, the till receipt will be printed using a single page.

  4. When designing the Form Template that will be used to print till receipts, bear the following specifications in mind:

    • Thermal receipt printers use paper with a standard width of 80 mm. This corresponds to 600 pixels in Standard ERP. When adding elements to the Form Template, the maximum right-hand co-ordinate is therefore 600, but you may find 590 is a more practical limit as this will leave a small margin to the edge of the paper.

    • The printer will add a left-hand margin, so you can work from 0 as the left-hand co-ordinate.

    • The printer will also add a top margin of about 80 pixels, so you again can work from 0 as the top co-ordinate.

    • There will be a bottom margin of about 60 pixels before the paper is cut.

    • If you will use the full 80 mm paper width, the number of characters that will fit is as follows:

      MS Sans Serif 6: 65 characters
      MS Sans Serif 8: 44 characters
      MS Sans Serif 10: 36 characters
      MS Sans Serif 12: 30 characters
      MS Sans Serif 14: 26 characters
      MS Sans Serif 16: 23 characters

  5. In this step, you will design the First page. Add fields and text elements as described below the illustration, to produce a design similar to the one in the illustration. The First page should contain the fields that you need to be printed at the top of each till receipt, including the fields that will print the first Item.

    To add a field to the design, click the [Field] button at the top of the window and then draw a box on the Form Template where the field is to appear. You can move or resize it later if necessary. The 'Field' window opens:

    Enter the Field Name (use 'Paste Special' to see all available Field Names for the "Bar Tab" Field Type), and paste a type style in the Style field.

    Use the Exclude From Page options to specify the pages on which each field will be printed. Tick Middle and Last, to signify that each field will be printed on the First and Single pages (i.e. they will be excluded from the Middle and Last pages). The Single page is described in more detail below in step x.

    In the case of fields that will be printed over more than one line (e.g. the field that will print your company address), specify the Field Name, and complete the other details as follows:

    Line Height
    Use the Line Height field to specify the vertical spacing between the lines (in pixels) If you leave it at 0 (the default), all the lines of text will be superimposed on each another. In the case of 10 point Times, a Line Height of at least 10 points is recommended.

    Top, Bottom
    Don't forget to enter top and bottom pixel measurements to ensure that the Text field is deep enough to accommodate the required number of lines of text in the specified font.

    Click the [OK] button in the dialogue box to save the field specifications, and repeat as necessary until you have added every field to the First page.

    Specify "Matrix" as the Format for the fields that will print the first Item. The other fields should have "Header" as the Format.

    You can add text elements to the design in a similar manner, by clicking the [Text] button at the top of the window and then drawing a box on the Form Template where the element is to appear. When the 'Text' window opens, type the text that is to be printed on the Form Template in the Text field. This can be up to 80 characters long, but it is limited to one line. To create a text area with more than one line, use the appropriate number of separate one-line text elements.

    As with fields, give all the text elements that are to appear on the First page the same page specification using the Exclude From Page options, as shown:

    Click the [OK] button in the dialogue box to save the text element specifications, and repeat as necessary until you have added every text element to the First page. As shown in the example design illustrated above, the text elements at the bottom of the First page should be the column headings for the Item listing followed by the fields that will print the first Item.

  6. Now design the Middle page. This should contain the fields that will list the Items on till receipts. To help with the design process, you can hide the elements that you added in step iv. To do this, select 'Middle Only' from the Operations menu. This displays only those elements that are to be printed on the Middle page. At this stage, there are no such elements, so the window goes blank. Add fields and text elements to the top of the design area, so that the design looks something like this:

    This time, use the Exclude From Page options to specify that each element will only be printed on the Middle pages (i.e. they will be excluded from the First, Single and Last pages). You should also specify "Matrix" as the Format in each field, to ensure the Items will be listed correctly and neatly:

    Note that Clipping has been activated for the "Description 1" field in the illustration. This will mean that long Item Names will be truncated, so that they do not extend over the Quantity, Unit Price and Row Sum.

    The Left and Right measurements should be the same as those for the fields for the first Item that you added in the previous step.

    If you need more space for long Item Names, you can place the "Description 1" field above or below the fields that will print the Item Number, quantity and price information.

    If you do this and you specified that more than one matrix row will be printed on each Middle page, you will need to double the Line Height in each field.

    If as is recommended a single matrix row is printed on each middle page, you cannot use the height of the field in the Form Template or the Line Height field to control the line spacing. After the last pixel on a Middle page has been printed, the next Middle page will be printed immediately. To control the line spacing, add a Text element that will print an underscore character and with 599 as the Left co-ordinate. As the width of the paper is 600 pixels, anything beyond 600 will not be printed. Use the Top and Bottom co-ordinates to control the line spacing. The Style should be one that uses a very small font so that the underscore is not easily visible on receipts.

    You may need to add a similar Text element to the design for the First page, so that the line spacing between the first and second Items is correct.

  7. In this step you will design the Last page. This should contain the fields that you need to be printed at the end of each till receipt (e.g. the last Item and the totals). To help with the design process, hide the elements that you added in the previous steps by selecting 'Last Only' from the Operations menu. Again place the fields and text elements at the top of the design area. As you must print at least one Item on the Last page, add the fields that will list the Items once again, to match the arrangement that you used for the Middle page:

    Use the Exclude From Page options to specify that each element will only be printed on the Last page (i.e. they will be excluded from the First, Middle and Single pages):

  8. Now, choose 'View All' from the Operations menu. Every elements from every page will be displayed. This allows you to confirm that the elements on all pages are correctly aligned with each other:

  9. If any element is not aligned correctly, drag it into position using the mouse, or double-click it to open its specification window and type in the correct co-ordinates.

  10. The final step is to design the Single page, the page that will be used when printing a Bar Tab that only contains one Item. This should include the fields from the First page (already added in step v and already specified to print on the First and Single pages) and the elements that you need to be printed at the end of each till receipt (e.g. the totals). To help with the design process, hide the elements that you added in the previous steps by selecting 'Single Page Only' from the Operations menu. This will display the fields from step v which will help with the alignment of the totals and other footer elements. In these additional elements, tick the First, Middle and Last options so that they will only be printed on the Single page.

  11. Depending on the printer you are using, you may need to select 'PC Printer' from the Operations menu, enter "1" in the Rows Per Page field and tick the End Page with Form Feed (FF) option, as well as specifying a Codepage.

  12. As mentioned in step iii, the Form Template described above will cause every till receipt to be printed using the first page, an appropriate number of middle pages, and the last page. A possible alternative that may be more suitable depending on the printer you are using is an essentially similar design, but with more than one Item being printed on each Middle page. Simply change the Middle Page figure in step iii. Depending on the printer, you may also need to change the Rows per Page specification in the 'PC Printer' window (step xi).

  13. When the design is complete, click the [Save] button in the Button Bar to save the Form Template.

  14. Now you should specify that the Form Template you have just designed is to be used when printing till receipts. For details, please refer to steps 5-7 at the beginning of this section.
---

Configuring the Bar Tab Window:

Go back to: