Credit and Debit Card Payments - Connecting Standard ERP to a credit and debit card processing system
This page describes connecting Standard ERP to a separate system that will control the processing of credit and debit card payments for POS Invoices. When a cashier receives a credit or debit card payment for a POS Invoice, they will seamlessly connect Standard ERP to the processing system. It will instruct the cashier to swipe the credit or debit card using a connected card reader, process the payment and finally update Standard ERP with the result of the process. At the time of writing, card processing applications supported by Standard ERP for use with POS Invoices are Bambora (Sweden), PC-EFTPOS and Smartpay (Australia and New Zealand), Point via Banksys Yomani and VeriFone Vx810 (Finland), Verifone (Latvia) and Worldpay.
Precise configuration details will vary depending on the card processing applications you are using. What follows is a general guide: for more detailed information, please refer to your local HansaWorld representative.
General ConfigurationBefore proceeding to the instructions for each processing system, ensure you have assigned Local Machine Codes to your tills and cash machines.
In the case of tills and cash machines with live connections to the server, open the Local Machine setting in the User Settings module and ensure the Code field in the header contains the correct Local Machine Code. You should do this separately on each till. If the Local Machine Code field was previously empty, you should quit Standard ERP on the till and restart.
In the case of a till with a live-sync connection to the server, you will have assigned a Local Machine Code when you connected the till to the server for the first time.
If you have tills with live-sync connections to the server, ensure you have define separate Number Series for Credit Card Slips for each live-sync till in the Synchronised Number Series setting, and that you have also defined a different Number Series for live tills in the Number Series - Credit Card Slips setting.
Bambora via iSMP Companion and Ingenico iPP 350In Sweden, Standard ERP can process credit and debit card payments for POS Invoices through Bambora. The connection to Bambora will be made through credit card terminals that you should connect to each till and cash machine: supported terminals are the iSMP Companion (connects to iOS only, using Bluetooth) and the Ingenico iPP 350.
To configure Standard ERP to process credit card payments through Bambora, follow these steps:
- Connect iSMP Companion or the Ingenico iPP 350 credit card terminals to each till or cash machine likely to process credit card payments. In the case of the iSMP Companion, pair it to the iOS device that will run Standard ERP.
- Working separately on each till connected to an iPP 350, open the Local Credit Card Terminal setting in the Point of Sales module and set the Terminal Type to "Bambora". Enter the IP address of the device, and specify 1337 as the Port.

On each iOS device connected to an iSMP, open the Local Credit Card Terminal setting. Set the Terminal Type to "Bambora" but leave the other fields empty.
- Add a "Credit Card" button to the POS Invoice window. In the row in the POS Button record that adds this button, you must specify a Payment Mode in the Code field, using 'Paste Special' if necessary. This Payment Mode will determine the Nominal Ledger Accounts that will be debited with the value of the credit and debit card payments. You should also add "Connect to CC Terminal" and "Reprint Last CC Slip" buttons:
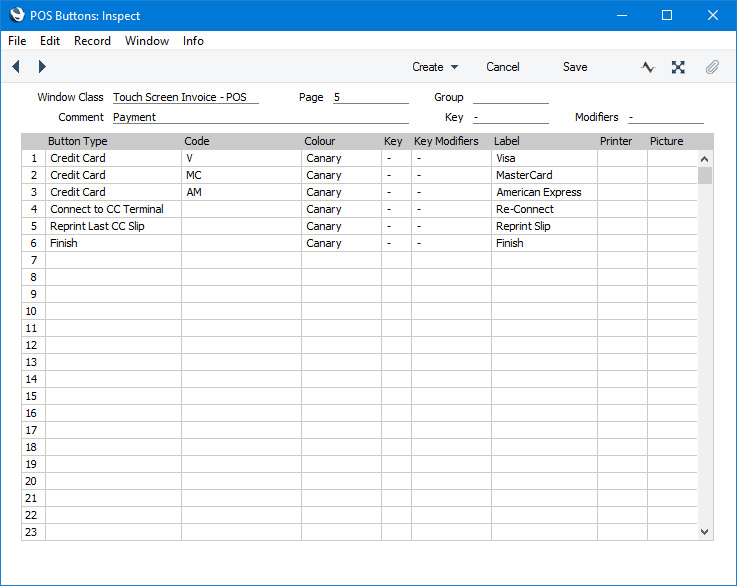
An option that is available is to use separate "Credit Card" buttons for each credit card type (e.g. American Express, Visa, MasterCard, Discover etc). For each button, specify a different Payment Mode as the Code, with each Payment Mode posting to a different Account. This will allow you to reconcile credit card statements more easily.
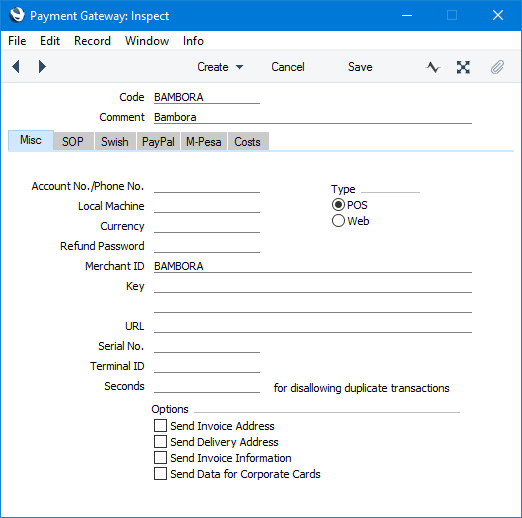
- Create a record in the Merchant ID setting in the Point of Sales module in which the Partner is "Bambora":

- Create a record in the Payment Gateways setting in the Point of Sales module that refers to the Merchant ID record from the previous step, and in which you have set the Type to "POS":
PC-EFTPOSPC-EFTPOS is an application available in Australia and New Zealand that allows point of sales applications including Standard ERP to communicate with EFTPOS card devices. PC-EFTPOS can only be used on Windows tills and cash machines.
To configure Standard ERP to communicate with PC-EFTPOS, follow these steps:
- Connect EFTPOS credit card terminals to each till or cash machine likely to process credit card payments. EFTPOS credit card terminals are available with USB or DB9 serial port connections: if your terminals have DB9 connections, you will need to use USB-to-DB9 adapters.
- Install the PC-EFTPOS software on each till. Detailed instructions are available from your local HansaWorld representative.
- Again working separately on each till, open the Local Credit Card Terminal setting in the Point of Sales module and set the Terminal Type to "PC-EFTPOS (IP)". Enter "localhost" as the IP address. In the IP Port field, enter the port that you specified (when installing the PC-EFTPOS software) to be used by the EFTPOS card terminal to communicate with the till:
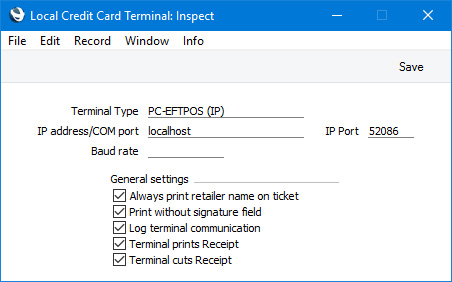
Tick the Terminal prints Receipt and Terminal cuts Receipt options if you would like the card terminal to print receipts. Otherwise, they will be printed by Standard ERP.
Although this setting is in the Point of Sales module, it is stored in the databases on the client machines. Therefore, you need to configure it separately on each client.
- Add a "Credit Card" button to the POS Invoice window. In the row in the POS Button record that adds this button, you must specify a Payment Mode in the Code field, using 'Paste Special' if necessary. This Payment Mode will determine the Nominal Ledger Accounts that will be debited with the value of the credit and debit card payments:
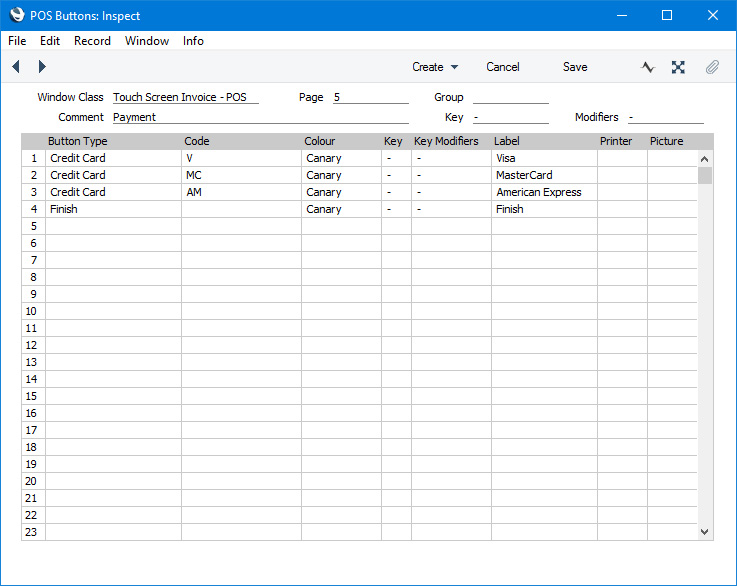
An option that is available is to use separate "Credit Card" buttons for each credit card type (e.g. American Express, Visa, MasterCard, Discover etc). For each button, specify a different Payment Mode as the Code, with each Payment Mode posting to a different Account. This will allow you to reconcile credit card statements more easily.
- Create a record in the Merchant ID setting in the Point of Sales module in which the Partner is "PC-EFTPOS":
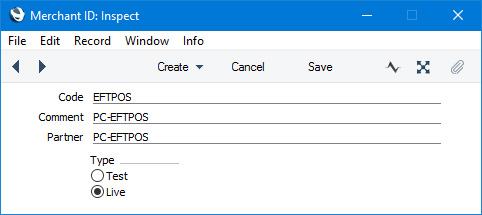
- Create a record in the Payment Gateways setting in the Point of Sales module that refers to the Merchant ID record from the previous step, and in which you have set the Type to "POS":

Point via Banksys Yomani or VeriFone Vx810In Finland, Standard ERP can process credit and debit card payments for POS Invoices through the Point Transaction Collecting System. The connection to Point will be made through credit card terminals that you should connect to each till and cash machine: supported terminals are the Banksys Yomani and the VeriFone Vx810.
To configure Standard ERP to process credit card payments through the Point Transaction Collecting System, follow these steps:
- Connect Banksys Yomani or VeriFone Vx810 credit card terminals to each till or cash machine likely to process credit card payments.
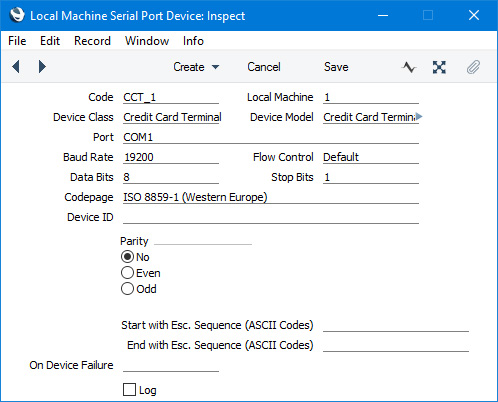
- Working on a desktop client, change to the Technics module and open the Local Machine Serial Port Devices setting. This setting should contain separate records for each individual serial port device (i.e. separate records for each individual card terminal). By specifying a Local Machine Code in each record, you will in effect use the setting to specify which tills and cash machines are connected to card terminals. Enter a separate record for each individual card terminal as follows:
- Code
- Enter a unique Code for the card terminal. The Code can consist of up to ten characters, and you can use both numbers and letters.
- Local Machine
- Paste Special
Local Machines setting, Point of Sales/Restaurant/Technics module
- Enter the Local Machine Code of the till or cash machine to which the card terminal is or will be attached.
- Device Class
- Paste Special
Choices of possible entries
- Use 'Paste Special' to set the Device Class to "Credit Card Terminal".
- Device Model
- Paste Special
Choices of possible entries
- Use 'Paste Special' to set the Device Model to "Credit Card Terminal Yomani Banksys" or "Credit Card Terminal Verifone" (depending on the model of card terminal you are using).
- Port
- Specify the till's serial port to which the card terminal is connected.
- If the till is a Windows machine, you may need to obtain a USB virtual comport driver.
- If the Till is a macOS or Linux machine and does not have a serial port, you will need an RS232-to-USB adapter. Install the driver supplied with the adapter. To discover the port number of the new port, you can use the Network section of System Preferences or type ls /dev/tty.* in a new Terminal window. Then enter the port number in this field (for example, /dev/tty.usbserial or /dev/tty.KeySerial1).
- Baud Rate, Flow Control, Data Bits, Stop Bits, Parity
- Refer to the manual for the card terminal to specify the appropriate communications settings. In the case of the Flow Control field, you can choose the relevant value using 'Paste Special'.
- Codepage
- Paste Special
Choices of possible entries
- Specify the code page (character encoding system) that is to be used when communicating with the card terminal. This information can again often be found in its manual.
All other fields should be empty.
- Again working separately on each client or Till, open the Local Credit Card Terminal setting in the Point of Sales module and set the Terminal Type to "Yomani banksys (Serial/COM)":

Leave the other fields empty. The purpose of this record is simply to signify that credit card payments are to be sent to Point via a credit card terminal.
Although this setting is in the Point of Sales module, it is stored in the databases on the client machines. Therefore, you need to configure it separately on each client.
- Add "Credit Card" and "Credit Card Payment Reversal" buttons to the POS Invoice window. In the rows in the POS Button record that add these buttons, you must specify a Payment Mode in the Code field, using 'Paste Special' if necessary. These Payment Modes will determine the Nominal Ledger Accounts that will be debited with the value of the credit and debit card payments (credited in the case of the "Credit Card Payment Reversal" button):
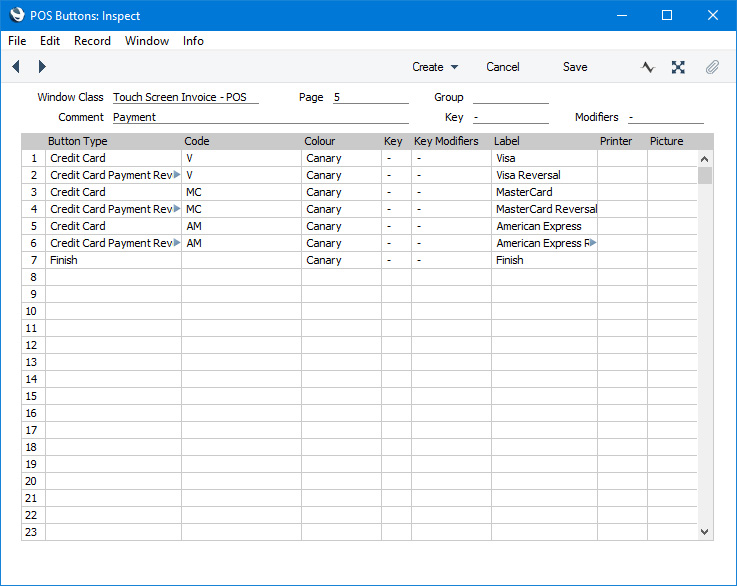
An option that is available is to use separate "Credit Card" buttons for each credit card type (e.g. American Express, Visa, MasterCard, Discover etc). For each button, specify a different Payment Mode as the Code, with each Payment Mode posting to a different Account. This will allow you to reconcile credit card statements more easily.
- Refer to the USB/Wifi receipt printers with user-definable print-outs page for details about connecting printers and designing the Form Template that will be used to print receipts.
To print credit card slip information on receipts, include the following fields in your Form Template:
- Credit Card Slip Note
- Enter CUSTOMER as the Field Argument in this field.
- Credit Card Slip Note 2
- Enter MERCHANT as the Field Argument in this field.
Specify a Line Height in both fields.
Depending on the printer you are using, you may need to set the Form Template to print two copies, using the 'Copies' function on the Operations menu).
SmartpayIn Australia and New Zealand, Standard ERP can process credit and debit card payments for POS Invoices through Smartpay. The connection will be made through credit card terminals that you should connect to each till and cash machine.
To configure Standard ERP to process credit card payments through Smartpay, follow these steps:
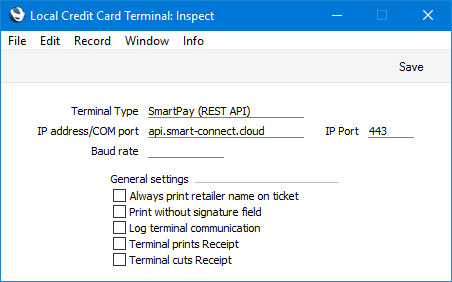
- Working separately on each till, open the Local Credit Card Terminal setting in the Point of Sales module and set the Terminal Type to "SmartPay (REST API)". Enter "api.smart-connect.cloud" as the IP address and 443 as the IP Port field:
Although this setting is in the Point of Sales module, it is stored in the databases on the client machines. Therefore, you need to configure it separately on each client.
- As mentioned under the 'General Configuration' heading earlier in this section, ensure you have assigned Local Machine Codes to your tills and cash machines. You should also assign unique Terminal IDs to each till (on the 'POS' card in the Local Machine and Local Settings settings).
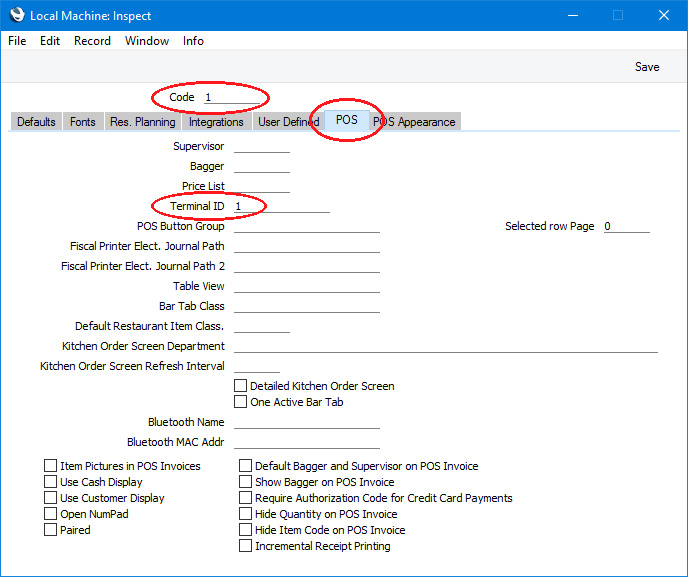
If the Local Machine Code field was previously empty on a till, quit Standard ERP on the till and restart.
- To pair a till with a Smartpay device, follow these steps:
- After restarting Standard ERP on the till as mentioned in step 2, open the Local Machine setting and select 'Pair with SmartPay' from the Operations menu with 'cog' icon (Tools menu with 'wrench' icon if you are using iOS or Android):
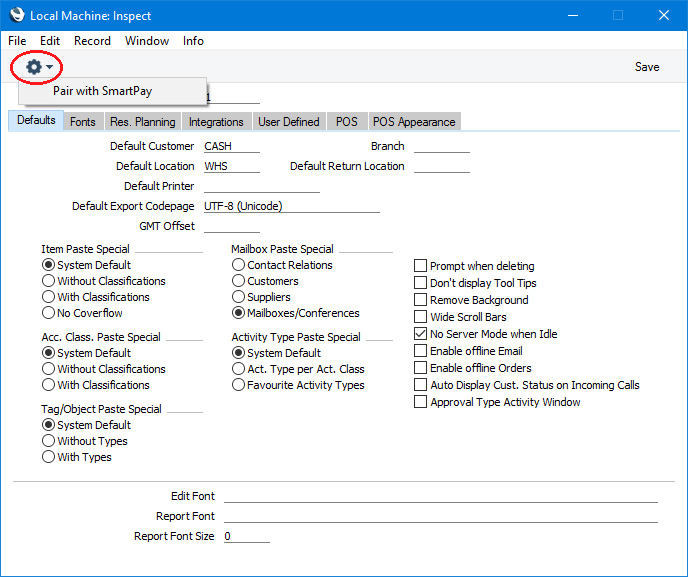
If the Operations menu is not visible, the probable reason is that the VAT Law (GST Law) in the Company Info setting is not "Australian" or "New Zealand".
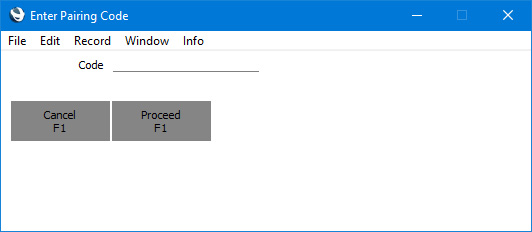
An 'Enter Pairing Code' window will open:
- On the Smartpay device, press the 'Menu' button and select 'CONFIG' (option 3).
- Enter "833767" and press Enter.
- Select 'POS Integrations' and then 'Authorise POS'.
- You will be given a Pairing Code: enter this in the 'Enter Pairing Code' window in Standard ERP and press [Proceed].
- In the Payment Modes setting, add Payment Modes for cash and credit card payments and for cash withdrawal (if you will allow cash withdrawals). Specify Accounts and Back Office Accounts for each Payment Mode (the cash and cash withdrawal Payment Modes will usually need the same Accounts). If necessary, you can enter separate Payment Modes for each credit card type (e.g. American Express, Visa, MasterCard, Discover etc), with each Payment Mode posting to a different Account. This will allow you to reconcile credit card statements more easily
- If you will allow cash withdrawals, enter the cash withdrawal Payment Mode from the previous step in the Cash Withdrawal field in the Default Payment Modes setting.
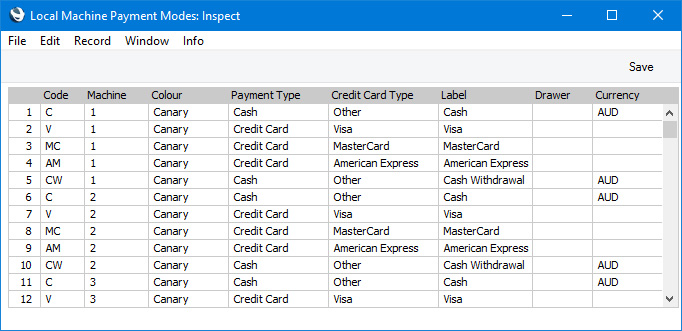
- List the Payment Modes (i.e. the payment methods) that can be used on each till in the Local Machine Payment Modes setting. You can use separate Payment Modes for different credit card types, if you listed them in step 4.
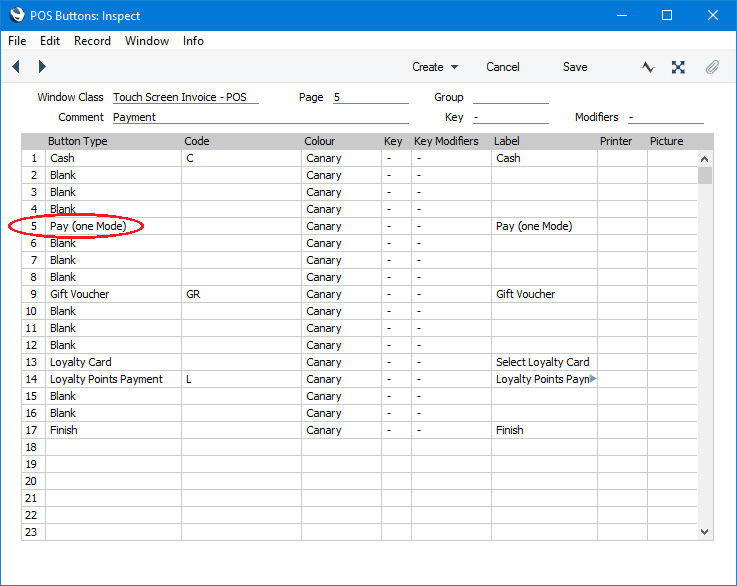
- Add a "Pay (one Mode)" button to the POS Invoice window:
- If you do not want to allow over-payments/cash withdrawals, assign each cashier to an Access Group in which you have denied access to the 'Allow Cash Withdrawal' Action.
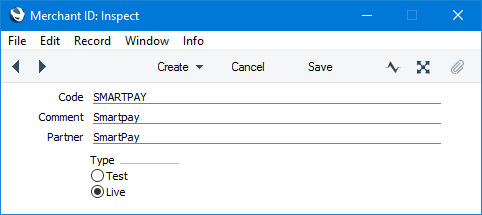
- Create a record in the Merchant ID setting in the Point of Sales module in which the Partner is "SmartPay":
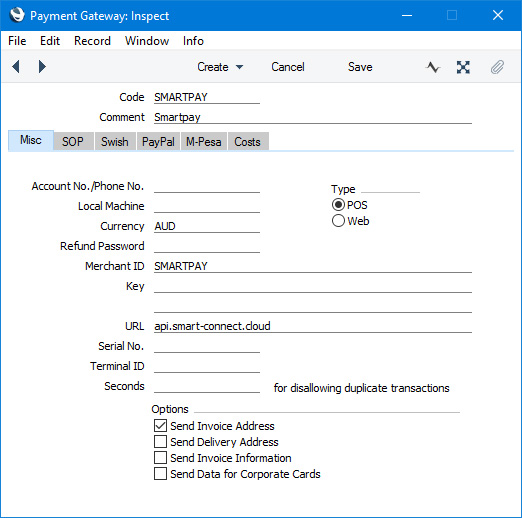
- Create a record in the Payment Gateways setting in the Point of Sales module that refers to the Merchant ID record from the previous step, and in which you have set the Type to "POS". Enter the Currency (AUD or NZD as appropriate) and the URL ("api.smart-connect.cloud"):
VerifoneIn Latvia, Standard ERP can process credit and debit card payments for POS Invoices through Verifone. The connection will be made through credit card terminals that you should connect to each till and cash machine.
To configure Standard ERP to process credit card payments through Verifone, follow these steps:
- Connect credit card terminals to each till or cash machine likely to process credit card payments.
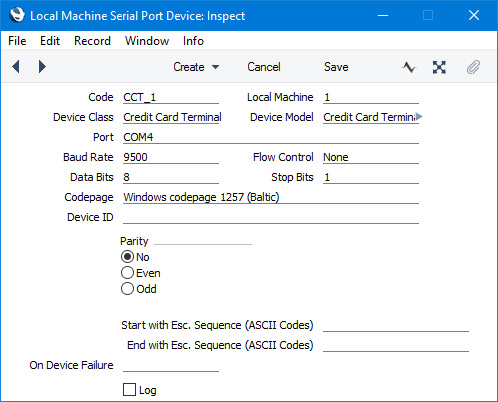
- Working on a desktop client, change to the Technics module and open the Local Machine Serial Port Devices setting. This setting should contain separate records for each individual serial port device (i.e. separate records for each individual card terminal). By specifying a Local Machine Code in each record, you will in effect use the setting to specify which tills and cash machines are connected to card terminals. Enter a separate record for each individual card terminal as follows:
- Code
- Enter a unique Code for the card terminal. The Code can consist of up to ten characters, and you can use both numbers and letters.
- Local Machine
- Paste Special
Local Machines setting, Point of Sales/Restaurant/Technics module
- Enter the Local Machine Code of the till or cash machine to which the card terminal is or will be attached.
- Device Class
- Paste Special
Choices of possible entries
- Use 'Paste Special' to set the Device Class to "Credit Card Terminal".
- Device Model
- Paste Special
Choices of possible entries
- Use 'Paste Special' to set the Device Model to "Credit Card Terminal Verifone".
- Port
- Specify the till's serial port to which the card terminal is connected.
- If the Till is a macOS or Linux machine and does not have a serial port, you will need an RS232-to-USB adapter. Install the driver supplied with the adapter. To discover the port number of the new port, you can use the Network section of System Preferences or type ls /dev/tty.* in a new Terminal window. Then enter the port number in this field (for example, /dev/tty.usbserial or /dev/tty.KeySerial1).
- Baud Rate, Flow Control, Data Bits, Stop Bits, Parity
- Refer to the manual for the card terminal to specify the appropriate communications settings. In the case of the Flow Control field, you can choose the relevant value using 'Paste Special'.
- Codepage
- Paste Special
Choices of possible entries
- Specify the code page (character encoding system) that is to be used when communicating with the card terminal. This information can again often be found in its manual.
All other fields should be empty.
- Remain in the Local Machine Serial Port Devices setting and enter separate records for the fiscal printers that will be attached to each till and cash machine. Please refer here for more information about fiscal printers.
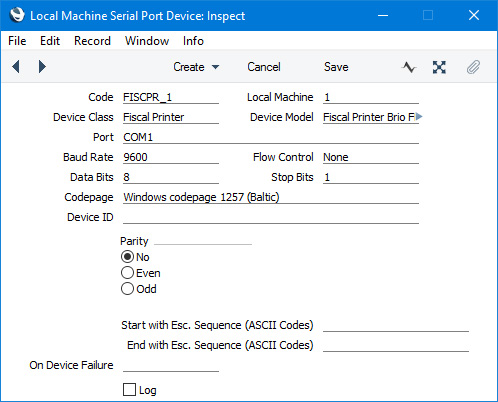
- Again working separately on each client or Till, open the Local Credit Card Terminal setting in the Point of Sales module and set the Terminal Type to "Verifone (Serial/COM)":
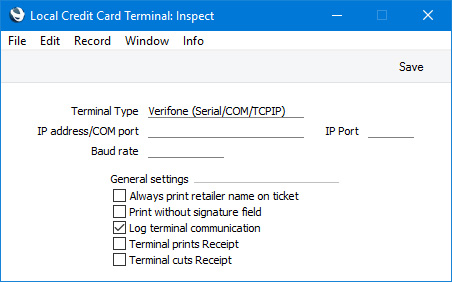
Leave the other fields empty. The purpose of this record is simply to signify that credit card payments are to be sent to Verifone via a credit card terminal.
Although this setting is in the Point of Sales module, it is stored in the databases on the client machines. Therefore, you need to configure it separately on each client.
- Add "Full Payment" and/or "Pay (one Mode)" buttons to the POS Invoice window.
In the case of "Full Payment" buttons, you can add more than one button, representing different payment methods. For example, you might add one "Full Payment" button to be used for cash payments and one for credit card payments. In the rows in the POS Button record that add these buttons, you must specify a Payment Mode in the Code field, using 'Paste Special' if necessary. These Payment Modes represent the payment method (e.g. cash or credit card) and will determine the Nominal Ledger Accounts that will be debited with the value of the payments. You can use separate "Full Payment" buttons for each credit card type (e.g. American Express, Visa, MasterCard, Discover etc). For each button, specify a different Payment Mode as the Code, with each Payment Mode posting to a different Account. This will allow you to reconcile credit card statements more easily:
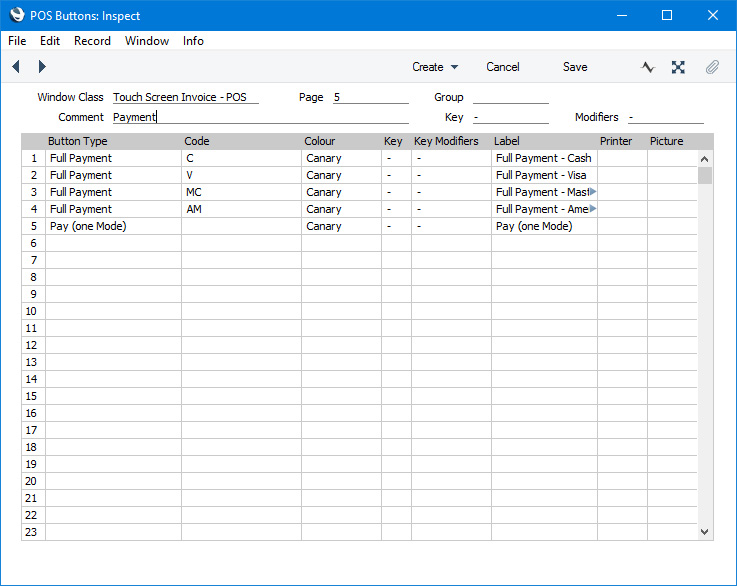
In the case of the "Pay (one Mode)" button, list the Payment Modes (i.e. the payment methods) that can be used on each till in the Local Machine Payment Modes setting. Again, you can use separate Payment Modes for different credit card types. The Local Machine Payment Modes setting is described here.
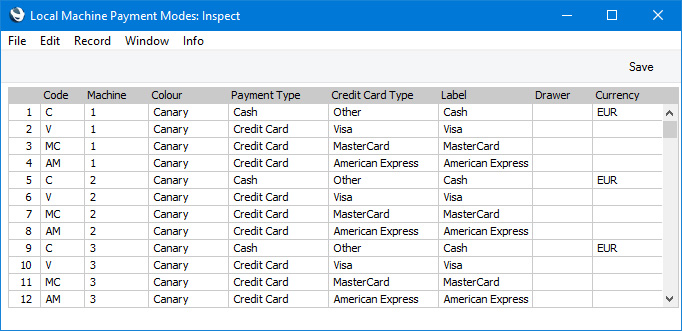
WorldpayStandard ERP can process credit and debit card payments for POS Invoices through Worldpay. The connection will be made through the Worldpay Integrated Payment Client (IPC) software that can only be used on a Windows computer. The IPC software will communicate with card readers and process payments.
To configure Standard ERP to process credit card payments through Worldpay, follow these steps:
- Install the Worldpay Integrated Payment Client (IPC) on a Windows machine.. The process that you need to follow to connect card readers is described in the file IPC Installation and Configuration for Testing.pdf, and a detailed description of IPC and its configuration is in the file IPC-2 PA-DSS-2.1.9.pdf. To configure the IPC software, run the YESEFTConfig.bat tool.
Standard ERP requires the following configuration in the IPC:
- General:
- PinPad
- iPP350
- AutoSensing COM Port
- ticked
- Interfacing:
- Socket
- Ticked
- Port
- Specify the preferred port for communication (the Socket Port).
- Receipt:
- Print Merchant Receipt
- Ticked
- Print Receipt
- Ticked if you wish to print the receipts through available printers. Select the appropriate printer from the drop-down menu.
- Send Receipt to Socket
- Ticked if you need receipts to be sent to the Credit Card Terminal Slips setting in Standard ERP.
- Receipt Port
- You should specify a Receipt Port if you have selected the Send Receipt to Socket option.
- Hosted IPC:
- Is Hosted EVT
- Ticked
- IPC As a Service
- Ticked
- IPC-1 Intramessage Compatibility
- Ticked
- Intra Message Port
- Must be 8000
To integrate the IPC with Standard ERP, run the StartPOSServer.bat application and make sure the application starts normally.
If the application does not start normally, logs are stored in C:/YESEFT/logs/ folder.
Use the IPC Troubleshooting guide -1.3.pdf for reference when dealing with IPC errors or contact the Worldpay support centre.
- Working separately on each client or Till, open the Local Credit Card Terminal setting in the Point of Sales module and set the Terminal Type to "WorldPay (TCPIP)":
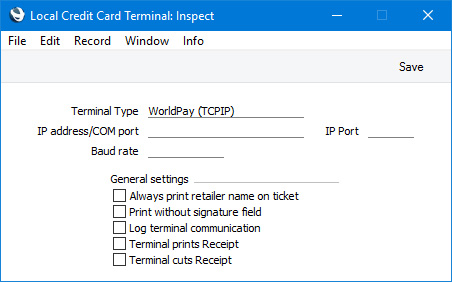
Although this setting is in the Point of Sales module, it is stored in the databases on the client machines. Therefore, you need to configure it separately on each client.
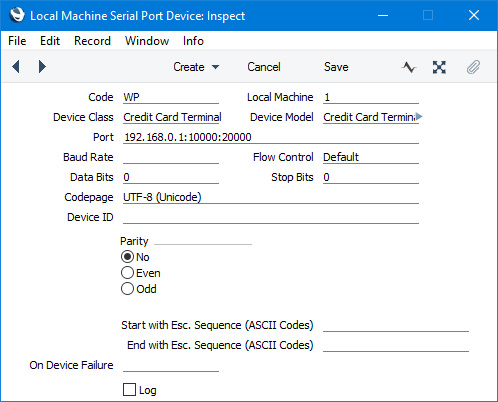
- Working on a desktop client, change to the Technics module and open the Local Machine Serial Port Devices setting. This setting should contain separate records for each individual serial port device (i.e. separate records for each individual card terminal). By specifying a Local Machine Code in each record, you will in effect use the setting to specify which tills and cash machines are connected to card terminals. Enter a separate record for each individual card terminal as follows:
- Code
- Enter a unique Code for the card terminal. The Code can consist of up to ten characters, and you can use both numbers and letters.
- Local Machine
- Paste Special
Local Machines setting, Point of Sales/Restaurant/Technics module
- Enter the Local Machine Code of a till or cash machine: you will need to enter separate records for each one that will be used to receive payments.
- Device Class
- Paste Special
Choices of possible entries
- Use 'Paste Special' to set the Device Class to "Credit Card Terminal".
- Device Model
- Paste Special
Choices of possible entries
- Use 'Paste Special' to set the Device Model to "Credit Card Terminal WorldPay (TCPIP)".
- Port
- Use the format IP Address:Socket Port:Receipt Port to specify the internal IP address of the machine on which the Worldpay IPC is running, followed by the Socket Port and the Receipt Port that you specified in the IPC.
- Add "Credit Card", "Full Payment" and/or "Pay (one Mode)" buttons to the POS Invoice window.
In the rows in the POS Button record that add "Credit Card" and "Full Payment" buttons, you must specify a Payment Mode in the Code field, using 'Paste Special' if necessary. This Payment Mode will determine the Nominal Ledger Accounts that will be debited with the value of the payments.
An option that is available is to use separate "Credit Card" or "Full Payment" buttons for each credit card type (e.g. American Express, Visa, MasterCard, Discover etc). For each button, specify a different Payment Mode as the Code, with each Payment Mode posting to a different Account. This will allow you to reconcile credit card statements more easily.
In the case of the "Pay (one Mode)" button, list the Payment Modes (i.e. the payment methods) that can be used on each till in the Local Machine Payment Modes setting. Again, you can use separate Payment Modes for different credit card types.

Please refer here for a description of the workflow required when receiving credit or debit card payments for POS Invoices through a credit and debit card processing system.
---
Configuring the POS Invoice Window:
Go back to:
|