The 'Reservations: Browse' Window
This page describes the browse window in the Reservation register.
---
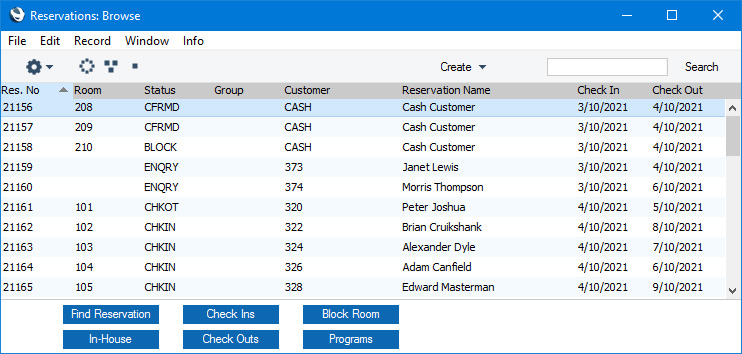
To open the Reservation register, first ensure you are in the Hotel module. Then, if you are using Windows or macOS, click the [Registers] button in the Navigation Centre and double-click 'Reservations' in the resulting list. If you are using iOS or Android, tap the [Registers] button in the Navigation Centre and then tap 'Reservations' in the 'Registers' list. The 'Reservations: Browse' window will be opened, listing Reservations that you have already entered.

If you do not see all the columns and buttons shown in the illustration, the probable reason is that you have not selected the
Hotel Interface option in the
Optional Features setting in the System module.
If you are using Windows or macOS, you can change the sort order by clicking on the column headings. To reverse any sort, simply click once again on the column heading. The current sort order is marked by the column heading being coloured blue. If you are using iOS or Android, tap on the column heading and choose the sort order you need. Repeat the procedure to reverse the sort.
To search for a particular record, first sort the list by the column that you want to use for the search. Then, enter the text that you want to find in the Search field in the top of the window (in the top right-hand corner if you are using Windows/macOS) and press the Return key (macOS) or Search (iOS/Android). The first record containing a match for your search string will be highlighted (if you are using Windows, a match will be highlighted as you type each character). For example, to search for Reservations with a particular Check In Date, sort by Check In before entering the Date (or the first few characters) in the Search field. You can also use the [Find Reservation] button described below.
If you are using Windows or macOS, there will be three buttons in the top left-hand corner of the browse window. These are part of the Limited Access feature. You can use them as follows (Windows versions of the buttons illustrated on the left, macOS on the right):

-
- Lists all Reservations.

-
- Lists Reservations belonging to members of the same Sales Group as the current user.

-
- Lists Reservations belonging to the current user (i.e. Reservations in which the Salesman field contains the Signature of the current user).
You can also prevent a user from seeing all Reservations in the list by restricting their view to their own Reservations or to those of their Sales Group.
When you enter a new Reservation record, your Signature will be placed in the Salesman field on the 'Other' card, and the Reservation will be assigned to your Sales Group. The Salesman and Sales Group fields are not modifiable.
Please refer to the page describing the 'Access' card of the Person register in the 'System Module' manual for full details about the Limited Access feature.
The lower part of the 'Reservations: Browse' window contains the following buttons:
- [Find Reservation] button
- To find a Reservation, press the [Find Reservation] button. A 'Find Reservation' window will open, where you can enter any information that you have about the Reservation you are looking for:

Press the [Run] button. A report will be printed to screen, listing the Reservations that match the information that you entered in the 'Find Reservation' window:

Double-click (Windows/macOS) or tap (iOS/Android) the Reservation Number of the Reservation that you need to open it.
- [In-House] button
- If you need to see a list of occupied Rooms and current Guests (i.e. Reservations in which the Status is Normal (checked in)), press the [In-House] button. An In-House Guests report will be printed to screen:

From the report you can open an individual Reservation by clicking (Windows/macOS) or tapping (iOS/Android) on a Reservation Number.
- [Check Ins] button
- If you need to see a list of the day's check ins (i.e. Reservations where the Guests are expected to check in and those where they have checked in), press the [Check Ins] button. A Check Ins report will be printed to screen listing Reservations sorted by Status:

From the report you can open an individual Reservation by clicking (Windows/macOS) or tapping (iOS/Android) on a Reservation Number or a Room Number.
- [Check Outs] button
- If you need to see a list of the day's check outs (i.e. Reservations where the Guests are expected to check out and those where they have checked out), press the [Check Outs] button. A Check Outs report will be printed to screen listing Reservations sorted by Status:

From the report you can open an individual Reservation by clicking (Windows/macOS) or tapping (iOS/Android) on a Reservation Number or a Room Number.
- In the report, a Reservation will be marked as "Ready" if everything has been invoiced or "Not Paid" otherwise.
- [Block Room] button
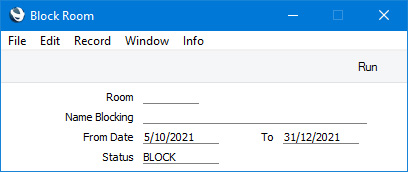
- If a Room will be out of order for the short to medium term (e.g. it is being decorated), there are several methods you can use to prevent it being used in Reservations. One is to create a blocking Reservation in which the Status is the Out of Order Status specified in the Hotel Settings setting. You can enter such a Reservation yourself or you can create it using the [Block Room] button.
- On pressing the button, the following window will open:

Specify the Room that you need to be marked as Out of Order and the period during which it cannot be used and press the [Run] button. The Start and End Times in the resulting Reservation will be the Check In and Check Out Times specified in the Hotel Settings setting. If you enter some text in the Name Blocking field, it will be copied to the Customer Name field in the Reservation.
- Rooms with Out of Order Reservations will be shown on a separate line in the Daily Statistics report.
The first four buttons ([Find Reservation], [In-House], [Check Ins] and [Check Outs]) are also available in both
Resource Planner windows.
---
The Reservation register in Standard ERP:
Go back to:
