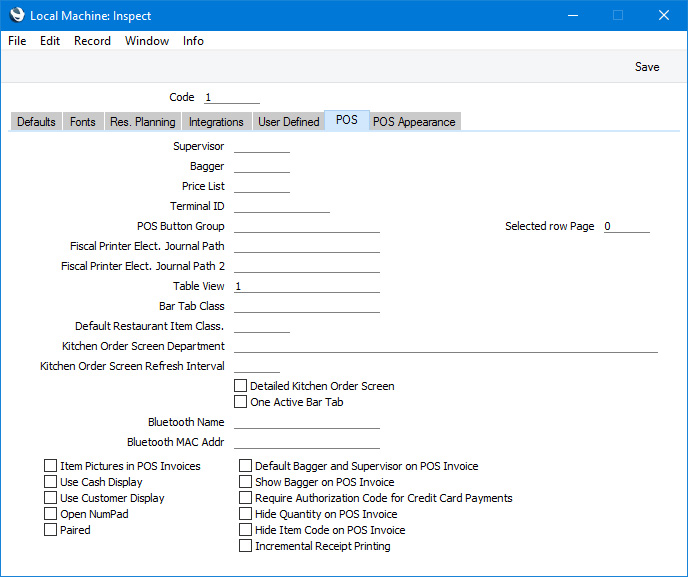
Local Machine - POS Card
This page describes the fields and options on the 'POS' card of the Local Machine setting with reference to the Restaurant module. Please follow the links below for descriptions of the other cards:
---
- Price List
- Paste Special
Price List register, Pricing module
- If you specify a Price List here, it will be used in all Bar Tabs recorded on the till or device unless a separate Price List has been specified for a particular Customer.
- When you create a new Bar Tab, the Price List will be chosen as follows:
- The Price List will be brought in from the card of the Default Customer's Contact record.
- If you have specified a Bar Tab Class in the field below, the Price List in that Bar Tab Class will be used. Note: if you have not specified a Price List in the Bar Tab Class, there will similarly be no Price List specified in new Bar Tabs.
- The Price List specified here in the Local Machine setting will be used.
If you change the Customer in a Bar Tab, the Price List will be changed as well.
If you add a Loyalty Card to a Bar Tab, the Customer will be changed accordingly and the Price List will be brought in from the relevant row in the Loyalty Card Membership Level Structure setting in the Restaurant and Point of Sales modules. If the Loyalty Card Membership Level Structure does not supply a Price List or the specified Customer does not have a Loyalty Card, then the Price List will again be chosen as specified above.
- The Price List that you specify here will also be used as described above in POS Invoices. It will also be offered as a default in Hotel Reservations if no Default Price List has been specified in the Hotel Settings setting or for the Default Hotel Customer. Please refer here for more details about the use of this field in Hotel Reservations.
- POS Button Group
- Paste Special
POS Button Groups setting, Point of Sales/Restaurant module
- When configuring the buttons that will appear in the Bar Tab and/or POS Invoice windows, you may need different sets of Buttons to be used, depending on how a particular till or device will be used. For example in a restaurant you might need different sets of buttons to appear on the tills in the food area compared to the tills in the bar. You can implement this using POS Button Groups.
- In this example, you would create one POS Button Group for the food area and one for the bar. Then, create the POS Button records that you need, assigning them each to the relevant Button Group (i.e. assign each POS Button record to the food area or to the bar). Then, use this field to assign a particular till or device to a Button Group (i.e. to specify whether the till or device will be used in the food area or the bar). Buttons designed for the food area will not be used on Tills in the bar and vice versa.
- Please refer here for more details.
- Fiscal Printer Elect. Journal Path, Fiscal Printer Elect. Journal Path 2
- In Lithuania, if an Empirija FB15 fiscal printer is attached to a till, you will need to print a daily Z report both to paper and to an electronic journal file. The electronic journal file should be saved in two locations, which you should specify in these two fields. Please refer to the description of the Fiscal Printer Reports setting here for more details.
- Table View
- Paste Special
Table Views setting, Restaurant module
- A Table View is a floor plan of the restaurant. If a restaurant has more than one room, floor or other division, it can have more than one Table View. A Table View will show each Table in the appropriate position in the room, with each Table using colour-coding to indicate whether it is occupied. Waiters and members of bar staff can use a Table View to assign Bar Tabs to Tables.
- If a till or device will always be used in the same room or on the same floor i.e. it will always be used to assign Bar Tabs to Tables from the same floor plan, specify here the Table View that represents that floor plan. Please refer here for more details about Table Views.
- Bar Tab Class
- Paste Special
Bar Tab Classes setting, Restaurant module
- If you need a default Bar Tab Class to be assigned to each new Bar Tab entered on a particular till or device, specify that Class here. If you have specified a Price List and/or Tag/Object in the relevant Bar Tab Class record, they will be copied to each new Bar Tab as well.
- If you need waiters and members of bar staff to be able to change the Class (and therefore the Price List and Tag/Object) in a Bar Tab, add a "Set Tab Class" button to the Bar Tab Class.
- Kitchen Order Screen Department
- Paste Special
Kitchen Departments setting, Restaurant module
- There are three methods that you can use to monitor Kitchen Orders as they progress through the kitchen: the Workflow Overview, the Kitchen Order Screen and the Calendar. Using the Kitchen Order Screen method allows operators at each station in the kitchen only to be shown the dishes that are relevant to them. You should list the various kitchen stations in the Kitchen Departments setting. Then, use this field to assign the devices that will be used in the kitchen to the relevant station. Please refer here for more details about the Kitchen Order Screen.
- Kitchen Order Screen Refresh Interval
- If you are using the Kitchen Order Screen mentioned above, it will be refreshed periodically and automatically so that newly-created Kitchen Orders will become visible.
- Use this field to specify how often the Kitchen Order Screen should be refreshed on the device, using the format HH:MM:SS. If you leave this field empty, the Kitchen Order Screen will be refreshed once a minute.
- One Active Bar Tab
- By default, if a waiter or member of bar staff uses the "All Tabs" button in the Bar Tab window to open an existing Bar Tab, that Bar Tab will be opened in a new window. The Bar Tab containing the "All Tabs" button that was pressed by the waiter will remain open in its own window behind the newly opened one. Select this option if you would like the Bar Tab containing the "All Tabs" button that was pressed by the waiter to be closed, so that only one Bar Tab window can be open at any time.
- Use Customer Display
- Use this option when a till or device has two built-in displays, one for waiters and bar staff and one for customers. When a waiter or member of bar staff creates a new Bar Tab, it will cause a second window (entitled 'Customer Display') to be opened as well as the usual 'Bar Tab: New' window. As the waiter or member of bar staff adds Items to the Bar Tab, they will be listed in both windows.
- The first time a waiter or member of bar staff creates a new Bar Tab on a particular till, the 'Customer Display' window will be opened on top of the 'Bar Tab: New' window. Drag the 'Customer Display' window to the display facing the customer and choose 'Save Position' from the Window menu. This will ensure the 'Customer Display' window will always be opened on the display facing the customer in future.
- Require Authorisation Code for Credit Card Payments
- Select this option if you would like it to be mandatory for credit and debit card payments to be accompanied by authorisation codes when they are recorded on a particular till or device. You will usually use this option when you are using a separate system to process credit and debit card payments and you need waiters and bar staff to record authorisation codes against the corresponding Bar Tabs. Please refer here for more details.
- Hide Quantity on POS Invoice
- Please refer here for details about this option.
- Hide Item Code on POS Invoice
- Please refer here for details about this option.
The Local Machine setting and the Restaurant module:
---
Go back to:
|