Opening Balances in the Sales Ledger - Opening Balances
The process described below applies to the entering of opening balances both from the previous fiscal year and for the current year to date.
You are now ready to enter the first Invoice. If you are entering a single opening balance figure per Customer, either for the previous fiscal year or for the current year to date, you will need to do this by entering it in an Invoice. If so, omit step 7 in the following procedure. Do this:
- If you are not already in the Sales Ledger module, move into it using the [Select Module] button in the Master Control panel.
- Click the [Invoices] button in the Master Control panel to open the Invoice register.
- Click [New] in the Button Bar.
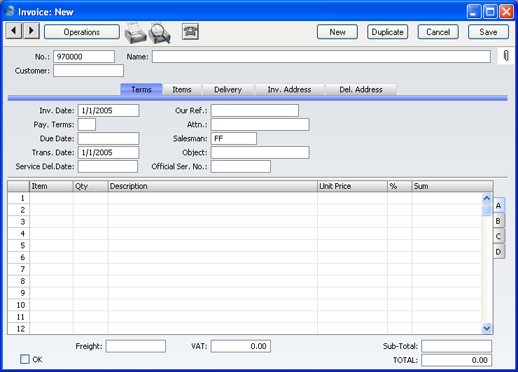
- In the 'Invoice: New' window three fields are already filled in: the Invoice Number (except in multi-user systems) and the Invoice and Transaction Dates (which show the current date taken from the system clock). If you are entering a single opening balance figure for each Customer, you might like to use a separate numbering sequence for opening balances (use the Number Series - Invoices setting in the Sales Ledger to set up numbering sequences). If you are entering individual Invoices, you will need to use the Invoice Number and Date of the original Invoice. In multi-user systems, an Invoice Number will be allocated when the Invoice is saved: when entering individual Invoices for the current year to date, to ensure each Invoice retains the number with which it was originally issued, it is recommended that you enter these Invoices in number order from a single client computer to ensure each Invoice retains the number with which it was originally issued. You can enter the Invoice Number yourself before you save the Invoice for the first time to be sure that it is correct.
- Place the insertion point in the Customer field and select 'Paste Special' from the Edit menu or use the shortcut (Ctrl-Return - Windows/Linux or ⌘-Return - Macintosh). The 'Paste Customer' window appears, showing a list of the Customers recorded in the Customer register. Select a Customer by clicking on its row and press the Return key twice. The first pressing causes the Customer Number to be transferred to the field in the Invoice, and the second will move all information about the Customer (Name, Address etc.) to the Invoice.
- Use the Return key to move the insertion point to the Date field. In the case of Customer balances from the end of the previous fiscal year, ensure that this is set to a date that is earlier than the cut-off date you specified in the Sub Systems setting.
- If you are entering individual Invoices, move the insertion point to the Item field and press Ctrl-Return or ⌘-Return again. Select the correct Item from the list and press Return twice. The insertion point is moved to the Qty field. Enter the number of items ordered, and press Return. Check that the Unit Price is correct and repeat for each item on the Invoice.
- If you are entering single opening balances, move the insertion point to the Qty field and enter a quantity of 1. Press Return and enter the text "Opening Balance" in the Description field. Enter an amount (excluding VAT) in the Unit Price field.
- Until you are familiar with the Invoice screen, it is a good idea to check that every field is correct. Clicking the named tabs marked 'Delivery', 'Inv. Address', etc causes different information about the Invoice to be shown, while the tabs marked A-D display further information about the Invoice items. Pay particular attention to the Sales Account and VAT Code fields on flip B. These defaults are taken from the Item record or, if not specified there, from the Account Usage S/L setting. It will be the latter in the case of single opening balances, as then you are not referring to the Item register.
- At the bottom of the Invoice the total is shown, together with the VAT amount and the total payable amount.
- Click [Save] to save the Invoice.
The window title changes to 'Invoice: Inspect'. You can now correct any mistakes before you click the OK check box. With the OK box checked, clicking the [Save] button in the Button Bar once again approves the Invoice and commits it to your Sales Ledger. After this you may not change the individual fields. Invoices must be approved before Receipts can be allocated to them and to appear in the Periodic Customer Statement.
- Finish with [New] if you wish to enter another Invoice. Or, if you are entering all Invoices for the current fiscal year, click [Duplicate]. This will create a new Invoice which will be a copy of the one just saved. This will save you having to enter Customer details, etc, again if they are the same.
- Finish with [Save] when you have entered the last Invoice, and close the window by clicking the close box.