Creating a Record Window for the Register
Having
created an App and a
register, the next step is to design and create a record window for the App. The record window is the window that you will use to add new records to the register, and to view and modify existing records.
If the 'Register Definition: Inspect' window is still open, choose 'Windows' from the Operations menu. If the 'Register Definition: Inspect' window is not still open, you can click the [Form Defs.] button in the Master Control panel:

In both cases, the 'Window Definitions: Browse' window is opened, listing any Window Definitions that already exist (i.e. including Window Definitions belonging to all Register Definitions, not just the one being worked on at the moment):
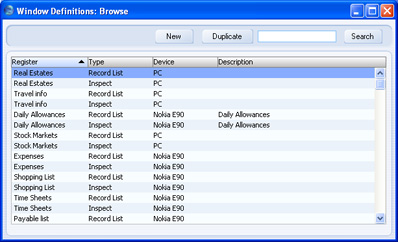
If you clicked the [Select This App] button as described in step 6 on the
Creating an App page, the ‘Window Definitions: Browse’ window will be empty.
To enter a new Window Definition, click [New] in the Button Bar or use the Ctrl-N (Windows) or ⌘-N (Macintosh) keyboard shortcut. Alternatively, highlight a Window Definition similar to the one you are about to design and click [Duplicate] in the Button Bar.
The 'Window Definition: New' window opens, empty if you clicked [New] or containing a duplicate of the highlighted Window Definition.
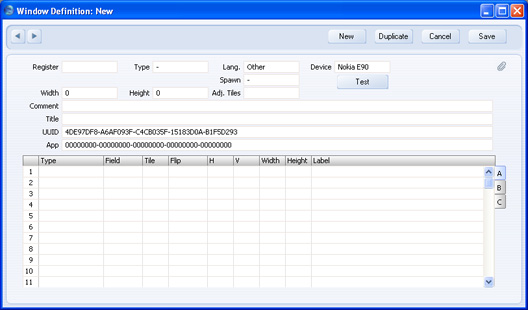
- Register
- Paste Special
Enabled Register Definitions
- Specify the register to which the window belongs, by entering the Name from the Register Definition. The Register Definition must be Enabled.
- Type
- Paste Special
Choices of possible entries
- Specify the Type of window. Choose "Inspect" in the Definition of a record window.
- Lang.
- If you are creating different Window Definitions for different Languages, specify the Language here. You must specify a Language (i.e. do not use the default value "Other"), otherwise the window will not open when you expect it to.
- Device
- Paste Special
Choices of possible entries - You can use the [Test] button to see how the window you are designing will appear on a particular Device. Specify that Device here. The choices are Nokia E90, PC, Series 60, Series 60 Small Screen, Series 80, Series 90 and Windows CE. Choose PC if the window will be used on any desktop or laptop computer.
- Register
- Specify the register to which the window belongs, by entering the Name from the Register Definition.
- Spawn
- This field is not used in record windows.
- Width, Height
- Specify the width and height of the window in pixels. If you use the [Test] button to see how the window you are designing will appear on a particular Device, these fields will only be used when the Device is PC.
- If the window is one that will be used on both a handheld device and a desktop computer, you should specify a Width and Height for when the window is used on the desktop computer. The maximum width and height figures for each device are listed on the Window Sizes for each Platform page.
- Adj. Tiles
- This field is described on the Adding Cards to a Record Window page.
- Comment
- Use this field to record any comments about the window.
- Title
- Specify a title for the window. Do not include the suffixes 'New', 'Update' or 'Inspect': these will be added automatically depending on the window status at the time. For example, if you specify "Stock Count" as the title, the actual window title will be 'Stock Count: New', 'Stock Count: Inspect' or 'Stock Count: Update'.
- UUID
- The Universally Unique Identifier is a unique code that is generated automatically and assigned to each Window Definition. You cannot change the UUID.
- App
- Use this field to connect the Window Definition to an App. Enter the UUID of the relevant App here.
Use the grid that takes up the majority of the 'Window Definition: New' window to list the fields and other objects that you want to appear in the new window, together with their sizes and positions. Each row in the grid contains one field or object:
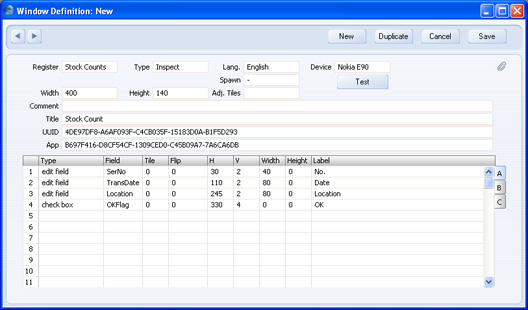
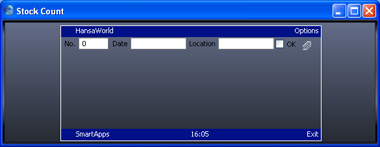
At any time, you can save the Window Definition and then click the [Test] button to check how the window will appear on the specified Device. This is how the three fields and one check box in the Window Definition illustrated above appear:
In the following sections, we will describe adding fields and objects of each Type to the window, as follows:
After completing the record window, proceed to designing a
browse window for the register.
---
See also:
Go back to:
See also: